
Are you ready to give your project a professional, long-lasting finish? Learning how to post heat vinyl wrap can transform ordinary surfaces into something eye-catching and durable.
Whether you’re customizing your car, laptop, or any other item, applying heat correctly is the secret to a smooth, wrinkle-free result. In this guide, you’ll discover simple, step-by-step tips that make the process easy—even if you’re a beginner. Keep reading, and you’ll soon master the technique that brings your vinyl wrap to life, making your work stand out every time.
Preparing The Surface
Preparing the surface is the first step to a successful heat vinyl wrap. The surface must be clean, smooth, and at the right temperature. These steps help the vinyl stick better and last longer. Skipping preparation can cause bubbles, peeling, or uneven application.
Cleaning And Degreasing
Start by cleaning the surface thoroughly. Use soap and water to remove dirt and dust. Dry the surface completely before moving on. Next, apply a degreaser to remove oils and grease. Oils stop the vinyl from sticking well. Wipe the surface with a clean cloth after degreasing. A clean surface helps the vinyl bond tightly.
Smoothing Imperfections
Check the surface for bumps, scratches, or rough spots. Sand down any rough areas gently with fine sandpaper. Fill deep scratches or holes with a suitable filler. Let the filler dry and sand it smooth. A smooth surface prevents wrinkles and bubbles in the vinyl. Take time to create an even base for the wrap.
Temperature Considerations
The surface temperature affects vinyl adhesion strongly. Work in a room or area between 60°F and 80°F (16°C to 27°C). Avoid cold or very hot surfaces. Heat vinyl wraps stick best on surfaces that are warm but not hot. Use a thermometer to check the temperature if needed. Proper temperature ensures a smooth, lasting finish.

Credit: www.rvinyl.com
Choosing The Right Vinyl
Choosing the right heat vinyl is the first step to a successful project. The right vinyl ensures the design sticks well and lasts long. It affects how easy the application is and how the final product looks. Understanding the types and quality of vinyl helps you pick the best option.
Types Of Heat Vinyl
There are several types of heat vinyl available. Each type has unique features and uses. Standard vinyl is good for simple designs and cotton fabrics. Stretch vinyl works well on stretchy materials like spandex. Glitter and metallic vinyl add sparkle and shine to your project. Reflective vinyl increases visibility in low light. Choose the type that fits your design and fabric.
Selecting Based On Project
Different projects need different vinyl types. For T-shirts, soft and flexible vinyl works best. For bags or hats, durable and strong vinyl is better. Small details require thin and precise vinyl. Large designs may need thicker vinyl for durability. Match the vinyl to the fabric and use of the item. This ensures the design stays intact and looks great.
Quality Matters
Good quality vinyl lasts longer and stays vibrant after washing. Cheap vinyl may peel or crack quickly. High-quality vinyl sticks better and is easier to cut. It also withstands heat and pressure without damage. Always choose vinyl from trusted brands. This protects your time and effort spent on the project.
Tools And Equipment
Posting heat vinyl wrap requires the right tools. Using proper equipment helps achieve smooth and long-lasting results. Each tool has a specific role in the process. Understanding these tools ensures better application and fewer mistakes.
Heat Press Machines
Heat press machines provide even heat and pressure. They help attach vinyl firmly to surfaces. These machines come in various sizes for different projects. Using a heat press ensures consistent temperature and time control. This reduces errors and improves wrap quality.
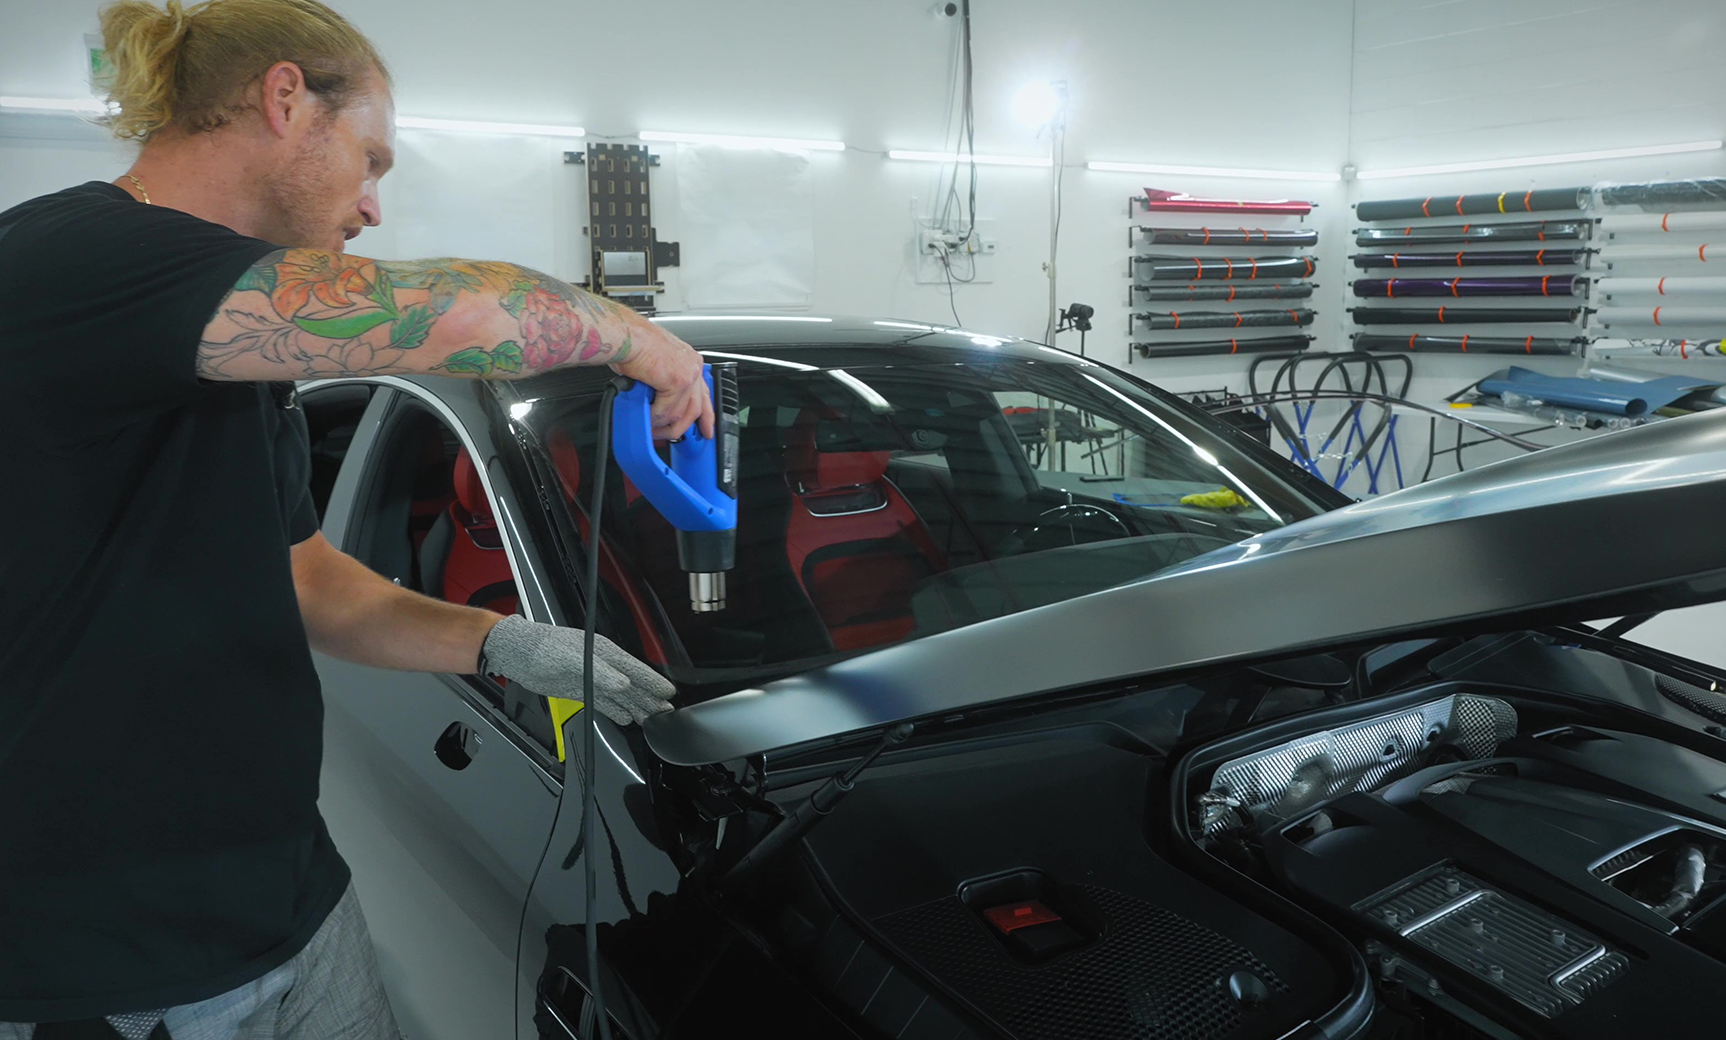
Heat Guns And Irons
Heat guns offer precise heat for tricky spots. They help stretch and mold vinyl around curves. Irons can also work for small areas or quick fixes. Both tools need careful handling to avoid overheating. Controlled heat prevents vinyl damage and bubbles.
Protective Accessories
Protective accessories keep your vinyl and tools safe. Teflon sheets protect vinyl from direct heat. Heat-resistant gloves shield your hands from burns. Using these accessories extends tool life and improves safety. They make the wrapping process cleaner and easier.
Cutting And Weeding
Cutting and weeding are key steps in posting heat vinyl wrap. These steps prepare your design for a smooth transfer. Proper cutting ensures clean edges. Careful weeding removes extra vinyl without damage. Follow these simple guidelines for the best results.
Design Setup
Start by creating a clear design. Use simple shapes and bold lines. Set the cutting machine to the right size. Mirror your design before cutting. This keeps the text readable after transfer.
Accurate Cutting Tips
Check the blade depth before cutting. Too deep cuts the backing paper. Too shallow cuts vinyl poorly. Use slow speed for precise cuts. Test cut on a small piece first.
Removing Excess Vinyl
Use a weeding tool or tweezers to remove extra vinyl. Pull slowly to avoid tearing. Remove small pieces first, then bigger areas. Leave only your design on the backing paper.
Heat Press Settings
Setting the right heat press settings is key to a perfect heat vinyl wrap. The temperature, pressure, and time must work together. Each setting affects how well the vinyl sticks and how long it lasts. Too much heat or pressure can damage the vinyl. Too little, and the vinyl may peel off. Follow these guidelines to get the best results every time.
Temperature Guidelines
Set the heat press temperature between 300°F and 320°F. This range works well for most heat transfer vinyl. Avoid going above 330°F to prevent burning the vinyl. Different vinyl brands may need slight adjustments. Always check the vinyl packaging for exact temperature advice.
Pressure Adjustment
Use medium pressure for most vinyl wraps. Too much pressure can stretch or damage the material. Too little pressure causes poor adhesion. Press firmly but gently. Adjust pressure according to the thickness of the vinyl and the fabric type. Test on a small piece first.
Time Management
Heat press time usually lasts 10 to 15 seconds. Pressing too long can cause the vinyl to melt or warp. Too short may not allow proper sticking. Follow the vinyl instructions for exact time. Keep the press steady and avoid moving it during the process.
Credit: vvividshop.com
Applying The Vinyl
Applying heat vinyl wrap needs care and precision for the best results. This step changes your plain item into something unique. Follow the right process to avoid bubbles and wrinkles. Use the right tools and techniques to make the design stick well and last longer.
Aligning The Design
Start by placing the vinyl wrap carefully on your surface. Make sure the design lines up straight and fits the area. Use a ruler or tape to check the edges. Hold the vinyl lightly before pressing it down. Correct alignment saves time and prevents mistakes later.
Using Heat Press Correctly
Set your heat press to the right temperature. Follow the vinyl wrap instructions for heat and time. Place the item flat in the press. Press evenly and avoid moving the item during heat. Use a protective sheet to stop damage to the vinyl. Let the vinyl cool before peeling the backing.
Avoiding Common Mistakes
Do not rush the pressing process. Avoid overheating, which can melt the vinyl. Do not stretch the vinyl too much, or it will warp. Keep the surface clean and dry before applying. Check for bubbles and smooth them out quickly. Take your time to get a clean, smooth finish.
Post-application Care
Post-application care is vital to keep your heat vinyl wrap looking fresh and lasting longer. Proper care helps the wrap stick well and avoid peeling or fading. Taking a few simple steps after applying the wrap will protect your design and maintain its bright colors.
Follow these easy tips to ensure your vinyl wrap stays in great condition. Caring for the wrap right after application improves its durability and appearance.
Cooling And Peeling
Let the vinyl cool completely after heating. This helps the adhesive bond tightly to the surface. Peel the backing slowly and at a low angle. Quick or harsh peeling can damage the vinyl or cause bubbles. Allow the wrap to rest for at least 24 hours before using or touching it.
Washing Instructions
Wait 3 to 5 days before washing the wrapped surface. Use mild soap and water for cleaning. Avoid harsh chemicals or strong detergents. Hand wash gently with a soft cloth or sponge. Do not use high-pressure water near edges or seams. Air dry or use a soft towel to prevent scratches.
Maintaining Durability
Keep the wrap away from sharp objects or rough surfaces. Park your vehicle in the shade to reduce sun damage. Avoid prolonged exposure to extreme heat or cold. Regularly inspect the wrap for any lifting edges or bubbles. Fix small issues quickly to stop bigger problems. Proper care extends the life of your heat vinyl wrap.

Credit: raxtify.com
Troubleshooting Tips
Heat vinyl wrap can sometimes be tricky to apply perfectly. Small problems like bubbles, wrinkles, or poor stickiness may appear. These issues can ruin the smooth look you want. This section shares simple tips to fix common problems quickly. Follow these steps to improve your vinyl wrap results and save time.
Handling Bubbles And Wrinkles
Bubbles happen when air gets trapped under the vinyl. Use a small pin to poke a tiny hole in the bubble. Press the air out gently with a squeegee or cloth. For wrinkles, heat the vinyl slightly with a heat gun. Warm vinyl becomes soft and easier to smooth. Then, use your hands or a squeegee to flatten the wrinkles carefully.
Fixing Adhesion Issues
Adhesion problems occur if the surface is dirty or cold. Clean the area with rubbing alcohol before applying the vinyl. Make sure the surface is dry and at room temperature. Warm the vinyl wrap gently before sticking it on. Press down firmly to help it stick better. Use a heat gun to activate the glue if needed.
Reapplying Techniques
Sometimes, you may need to remove and reapply the vinyl. Heat the vinyl with a heat gun to soften the adhesive. Peel the vinyl slowly to avoid tearing. Clean the surface again before reapplying. Align the vinyl carefully, then press down from the center outward. Use a squeegee to push out air and secure the edges.
Frequently Asked Questions
What Materials Are Needed To Post Heat Vinyl Wrap?
To post heat vinyl wrap, you need vinyl wrap sheets, a heat gun or iron, a squeegee, and gloves. Clean the surface thoroughly before applying the wrap for better adhesion. Using a heat source helps mold the wrap to curves and edges smoothly.
How Do You Prepare The Surface For Heat Vinyl Wrap?
Clean the surface with soap and water, then dry it completely. Remove any dust, oils, or residues using isopropyl alcohol. A smooth, clean surface ensures the vinyl wrap adheres well and lasts longer without bubbles or peeling.
What Temperature Is Best For Heating Vinyl Wrap?
Maintain a temperature between 250°F and 300°F (120°C to 150°C) when heating vinyl wrap. Too high heat can damage the vinyl, while too low heat may not make it flexible enough to conform. Use a heat gun or iron with adjustable settings.
How To Avoid Bubbles When Applying Heat Vinyl Wrap?
Apply the vinyl slowly and use a squeegee to press out air bubbles. Heat the vinyl gently to make it pliable, then stretch and smooth it carefully. Work from the center outward to push trapped air towards edges.
Conclusion
Applying heat vinyl wrap is simple with the right steps. Clean the surface well before starting. Use steady heat and smooth pressure while wrapping. Take your time to avoid bubbles or wrinkles. Practice makes the process easier and more precise.
Enjoy the fresh look your vinyl wrap creates. Keep these tips in mind for best results. You can change your style anytime with vinyl wrap. Try it yourself and see the difference.


