
Are your rear disc brake rotors causing noise, vibration, or poor braking performance? Removing and replacing them might seem tricky, but with the right steps, you can do it yourself and save time and money.
In this guide, you’ll discover simple, clear instructions to safely remove your rear disc brake rotors. Whether you’re a beginner or just need a quick refresher, this article will give you the confidence to get the job done right. Keep reading, and you’ll be one step closer to smoother, safer rides.
Credit: www.buybrakes.com
Tools Needed
Removing rear disc brake rotors requires the right tools. Using proper tools makes the job safer and easier. Prepare all tools before starting the work. This saves time and avoids frustration.
Essential Hand Tools
You need a few basic hand tools to remove brake rotors. A ratchet and socket set helps remove bolts. A screwdriver or pry bar can separate stuck parts. A rubber mallet helps loosen the rotor without damage. A brake cleaner spray cleans dirt and grease. A hex key or Allen wrench may be needed for some bolts. Keep all tools handy and organized.
Safety Equipment
Safety gear protects you during brake rotor removal. Wear safety goggles to shield your eyes from dust and debris. Use gloves to protect your hands from sharp edges. A dust mask stops you from breathing brake dust. Work in a well-ventilated area to avoid fumes. Proper safety gear reduces injury risks and keeps you comfortable.
Prepare Your Vehicle
Preparing your vehicle is the first step to safely remove rear disc brake rotors. This stage ensures the car stays steady and you work without interruptions. Proper preparation helps avoid accidents and damage to your vehicle.
Secure The Car
Park your car on a flat surface to keep it stable. Apply the parking brake to stop the wheels from moving. Place wheel chocks in front of and behind the front tires. This stops the car from rolling while you work.
Lift And Support
Use a reliable jack to lift the rear of the vehicle. Check your car’s manual for the correct jacking points. After lifting, place jack stands under the frame for extra support. Never rely on the jack alone to hold the car up.
Remove The Wheel
Removing the wheel is the first step to access the rear disc brake rotors. This process is simple but needs care. Follow these steps carefully to avoid damage and ensure safety.
Loosen Lug Nuts
Start by loosening the lug nuts on the wheel. Use a lug wrench that fits the nuts well. Turn each nut counterclockwise. Do not remove them completely yet. Just break their tight grip. This step makes it easier to take off the wheel later.
Take Off The Wheel
Next, lift the car with a jack until the wheel is off the ground. Make sure the car is stable before you continue. Now, remove the loosened lug nuts completely. Keep them in a safe place. Pull the wheel straight off the hub. Set the wheel aside carefully to avoid scratches or damage.
Take Off The Brake Caliper
Removing the brake caliper is a key step in changing rear disc brake rotors. The caliper holds the brake pads and presses them against the rotor to stop the car. Taking off the caliper carefully helps avoid damage and makes the rotor easy to remove. Follow each step with care and keep tools ready.
Locate Caliper Bolts
First, find the caliper bolts. These bolts hold the caliper to the wheel hub. Usually, two bolts secure the caliper in place. They may be on the back or side of the caliper. Use a flashlight if the area is dark. Identify the correct size wrench or socket before starting.
Remove And Hang Caliper Safely
Next, loosen and remove the caliper bolts. Turn bolts counterclockwise with the wrench. Pull the caliper gently away from the rotor. Do not force it to avoid damage. Use a wire or hook to hang the caliper on the suspension. Do not let the caliper hang by the brake hose. This prevents brake line damage and extra repair costs.
Detach The Brake Pads
Detaching the brake pads is an important step in removing rear disc brake rotors. It helps you access the rotor safely. Removing the pads prevents damage to them and the caliper. Handle the brake pads carefully to avoid dirt and damage.
Slide Out Brake Pads
Start by locating the brake pads inside the caliper. Use your hands or a small tool to slide them out gently. Do not force the pads, as this can cause damage. Sometimes, pads are held by pins or clips—remove these first. Keep the pads in a clean place to avoid contamination.
Inspect For Wear
Check the thickness of each brake pad. Thin or uneven pads need replacement. Look for cracks, breaks, or rough surfaces. Worn pads can reduce braking power and damage the rotor. Clean pads that still look good before reinstallation. This step ensures safety and better brake performance.
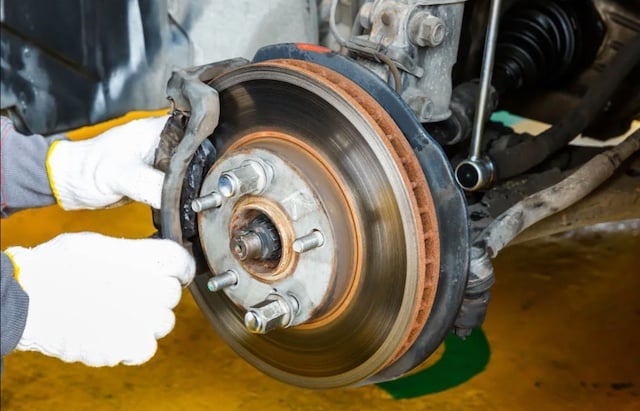
Remove The Rotor
Start by loosening and removing the caliper bolts to free the brake caliper. Then slide the rotor off the wheel hub carefully. Sometimes, light tapping helps if the rotor sticks due to rust.
Check For Retaining Screws
Start by examining the rotor for small screws. These screws hold the rotor firmly in place. Use a screwdriver to remove them. Sometimes, rust or dirt can make screws hard to turn. Apply some penetrating oil if needed. Removing these screws is essential before taking off the rotor.
Loosen And Remove Rotor
After removing the screws, the rotor may still stick. This happens due to rust or tight fitting. Tap the rotor gently with a rubber mallet. Avoid hitting it hard to prevent damage. If it still does not come off, try loosening it by rotating it back and forth. Once loose, pull the rotor straight off the hub. Keep it safe if you plan to reuse it.
Clean And Inspect Components
After removing the rear disc brake rotors, cleaning and inspecting the parts is important. This step helps to keep your brakes working well and safe. Dirt or damage can cause problems later. Take your time to check each component carefully.
Clean Hub Surface
The hub surface holds the rotor in place. Dirt or rust here can stop the rotor from fitting right. Use a wire brush or sandpaper to clean the hub surface. Remove all rust and old grease. Wipe the area with a clean cloth. A clean hub surface helps the rotor sit flat and reduce noise.
Check Rotor And Hardware
Look at the rotor for cracks, deep grooves, or warping. Any damage means the rotor should be replaced. Also, check the screws or bolts that hold the rotor. Make sure they are not worn or stripped. Replace any damaged hardware to keep the rotor secure. Proper inspection keeps your brakes safe and effective.

Credit: www.youtube.com
Tips For Stubborn Rotors
Removing rear disc brake rotors can be tricky when they get stuck. Rust and dirt often cause rotors to bind tightly to the hub. This section gives simple tips to free stubborn rotors without damage. Small efforts can save time and avoid extra costs.
Use Penetrating Oil
Spray penetrating oil on the rotor hub where it meets the rotor. Let it soak for 10 to 15 minutes. The oil helps break rust and loosen the metal parts. Use a brush to spread the oil evenly. Repeat if the rotor stays stuck. This step makes removal easier and safer.
Tap Rotor Gently
Use a rubber mallet or hammer to tap the rotor gently. Hit around the rotor edge, not the center. Tapping breaks rust bonds and loosens the rotor. Avoid heavy hits to prevent damage. Tap each side evenly. This method often frees rotors without extra tools.

Credit: www.brakeandfrontend.com
Frequently Asked Questions
How Do You Safely Remove Rear Disc Brake Rotors?
First, lift and secure the vehicle. Remove the wheel, caliper, and caliper bracket. Then, take off the rotor carefully, avoiding damage to surrounding parts.
What Tools Are Needed To Remove Rear Disc Brake Rotors?
You typically need a jack, lug wrench, socket set, screwdriver, and possibly a hammer or rotor puller for stuck rotors.
How To Handle Stuck Rear Brake Rotors?
Apply penetrating oil around the rotor hub. Gently tap the rotor with a hammer to loosen rust or debris before removal.
Can I Remove Rear Disc Brake Rotors Without Removing Calipers?
No, you must remove the caliper and its bracket first to access and remove the rotor safely.
Conclusion
Removing rear disc brake rotors is simple with the right steps. Take your time and follow safety rules closely. Use the proper tools to avoid damage. Clean parts before installing new rotors for best results. Regular brake checks keep your car safe on the road.
Practice these tips to do the job confidently. Keep learning and improving your car skills. Your brakes will work better and last longer this way.


