If your brakes feel rough or noisy, your brake rotors might need resurfacing. Knowing how to resurface brake rotors can save you money and keep your car running smoothly.
You don’t have to be a mechanic to do this – with the right steps, you can restore your rotors at home. Keep reading, and you’ll discover simple, clear instructions that make the process easy and safe. By the end, you’ll know exactly how to bring your brake rotors back to life and enjoy a smoother, safer ride.
Signs Of Worn Brake Rotors
Worn brake rotors affect your car’s stopping power and safety. Knowing the signs helps you act quickly. This prevents bigger problems and saves money.
Brake rotors wear out over time due to friction and heat. They develop grooves, cracks, or warping. These issues reduce braking efficiency and cause vibrations. Spotting these signs early keeps your brakes working well.
Common Symptoms
Feel vibrations or shaking when braking? This often means warped rotors. Hear squealing or grinding noises? It shows rotor surface damage. Notice longer stopping distances? Worn rotors reduce braking strength. See visible grooves or cracks on rotors? These are clear signs of wear.
When To Consider Resurfacing
Resurface rotors if they have light grooves or uneven surfaces. This smooths the rotor and restores braking. Avoid resurfacing if rotors are too thin or deeply damaged. In those cases, replace them for safety. Check rotor thickness with a gauge before deciding.
Tools And Materials Needed
Before starting to resurface brake rotors, gather the right tools and materials. Using proper equipment ensures a smooth and safe process. It also helps achieve a clean, even surface on the rotors. Here is a list of what you will need to get started.
Essential Tools
You will need a brake rotor resurfacing machine or a lathe to remove surface imperfections. A set of socket wrenches helps remove the wheel and brake caliper. A torque wrench is necessary to tighten bolts to the correct specification. A dial indicator measures rotor runout for accuracy. Sandpaper or a wire brush cleans the rotor surface. Clean rags or shop towels keep the area free of dust and debris.
Safety Gear
Safety is key when working with brake parts. Wear safety glasses to protect your eyes from metal shavings. Use work gloves to shield your hands from sharp edges. A dust mask prevents inhalation of brake dust and metal particles. Closed-toe shoes protect your feet from falling tools or parts. Hearing protection is important if using loud machinery.
Preparing Your Vehicle
Preparing your vehicle properly is the first step to resurface brake rotors safely and effectively. This stage involves lifting the car and removing the wheels. Doing these tasks carefully helps you access the brake rotors easily. It also keeps you safe while working on your vehicle. Follow these steps to prepare your vehicle well before starting the resurfacing process.
Lifting And Securing The Car
Park your car on a flat, stable surface. Engage the parking brake to stop the car from moving. Use a reliable car jack to lift the vehicle. Place the jack under the recommended lift points. These points are usually near the wheels or the frame. Lift the car slowly and evenly. Once the car is lifted, use jack stands to support it. Never rely on the jack alone. Double-check that the car is steady before you work underneath.
Removing The Wheels
Start by loosening the lug nuts while the car is still on the ground. Turn the lug nuts counterclockwise using a lug wrench. Once loose, lift the car and remove the lug nuts completely. Pull the wheel straight off the hub. Place the wheel aside safely. Check the brake rotor and caliper for any obvious damage before proceeding. Removing the wheels gives you clear access to the brake rotors for resurfacing.
Removing The Brake Rotors
Removing the brake rotors is the first step to resurface them properly. It requires careful work to avoid damage. You must detach some brake parts before taking off the rotors. This process helps you access the rotors safely.
Detaching Brake Components
Start by loosening the lug nuts on the wheel. Then, lift the car using a jack and secure it on stands. Remove the wheel to expose the brake parts. Next, remove the brake caliper bolts with a wrench. Carefully slide the caliper off the rotor and hang it with a wire. Do not let the caliper hang by the brake hose. Remove the brake pads from the caliper bracket. Finally, take off the caliper bracket bolts to free the rotor.
Taking Off The Rotors
Check if the rotor is held by screws. Remove any screws using a screwdriver. If the rotor sticks to the hub, tap it gently with a rubber mallet. Avoid hitting the rotor face to prevent damage. Pull the rotor straight off the hub. Clean the hub surface before installing the resurfaced rotor. This step ensures a smooth fit and prevents vibrations.
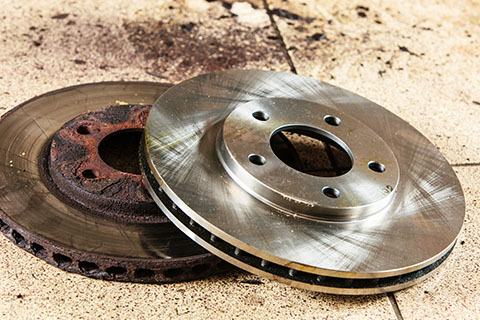
Cleaning The Rotors
Cleaning the rotors is a key step before resurfacing brake rotors. Dirt, rust, and debris can affect the quality of the repair. A clean surface helps the rotor work better and last longer. Take your time to make sure the rotors are free from any unwanted material. This also helps spot any problems early.
Removing Rust And Debris
Start by removing rust from the rotor surface. Use a wire brush or sandpaper for this task. Light rust can be wiped off with a cloth and brake cleaner. Make sure to clean both sides of the rotor. Remove dust, grease, and any loose particles. Clean rotors allow better contact with brake pads.
Inspecting For Damage
After cleaning, check the rotors closely for damage. Look for cracks, deep grooves, or warping. Small scratches can be fixed during resurfacing. Big cracks or heavy damage mean the rotor needs replacement. Check thickness with a micrometer to ensure safety. Damaged rotors can cause brake failure or noise.

Credit: knowhow.napaonline.com
Resurfacing Techniques
Resurfacing brake rotors is a key step in maintaining your vehicle’s braking system. This process removes surface imperfections and restores smoothness. It improves brake performance and extends rotor life. Two common resurfacing techniques include using a lathe and hand resurfacing methods.
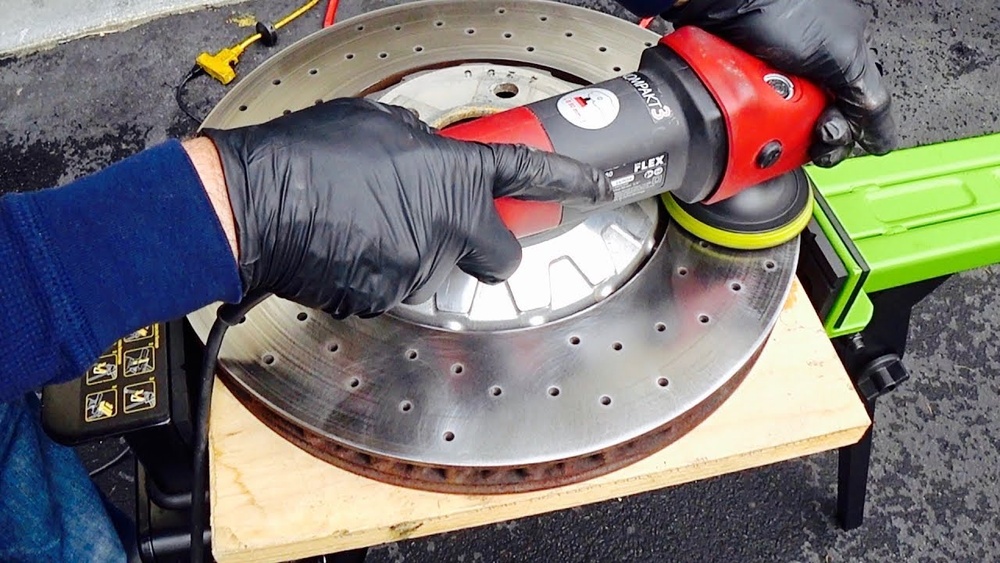
Using A Lathe
A lathe is a machine that spins the rotor while cutting tools shave the surface. This method produces a very smooth and even finish. It removes warping, grooves, and rust effectively. Professionals often use lathes because they deliver precise results. The process requires the rotor to be removed from the vehicle. Then it is mounted on the lathe for resurfacing. The lathe cuts a thin layer off the rotor surface. This restores the flatness and proper thickness needed for safe braking.
Hand Resurfacing Methods
Hand resurfacing is a simpler option for minor rotor imperfections. It involves using sandpaper or a grinding tool. The rotor stays on the vehicle during this process. You rub the surface to remove rust and light grooves. This method is less precise than a lathe but useful for quick fixes. It takes patience and care to avoid uneven surfaces. Hand resurfacing can improve rotor condition when done properly. It is a good choice for DIY brake maintenance.
Reinstalling Brake Components
Reinstalling brake components is a key step after resurfacing brake rotors. It ensures your brakes work safely and smoothly. Proper reassembly restores the brake system’s original function. Take care with each part to avoid issues later.
Placing Rotors Back
Start by positioning the rotor on the wheel hub. Make sure it sits flat and even. Align the holes so the rotor fits perfectly. Use a few lug nuts to hold the rotor in place. Tighten these nuts slightly to keep the rotor steady. Check the rotor for any movement before continuing.
Reassembling Brake Parts
Next, reinstall the brake caliper bracket onto the rotor. Secure it with the bolts and tighten firmly. Slide the brake pads into the caliper bracket. Push the caliper over the brake pads and rotor carefully. Fasten the caliper bolts to hold everything tight. Double-check all bolts for proper tightness. Test the brake lever or pedal to confirm smooth movement.

Credit: www.youtube.com
Testing Your Brakes
Testing your brakes after resurfacing brake rotors is a key step. It ensures safety and proper function. This process helps catch any issues before driving normally. Follow simple checks and road tests to confirm your brakes work well.
Initial Brake Check
Start by pressing the brake pedal slowly. Feel for any unusual vibrations or noises. The pedal should feel firm and steady. Check for any pulling to one side while braking. Inspect the brake fluid level and look for leaks. This quick check shows if the rotors and pads align properly.
Road Test Tips
Drive at a low speed in a safe area. Apply the brakes gently several times. Listen for any grinding or squealing sounds. Notice if the car stops smoothly and straight. Avoid sudden or hard braking during the test. Gradually increase speed and braking force. This helps confirm the resurfaced rotors work as expected.
When To Replace Instead Of Resurfacing
Not all brake rotors can be resurfaced safely. Sometimes, replacing rotors is the better choice. Knowing when to replace rotors helps keep your brakes working well. It also protects your safety on the road. Two important factors decide if you should replace rotors instead of resurfacing.
Rotor Thickness Limits
Every rotor has a minimum thickness limit. This limit is set by the manufacturer. It ensures the rotor stays strong and cool during braking. You can find this number stamped on the rotor or in your car’s manual. If the rotor is thinner than this limit, do not resurface it. Resurfacing will make the rotor weaker and unsafe. Replace the rotor to keep your brakes reliable.
Severe Damage Signs
Deep grooves, cracks, or warping show severe rotor damage. These problems affect how well the brakes stop your car. Resurfacing cannot fix deep cracks or heavy warping. Also, if the rotor surface is uneven, it causes brake vibration. Such damage means the rotor must be replaced. New rotors give you smooth, safe braking again.
Maintaining Brake Rotors
Maintaining brake rotors is key to safe and smooth driving. Proper care helps avoid costly repairs and extends rotor life. Small steps can keep rotors in good shape and improve braking performance.
Regular Inspections
Check brake rotors every few months for signs of wear. Look for grooves, cracks, or rust on the surface. Listen for unusual noises when braking. Thin or uneven rotors reduce braking power and need attention. Early detection prevents damage to other brake parts.
Driving Habits For Longevity
Drive gently to reduce rotor wear. Avoid hard braking except in emergencies. Slow down gradually to let brakes cool down. Do not overload the vehicle. Smooth driving keeps rotors from overheating and warping. Good habits save money and improve safety.
Credit: www.oceanworksberkeley.com
Frequently Asked Questions
What Tools Do I Need To Resurface Brake Rotors?
You need a brake lathe, safety gear, and basic hand tools. A brake lathe precisely removes rotor surface imperfections. Safety gear protects your eyes and hands. Hand tools help remove and reinstall the rotors efficiently.
How Often Should Brake Rotors Be Resurfaced?
Resurface rotors when you notice vibration or uneven wear. Typically, resurfacing is done every 30,000 to 70,000 miles. Always check rotor thickness and manufacturer guidelines before resurfacing. Proper maintenance extends rotor life and ensures smooth braking.
Can I Resurface Brake Rotors At Home?
Yes, if you have the right tools and skills. Using a brake lathe requires precision and safety precautions. If unsure, consult a professional to avoid rotor damage or brake failure. Proper resurfacing improves brake performance and safety.
What Signs Indicate Brake Rotors Need Resurfacing?
Common signs include brake vibration, noise, and uneven rotor wear. Warped or scored rotors reduce braking efficiency. Inspect rotors during brake service for grooves or rust. Early resurfacing prevents costly rotor replacement and ensures safe driving.
Conclusion
Resurfacing brake rotors helps improve your vehicle’s safety and performance. It removes uneven surfaces and restores smooth braking. Always check the rotor thickness before starting the process. Use the right tools and follow safety steps carefully. Taking time to resurface rotors can save money on replacements.
Regular maintenance keeps brakes working well and lasts longer. A smooth brake rotor means better control and comfort while driving. Keep these tips in mind for safer, smoother stops every time.

