
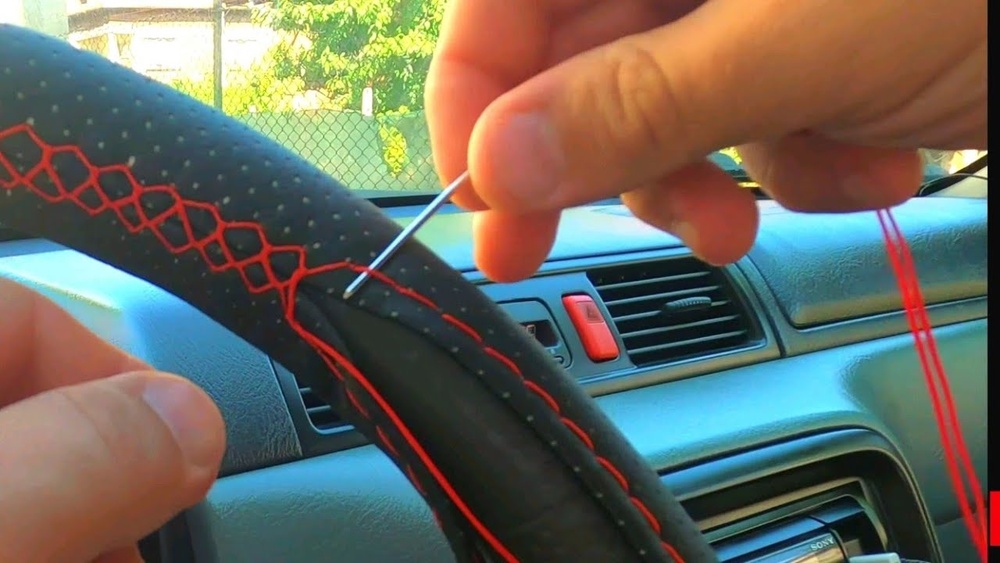
If you want to give your car’s interior a fresh, stylish look, stitching your own leather steering wheel cover is a great place to start. Not only will it protect your steering wheel, but it will also give you a comfortable grip every time you drive.
You might think it’s a tricky task, but with the right steps and a little patience, you can create a cover that fits perfectly and looks professional. In this guide, you’ll discover easy-to-follow tips and tricks that make stitching leather simple and satisfying.
Ready to transform your steering wheel and impress yourself with your handiwork? Let’s dive in!
Materials Needed
Gathering the right materials is the first step to stitch a leather steering wheel cover. Choosing quality supplies makes your work easier and results better.
Each item plays a key role in the process. Careful selection ensures durability and a neat finish for your cover.
Leather Selection
Pick soft, flexible leather for comfort and grip. Cowhide and lambskin are popular choices. Avoid stiff leather; it is hard to sew and less comfortable. Choose leather thick enough to last but thin enough to wrap smoothly.
Thread And Needle
Use strong, waxed thread made for leatherwork. Polyester or nylon thread holds well and resists wear. Select a heavy-duty needle designed for leather. Needles with a sharp, triangular point make stitching easier and cleaner.
Additional Tools
Use a leather punch to make uniform holes for stitching. A ruler or measuring tape helps keep your stitching even. A pair of sharp scissors cuts the leather cleanly. A stitching pony or clamp holds the leather steady while you sew.

Credit: www.youtube.com
Preparing The Leather
Preparing the leather is the first step in making a leather steering wheel cover. It ensures the cover fits well and looks good. Proper preparation helps avoid mistakes during stitching. Each step must be done carefully for the best results.
Start with clean, smooth leather. Any dirt or wrinkles can cause problems later. Take your time to work on the leather before cutting or sewing.
Measuring The Steering Wheel
Measure the steering wheel’s circumference with a flexible tape. Wrap the tape around the wheel’s outer edge. Note the exact length in inches or centimeters. Also, measure the width you want for the cover. Accurate measurements help the leather fit tightly.
Cutting The Leather
Use a sharp knife or leather scissors for cutting. Place the leather on a flat surface. Mark the size based on your measurements. Cut slowly and carefully to keep smooth edges. Avoid jagged or uneven cuts. Clean cuts make stitching easier and the cover neater.
Marking Stitching Lines
Mark stitching lines on the leather before sewing. Use a ruler and a pencil or chalk. Draw two parallel lines along the edges. These lines guide your stitches. Keep the lines straight and even. Clear marks help keep the stitches uniform and tight.
Starting The Stitch
Starting the stitch is the first step in creating a strong and neat leather steering wheel cover. This part sets the tone for the entire project. A clean start helps the stitches stay tight and the leather stay in place. Focus on aligning the leather correctly and making a secure first stitch. This ensures the thread will hold well and look good as you continue.
Aligning The Leather
Place the leather cover evenly around the steering wheel. Check that the edges match up without gaps or overlaps. Smooth out any wrinkles or folds in the leather. Proper alignment prevents uneven stitching later. Take your time to adjust the leather before you start stitching.
Making The First Stitch
Thread your needle with strong, waxed thread. Start at the bottom center of the cover for balance. Push the needle through both leather edges carefully. Pull the thread all the way through, leaving a small tail. Make sure the stitch is tight but not too tight to tear the leather.
Securing The Thread
Loop the thread around the stitch to lock it in place. Pull the thread firmly to secure the knot. Cut off any extra thread close to the knot. A strong start prevents the thread from coming loose later. Check the knot to ensure it holds before continuing.
Stitching Techniques
Stitching leather steering wheel covers requires care and skill. The right techniques help create a strong and neat finish. This section explains simple stitching methods. It guides you through keeping stitches even. It also covers handling tricky corners smoothly. Follow these tips for a professional look.
Basic Saddle Stitch
The saddle stitch is strong and ideal for leather. Use two needles and a single thread. Push one needle through a hole from one side. Then push the other needle through the same hole from the opposite side. Pull both needles tight to secure the stitch. Repeat this process for every hole. This creates a durable seam that lasts long.
Maintaining Even Tension
Keep thread tension steady for neat stitches. Too loose thread looks messy and weak. Too tight thread can tear the leather. Pull the thread gently after every stitch. Check your work often for consistency. Even tension helps the cover fit snugly on the wheel.
Handling Corners
Corners need careful stitching to avoid bunching. Slow down and make smaller stitches here. Bend the leather slightly to follow the curve. Use extra holes if needed for better control. Smooth corners improve the cover’s appearance and comfort.
Finishing Touches
Finishing touches give your leather steering wheel cover a neat, complete look. These steps protect your work and improve durability. Take time with these final details for the best result.
Tying Off The Thread
Secure the thread firmly to stop it from unraveling. Make a tight knot close to the leather surface. Pull the thread gently but firmly until the knot sits tight. Repeat with a second knot for extra security. Hide the knot inside a stitch or between the cover layers.
Trimming Excess Leather
Cut away any extra leather pieces sticking out. Use sharp scissors for a clean, straight edge. Avoid cutting too close to the stitches to prevent damage. Trim slowly and carefully to keep the cover smooth. This step makes the cover look polished and tidy.
Conditioning The Cover
Apply a leather conditioner to keep the cover soft and flexible. Use a small amount on a clean cloth. Rub gently over the entire cover surface. Conditioning prevents cracking and adds a nice shine. Let the cover dry completely before using the steering wheel.

Credit: www.amazon.com
Tips For A Professional Look
Stitching a leather steering wheel cover with a professional look requires care and attention. Small details make a big difference in the final result. Follow these tips to create a clean and polished finish. Your steering wheel will look neat and last longer.
Consistent Stitch Length
Keep your stitch length even throughout the cover. Uneven stitches look messy and unprofessional. Use a ruler or stitch marker to guide your needle. Slow down to maintain control and precision. Consistency shows skill and improves durability.
Using Quality Materials
Choose strong leather and durable thread for stitching. Cheap materials can tear or wear out quickly. Quality leather feels smooth and looks better after stitching. Use waxed or nylon thread for extra strength. Good tools make the process easier and the cover last longer.
Regular Maintenance
Clean and condition the leather regularly to keep it soft. Dirt and sweat can damage the material over time. Use a gentle leather cleaner and a soft cloth. Apply leather conditioner every few months to prevent cracks. Proper care keeps your cover looking new and professional.

Credit: communitysecurity.com
Frequently Asked Questions
How Do I Prepare Leather For Stitching A Steering Wheel Cover?
Clean the leather surface thoroughly and let it dry. Cut the leather to fit the wheel. Mark stitch holes evenly for smooth sewing.
What Type Of Thread Is Best For Leather Stitching?
Use strong, waxed polyester or nylon thread. These threads resist wear and provide durability. Avoid cotton threads as they can fray easily.
How Long Does It Take To Stitch A Leather Steering Wheel Cover?
Stitching usually takes about 1 to 2 hours. Time varies by skill level and stitching method. Practice improves speed and accuracy.
Can I Stitch A Leather Cover Without Special Tools?
Basic tools like needles and thread suffice. However, a stitching awl and leather punch make work easier. Proper tools ensure neat, durable stitching.
Conclusion
Stitching a leather steering wheel cover takes patience and care. Follow each step slowly and keep your thread tight. This helps the cover fit snugly and last longer. Using the right tools makes the job easier and neater. Practice will improve your stitching skills over time.
Enjoy the feeling of a custom-made cover on your wheel. A well-stitched cover adds comfort and style to your drive. Keep this guide handy for your next leather project. Simple steps lead to great results.

