If you’ve ever faced squeaky brakes or felt a vibration when stopping, it might be time to replace your brake rotors. But how do you take brake rotors off safely and correctly?
You might think it’s a job only mechanics can handle, but with the right steps, you can do it yourself. In this guide, you’ll discover simple, clear instructions that make the process easy to follow. Keep reading, and by the end, you’ll have the confidence to tackle this task on your own, saving time and money while keeping your car in top shape.
Credit: www.reddit.com
Tools Needed
Removing brake rotors requires the right tools. Having these tools ready makes the job easier and safer. This section covers the essential hand tools, optional power tools, and safety equipment needed.
Essential Hand Tools
Start with a good set of wrenches and sockets. A ratchet wrench helps remove bolts quickly. You will also need a screwdriver to pry off any clips or covers. A hammer or rubber mallet can loosen stuck rotors. Keep a wire brush handy to clean rust and debris.
Optional Power Tools
Power tools speed up the process. An impact wrench removes bolts faster than hand tools. A cordless drill with a wire brush attachment cleans the rotor surface well. Use a power sander to smooth rough edges if needed. These tools save time but are not necessary.
Safety Equipment
Always protect yourself. Wear safety glasses to guard your eyes from dust and debris. Use gloves to protect your hands from sharp edges and chemicals. A dust mask prevents breathing in brake dust. Proper clothing prevents injuries during work.
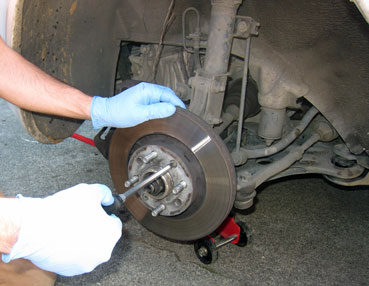
Credit: www.myautorepairadvice.com
Prepare The Vehicle
Preparing your vehicle is the first step to safely remove brake rotors. This phase sets the foundation for smooth work and prevents accidents. Proper preparation makes the job easier and faster.
Park And Secure The Car
Choose a flat surface to park your vehicle. Engage the parking brake firmly. Place wheel chocks behind the wheels to stop any movement. This keeps the car stable while you work on it.
Loosen Lug Nuts
Before lifting the car, slightly loosen the lug nuts on the wheel. Use a lug wrench for better grip. Do not remove them fully yet. Loosening helps to remove the wheel easily later.
Lift And Support The Vehicle
Use a reliable jack to lift the car at the correct lift point. Raise the car until the wheel is off the ground. Secure the car with jack stands for safety. Never rely on the jack alone to hold the car up.
Remove The Wheel
Start by loosening the lug nuts before lifting the car with a jack. Remove the wheel carefully to access the brake rotor underneath. This step is essential for a safe and smooth rotor removal process.
Take Off The Lug Nuts
Start by loosening the lug nuts that hold the wheel in place. Use a lug wrench or a breaker bar for better grip. Turn each nut counterclockwise. Do not remove them completely yet. Just loosen them while the car is still on the ground. This prevents the wheel from spinning and keeps the car stable.
Remove The Wheel Safely
After loosening the lug nuts, lift the car using a jack. Place the jack under the recommended lift point. Raise the car until the wheel is off the ground. Now, fully remove the lug nuts. Keep them in a safe spot to avoid losing any. Carefully pull the wheel straight off the hub. Set the wheel aside on a flat surface. This gives clear access to the brake rotor for removal.
Access The Brake Components
Accessing the brake components is the first step to removing brake rotors safely. You need to expose the parts clearly and handle them with care. This process helps avoid damage and makes the job easier. Follow each step carefully to work on the brakes properly.
Take your time and prepare your tools before starting. Safety is important, so make sure the car is stable and secure. Now, let’s begin with the key tasks to access the brake components.
Locate The Brake Caliper
The brake caliper holds the brake pads and fits over the rotor. Find it by looking behind the wheel. It is usually a large metal part clamping the rotor. Knowing its position helps you plan the next steps easily.
Remove The Caliper Bolts
Use a wrench or socket to loosen the caliper bolts. These bolts keep the caliper attached to the wheel hub. Turn them counterclockwise until they come off. Keep the bolts safe for reassembly later.
Secure The Caliper
Once the bolts are off, do not let the caliper hang by the brake hose. Use a wire or hook to hang it on the suspension. This protects the brake hose from damage. Securing the caliper also clears space to remove the rotor easily.
Take Off The Brake Rotor
Removing the brake rotor is a key step in brake maintenance. It lets you check for wear or replace old parts. The process needs care and the right tools. Follow clear steps to take off the rotor safely and easily.
Remove Retaining Screws
Look for small screws holding the rotor to the hub. Use a screwdriver to remove them. These screws keep the rotor in place during driving. Removing them frees the rotor for easy removal.
Handle Stuck Rotors
Rotors can get stuck from rust or dirt. Tap the rotor gently with a rubber mallet. Avoid hitting hard to prevent damage. Move the rotor back and forth to loosen it.
Use Of Penetrating Oil
Apply penetrating oil around the rotor hub. Let it sit for 10 to 15 minutes. The oil breaks rust and helps loosen the rotor. Repeat if the rotor remains stuck before trying again.
Inspect And Clean
Inspecting and cleaning the brake rotors and hub area is a key step before installing new parts. It helps ensure safety and better brake performance. Taking time to check and clean prevents future problems.
Check Rotor Condition
Look closely at the rotor surface for deep grooves or cracks. Small rust spots are normal but large rust patches can cause issues. Measure rotor thickness with a gauge. Replace the rotor if it is too thin or damaged.
Clean Hub Surface
Remove dirt, rust, and old brake dust from the hub surface. Use a wire brush or sandpaper to clean well. A clean hub helps the rotor sit flat and reduces vibrations while driving.
Prepare For New Rotor
Apply a thin layer of anti-seize lubricant on the hub surface. This stops the rotor from sticking to the hub over time. Check that all mounting holes are clear. Align the new rotor carefully before tightening bolts.
Tips For Easier Removal
Removing brake rotors can be tough without the right steps. Rust and dirt often make the job harder. Simple habits can save time and effort during rotor removal. Following easy tips helps keep your brake parts in good shape.
Keep your tools and rotors clean. A little care goes a long way. These tips lower the chance of stuck or damaged rotors.
Prevent Rust Buildup
Rust is a common problem that sticks rotors to the hub. Clean the rotor surface regularly. Use a wire brush to remove dirt and rust. Store your car in a dry place to avoid moisture. Rust prevention makes future rotor removal smoother and faster.
Use Anti-seize Compounds
Apply anti-seize on the hub before mounting the rotor. This compound stops rust from bonding metal parts. Spread a thin layer evenly for best results. Anti-seize helps rotors slide off easily during repairs or replacements.
Routine Maintenance Advice
Check brake parts every few months. Tighten bolts and clean surfaces to avoid buildup. Replace worn parts before damage spreads. Routine care keeps rotors in good condition and eases removal. Regular checks save time and reduce repair costs.
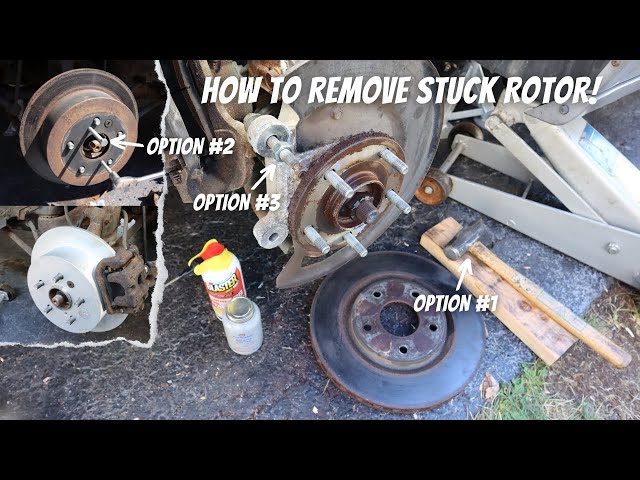
Credit: www.youtube.com
Frequently Asked Questions
How Do You Safely Remove Brake Rotors?
First, lift the vehicle and remove the wheel. Then, unbolt the caliper and hang it securely. Finally, remove the rotor bolts and slide the rotor off the hub.
What Tools Are Needed To Take Off Brake Rotors?
You need a jack, lug wrench, socket set, screwdriver, and possibly a rubber mallet. Having penetrating oil helps loosen stuck rotors.
Can Rust Affect Brake Rotor Removal?
Yes, rust often causes rotors to stick. Use penetrating oil and gentle taps with a mallet to free the rotor safely.
Should Brake Calipers Be Removed To Take Off Rotors?
Yes, removing calipers is essential to access the rotors. Always support the caliper to avoid brake line damage.
Conclusion
Removing brake rotors can seem hard at first. Take your time and follow each step carefully. Use the right tools to avoid damage or injury. Keep parts organized to make reassembly easier. Checking your work helps ensure safety on the road.
Practice builds confidence and skill over time. Stay patient and focused throughout the process. This task becomes simpler with experience. Safety matters most when working on brakes. You can handle this job well by staying calm and careful.