
Vinyl wrapping curved edges can seem tricky, but with the right approach, you can achieve a smooth, professional finish. If you’ve ever struggled with bubbles, wrinkles, or uneven edges, this guide is made for you.
You’ll learn simple steps to handle those tricky curves with confidence and make your project look flawless. Ready to transform your vinyl wrap skills and get stunning results every time? Keep reading—you’re about to discover how easy it can be!
Choosing The Right Vinyl
Choosing the right vinyl is key to a smooth wrap on curved edges. The vinyl must bend and stretch without tearing. It needs to stick well but also stay flexible. Picking the correct type helps the wrap last longer and look better. Consider the vinyl’s material, thickness, and finish before starting your project.
Types Of Vinyl For Curves
Cast vinyl is perfect for curved surfaces. It is thin and flexible, allowing it to conform to shapes easily. Calendered vinyl is thicker and less flexible. It works well on flat surfaces but may wrinkle on curves. For wrapping edges, always choose cast vinyl for better results.
Thickness And Flexibility
Thin vinyl is easier to stretch and form around curves. Thick vinyl can crack or bubble when bent. Look for vinyl with a thickness of 2 mil or less for curves. Flexibility is important. Vinyl should stretch without losing its color or adhesive power. Test a small piece before wrapping the entire surface.
Color And Finish Options
Vinyl comes in many colors and finishes. Matte, gloss, satin, and metallic are popular choices. The finish affects how light reflects off the surface. Choose a finish that matches your style and hides imperfections on curves. Dark colors may show heat marks during installation. Lighter colors are easier to work with on edges.
Preparing The Surface
Preparing the surface is a key step before vinyl wrapping curved edges. A clean and smooth base helps the vinyl stick well. It also prevents bubbles and wrinkles. Taking time to prepare the surface ensures a neat and lasting wrap.
Cleaning And Degreasing
Start by cleaning the surface with soap and water. Use a soft cloth to remove dirt and dust. Next, apply a degreaser to remove oils and grease. These substances can stop the vinyl from sticking properly. Wipe the surface dry with a clean cloth.
Removing Old Wraps And Residue
Check for any old vinyl or adhesive on the surface. Peel off old wraps carefully to avoid damage. Use an adhesive remover to get rid of sticky residue. Clean the area again after removing all traces. A residue-free surface improves vinyl adhesion.
Ensuring A Smooth Base
Inspect the surface for bumps, scratches, or dents. Sand rough spots gently with fine sandpaper. Fill any deep scratches with a suitable filler and let it dry. Smooth surfaces help the vinyl wrap conform to curves easily. This step prevents wrinkles and air bubbles later.
Tools Needed
Vinyl wrapping curved edges needs the right tools. These tools help you apply vinyl smoothly and avoid bubbles or wrinkles. Using proper equipment makes the job easier and gives better results. Below are the main tools you need.
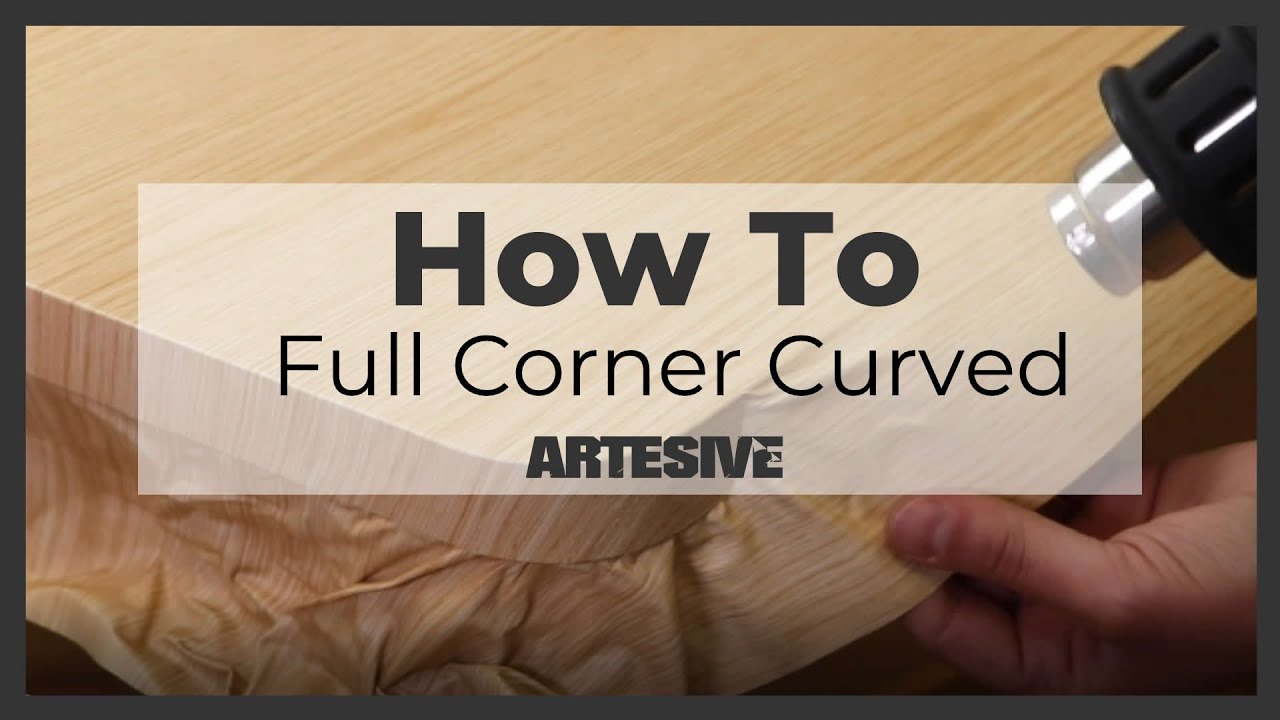
Heat Guns And Their Use
Heat guns soften the vinyl, making it flexible. This helps the vinyl wrap around curves without tearing. Use the heat gun on low to medium heat. Move it steadily to warm the vinyl evenly. Avoid overheating to prevent damage.
Squeegees And Application Tools
Squeegees push air bubbles out from under the vinyl. They also help press the vinyl firmly onto surfaces. Soft felt or rubber squeegees work best. Use gentle pressure to avoid scratching the vinyl. Application tools come in different shapes for corners and edges.
Cutting And Trimming Instruments
Sharp knives or blades trim excess vinyl cleanly. Use a craft knife or a precision cutting tool. Replace dull blades often for smooth cuts. Cutting mats protect surfaces and make cutting safer. Always cut carefully to avoid damaging the wrapped item.

Credit: www.youtube.com
Techniques For Wrapping Curved Edges
Wrapping curved edges with vinyl requires special techniques to achieve a smooth finish. Curves can be tricky because the vinyl needs to stretch and fit tightly. Proper handling prevents wrinkles and bubbles, making the wrap look professional and clean. Understanding how to manage different curves helps improve the final result.
Stretching And Heating Vinyl
Heating vinyl makes it more flexible. Use a heat gun to warm the vinyl gently. Stretch the vinyl slowly over the curved edge while heating. This softens the material and helps it mold to the shape. Avoid overheating to prevent damage. Stretch in small sections for better control.
Working With Concave And Convex Curves
Concave curves bend inward, like a bowl shape. Pull vinyl carefully to avoid lifting the edges. Use a squeegee to press the vinyl into the curve. Convex curves bulge outward. Stretch the vinyl evenly over the bulge. Use heat to soften the vinyl for smooth wrapping. Both curves need patience and steady hands.
Avoiding Wrinkles And Bubbles
Wrinkles appear when vinyl folds or bunches. Bubbles form from trapped air. Use a squeegee to press out air pockets. Work from the center outward to push air out. Heat and stretch the vinyl to reduce wrinkles. Take your time and adjust as you go. Smooth vinyl means a better wrap.
Securing The Vinyl
Securing the vinyl wrap on curved edges is key to a smooth, lasting finish. This step keeps the vinyl tight and prevents peeling over time. Careful handling during this phase can save hours of fixing later.
Focus on proper adhesion, neat folds, and clean overlaps. These details help the vinyl look professional and last longer. Below are tips to secure vinyl on curves effectively.
Proper Adhesion Tips
Clean the surface thoroughly before applying vinyl. Dirt and oils reduce stickiness. Use a mild cleaner and dry well.
Heat the vinyl gently with a heat gun. Warm vinyl sticks better and stretches easily. Avoid overheating to prevent damage.
Press the vinyl firmly using a squeegee. Start from the center and push outwards. This removes air bubbles and improves grip.
Tucking And Folding Edges
Use your fingers to tuck vinyl into tight curves. Stretch the vinyl slightly but don’t overdo it.
Fold excess vinyl neatly at edges. Sharp folds reduce wrinkles and create a clean line.
Trim extra vinyl carefully. Cut close but avoid cutting the surface beneath.
Handling Overlaps And Seams
Overlap vinyl pieces slightly at seams. This prevents gaps and keeps water out.
Use a seam roller to press overlaps firmly. This strengthens the bond and smooths the seam.
Heat the seam area after pressing. Warmth helps vinyl settle and stick evenly.
Finishing Touches
Finishing touches make your vinyl wrap look smooth and professional. This stage is key to secure the vinyl on curved edges. Take your time. Small details matter a lot. Proper finishing helps the wrap last longer and resist peeling.
Trimming Excess Vinyl
Use a sharp blade to cut away extra vinyl carefully. Follow the curve closely without rushing. Leave a small margin near the edge for safety. Cut slowly to avoid damaging the surface beneath. Clean cuts prevent bubbles and wrinkles later.
Post-application Heating
Heat the wrapped area gently with a heat gun or hair dryer. Warm vinyl sticks better around curves and edges. Move the heat source evenly and keep it moving. Avoid overheating to prevent damage or melting. This step helps vinyl settle and form tight bonds.
Protecting The Wrapped Surface
After wrapping, avoid harsh cleaning chemicals on the vinyl. Use mild soap and water to clean the surface. Park the vehicle or object away from direct sunlight when possible. Applying a vinyl protectant can extend the life of the wrap. This keeps colors vibrant and prevents cracking.
Common Mistakes To Avoid
Vinyl wrapping curved edges can be tricky. Many make mistakes that cause bubbles, wrinkles, or peeling. Avoiding these errors saves time and gives a smooth finish. Focus on three common mistakes to keep your wrap perfect.
Overstretching Vinyl
Stretching vinyl too much weakens the material. It can tear or lose its shape. Pull gently and slowly while applying heat. Let the vinyl relax before stretching more. Overstretching leads to bubbles and uneven surfaces.
Insufficient Surface Prep
Dirty or oily surfaces stop vinyl from sticking well. Clean the area with soap and water. Use alcohol to remove grease or wax. Dry the surface completely before wrapping. Skipping prep causes lifting and peeling later.
Ignoring Temperature Guidelines
Vinyl works best within certain temperatures. Too cold makes vinyl stiff and hard to stretch. Too hot makes it too soft and sticky. Apply vinyl in moderate temperatures. Use a heat gun carefully to shape curves without damage.

Credit: www.reddit.com
Maintenance For Longevity
Maintaining vinyl wrap on curved edges helps it last longer and stay attractive. Proper care keeps the wrap smooth and prevents peeling or cracking. Small steps can protect your investment and keep the surface looking fresh.
Cleaning Tips For Wrapped Surfaces
Use a soft cloth or sponge to clean wrapped areas. Avoid abrasive materials that can scratch the vinyl. Mild soap mixed with water works best for removing dirt. Rinse with clean water and dry gently to avoid water spots. Do not use strong chemicals or solvents, as they damage the wrap.
Repairing Minor Damages
Small tears or bubbles can appear over time. Use a heat gun to soften the vinyl and smooth out bubbles carefully. For tiny tears, apply a vinyl repair kit that matches your wrap color. Act quickly to prevent damage from spreading. Regular checks help spot problems early.
When To Rewrap
Look for fading, peeling, or large cracks as signs to rewrap. If repairs no longer fix the damage, new vinyl is needed. Rewrapping restores the original look and protects the surface below. Plan rewraps every few years depending on exposure to sun and weather.
Credit: www.youtube.com
Frequently Asked Questions
How Do You Prepare Curved Edges For Vinyl Wrapping?
Clean the surface thoroughly to remove dirt and oils. Use a heat gun to warm the vinyl, making it flexible. Stretch the vinyl gently over the curves to avoid bubbles and wrinkles. Proper preparation ensures a smooth, long-lasting finish on curved edges.
What Tools Are Needed For Vinyl Wrapping Curved Edges?
Essential tools include a heat gun, squeegee, sharp utility knife, and gloves. A heat gun softens the vinyl for easier stretching. The squeegee smooths out air bubbles. A sharp knife trims excess vinyl for clean edges, ensuring a professional wrap on curved surfaces.
How Do You Avoid Bubbles On Curved Vinyl Wraps?
Apply heat evenly with a heat gun to soften the vinyl. Use a squeegee to press the vinyl firmly onto the surface. Start from the center and move outward to push air out. Proper technique prevents bubbles and creates a seamless wrap on curves.
Can Vinyl Wrap Stretch Without Losing Adhesion?
Yes, quality vinyl wrap is designed to stretch up to 150%. Heat helps activate the adhesive and increases flexibility. Avoid overstretching to prevent damage. Proper heat application maintains strong adhesion and a smooth finish on curved edges.
Conclusion
Vinyl wrapping curved edges takes patience and the right steps. Stretch the vinyl gently to avoid wrinkles or bubbles. Use heat to soften the vinyl and make it bend smoothly. Take your time pressing the vinyl into tight corners. Clean surfaces help the wrap stick better and last longer.
Practice on small areas before tackling large curves. These tips will help you achieve a neat, smooth finish. Keep trying, and your vinyl wrap will look professional and clean.


