
Are you tired of your kitchen looking dull and outdated? What if you could give your kitchen doors a fresh, stylish makeover without spending a fortune or hiring a pro?
Vinyl wrapping your kitchen doors is an easy, affordable way to transform your space quickly. In this guide, you’ll discover simple steps to achieve a smooth, professional finish that will impress everyone who walks in. Ready to change your kitchen’s look and feel with just a few tools and some patience?
Keep reading, and you’ll learn exactly how to do it yourself.
Credit: www.wesprayupvc.co.uk
Materials Needed
Before starting a vinyl wrap project on kitchen doors, gather all necessary materials. Having the right supplies ensures a smooth and successful process. Each item plays a key role in achieving a clean, long-lasting finish.
Choosing The Right Vinyl Wrap
Select vinyl wrap made for furniture or cabinets. This type sticks well and resists heat and moisture. Matte or glossy finishes offer different looks. Pick the color and texture that match your kitchen style. Avoid thin or low-quality vinyl, as it may peel easily.
Essential Tools
Gather tools that make application easier. A squeegee helps smooth out air bubbles. A sharp utility knife cuts vinyl accurately. Use a heat gun to soften vinyl for curves. A measuring tape and ruler ensure precise cuts. Keep a clean cloth handy to wipe surfaces.
Preparing The Workspace
Clear the area around your kitchen doors. Dust and dirt can ruin vinyl adhesion. Clean doors thoroughly with soap and water. Dry them completely before starting. Work in a well-lit space to see details clearly. A flat, stable surface helps with cutting and measuring.
Preparing Kitchen Doors
Preparing kitchen doors is the first step for a smooth vinyl wrap project. Clean, smooth surfaces help vinyl stick better and last longer. Taking time to prepare doors saves effort later and gives a neat finish.
Cleaning And Removing Hardware
Start by wiping the doors with a mild cleaner. Remove dirt, grease, and dust. Use a soft cloth to avoid scratches. Take off all hardware like handles and hinges. This makes wrapping easier and prevents bubbles under the vinyl.
Sanding And Repairing Surfaces
Check doors for rough spots or damage. Lightly sand the surface with fine sandpaper. This helps vinyl stick well. Fill any holes or cracks with wood filler. Let the filler dry completely. Sand again to smooth the repaired areas before wrapping.
Measuring And Cutting Vinyl
Measuring and cutting vinyl is a key step for a smooth kitchen door wrap. Precision here makes the process easier and the finish cleaner. Take your time to measure and cut carefully. This ensures the vinyl fits perfectly on each door panel.
Taking Accurate Measurements
Start by removing the kitchen door from its hinges. Lay it flat on a clean surface. Use a tape measure to note the width and height. Measure each door panel separately for best results. Write down your numbers clearly. Double-check each measurement to avoid mistakes. Remember to add a small margin for trimming later.
Cutting Vinyl To Size
Place the vinyl sheet on a flat, clean surface. Use a ruler and pencil to mark the cutting lines. Cut slowly with a sharp utility knife or scissors. Follow the lines carefully to keep edges straight. Leave a little extra vinyl around the edges for adjustments. Avoid rushing; neat cuts prevent peeling and bubbles later.

Credit: www.youtube.com
Applying The Vinyl Wrap
Applying vinyl wrap to kitchen doors requires care and patience. This step is key to getting a smooth, professional look. Follow simple steps to place the vinyl correctly and avoid common mistakes.
Positioning The Vinyl
Start by peeling a small part of the vinyl backing. Align the vinyl with the top edge of the door. Hold the vinyl firmly but do not press it down fully yet. Check that the vinyl is straight and covers the door completely. Adjust as needed before moving on.
Smoothing And Removing Air Bubbles
Use a soft squeegee to press the vinyl from the center outwards. Push gently to remove air bubbles and wrinkles. Work slowly and carefully across the entire surface. If air bubbles remain, lift the vinyl slightly and smooth again. Repeat until the surface is flat and even.
Trimming Excess Material
Use a sharp utility knife to cut away extra vinyl around the door edges. Cut close to the edge but avoid cutting the door itself. Trim in small sections for more control. After trimming, press edges firmly to seal the vinyl on the door.
Finishing Touches
Finishing touches make your vinyl wrap job look complete and last longer. They help protect the wrap and keep your kitchen doors looking fresh. Careful attention at this stage ensures a neat, professional result.
Reattaching Hardware
Remove all hardware before wrapping. Now, carefully screw handles and knobs back on. Make sure screws fit tightly but do not damage the wrap. Check each piece to confirm it works smoothly.
Sealing Edges For Durability
Seal edges with clear edge sealer or heat. This stops peeling and water damage. Press edges firmly to avoid air bubbles or wrinkles. Focus on corners and spots near hinges for best results.
Cleaning And Maintenance Tips
Clean vinyl with a soft cloth and mild soap. Avoid harsh cleaners or scrubbing pads. Wipe spills quickly to prevent stains. Regular care keeps the wrap shiny and new longer.
Credit: www.reddit.com
Troubleshooting Common Issues
Troubles can happen while vinyl wrapping kitchen doors. Small mistakes might cause wrinkles, bubbles, or peeling edges. Fixing these issues quickly keeps your wrap looking fresh and smooth. Here are some easy solutions to common problems.
Fixing Wrinkles And Bubbles
Wrinkles and bubbles often appear if the vinyl was not applied evenly. Use a soft cloth or a squeegee to press the vinyl down. Start from the center and push outward. For bubbles, gently lift the vinyl near the bubble. Use a pin to poke a tiny hole. Press the air out slowly.
Heat helps with stubborn wrinkles. Use a hairdryer on low heat. Warm the area and smooth the vinyl with your hand. Avoid too much heat; it can damage the vinyl.
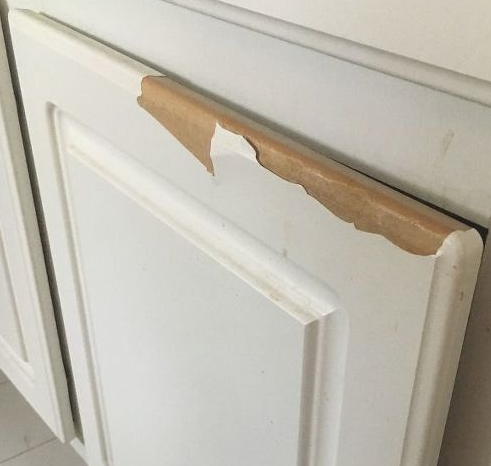
Dealing With Peeling Edges
Peeling edges happen when the vinyl does not stick well to the surface. Clean the edges with rubbing alcohol to remove dirt and oils. Press the vinyl down firmly. Use a heat gun or hairdryer on low heat to warm the edges. This helps the glue stick better.
If the peel is large, apply a small amount of vinyl adhesive under the loose edge. Press it down carefully and allow it to dry. Avoid stretching the vinyl during this process.
Frequently Asked Questions
What Materials Are Needed To Vinyl Wrap Kitchen Doors?
You need vinyl wrap sheets, a squeegee, a utility knife, a heat gun, and cleaning supplies. These tools ensure a smooth, durable application and professional finish on your kitchen doors.
How Do I Prepare Kitchen Doors For Vinyl Wrapping?
Clean the doors thoroughly to remove grease and dirt. Sand any rough spots and remove hardware. Proper preparation ensures the vinyl adheres well and lasts longer.
Can I Vinyl Wrap Kitchen Doors Myself?
Yes, vinyl wrapping kitchen doors is a DIY-friendly project. With patience and the right tools, you can achieve a professional look without hiring a pro.
How Long Does Vinyl Wrapping Kitchen Doors Last?
Vinyl wraps typically last 5 to 10 years with proper care. Avoid harsh cleaners and excessive moisture to extend the wrap’s lifespan.
Conclusion
Vinyl wrapping kitchen doors is a simple way to refresh your space. You can change colors and styles without big costs or effort. Clean the doors well before starting to get smooth results. Take your time to apply the vinyl carefully.
Small bubbles can be removed easily with a tool or cloth. This project saves money and adds new life to your kitchen. Try it yourself and enjoy a fresh, updated look. You don’t need special skills to do it right.
Just follow the steps, and your kitchen will look great.


