
Are you planning to give your car, laptop, or any surface a fresh new look with vinyl wrap? One of the biggest questions you might have is: How much vinyl wrap do I need?
Getting the right amount is key. Too little, and you’ll be stuck with an incomplete project. Too much, and you could waste money and materials. You’ll discover simple ways to measure your surface and calculate exactly how much vinyl wrap is perfect for your project.
Keep reading, and you’ll be ready to wrap like a pro without any guesswork or stress.
Calculating Vehicle Dimensions
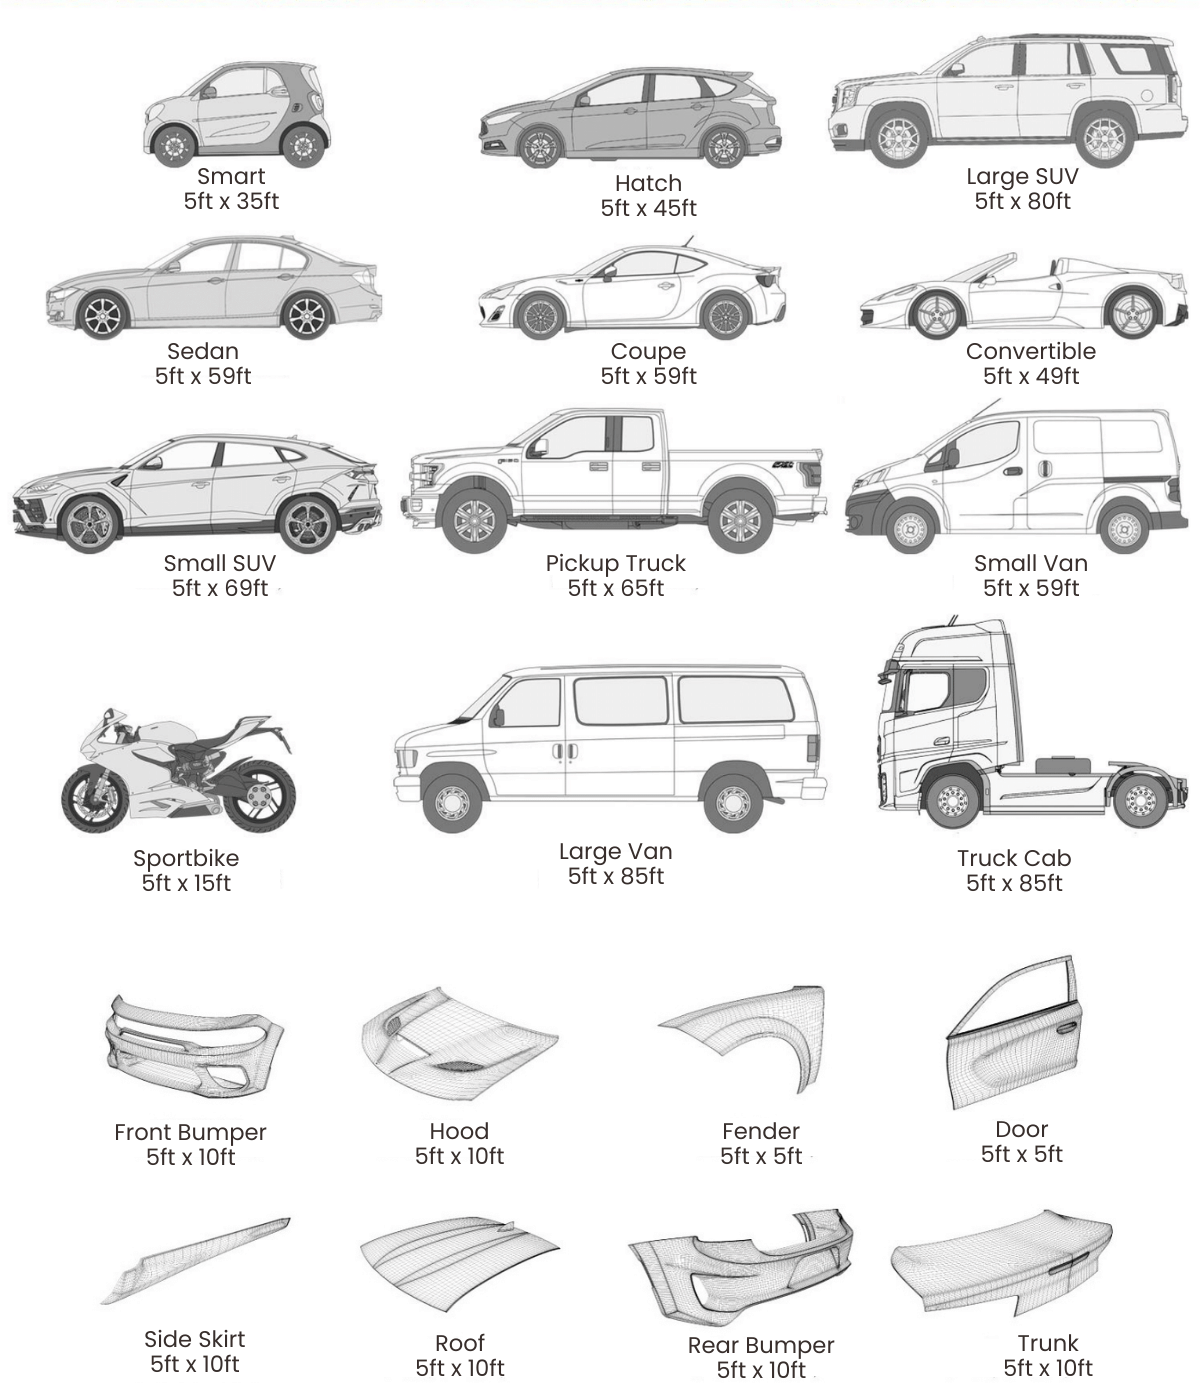
Calculating your vehicle’s dimensions is the first step in figuring out how much vinyl wrap you need. Accurate measurements help you avoid buying too little or wasting material. This process breaks down into three key parts: measuring length and width, accounting for curves and contours, and estimating surface area.
Measuring Length And Width
Start by measuring the vehicle’s length from the front bumper to the rear bumper. Use a tape measure for accuracy. Next, measure the width at the widest points, usually across the doors or mirrors. Write down these numbers carefully.
Accounting For Curves And Contours
Vehicles are not flat. They have curves and edges that affect how much vinyl you need. Add extra inches to cover these shapes fully. Think about bumpers, wheel arches, and side mirrors. These details require more material than flat surfaces.
Estimating Surface Area
Multiply the length by the width to get a base surface area. Then add 10 to 20 percent more for curves and overlaps. This extra amount ensures you have enough vinyl to wrap the entire vehicle smoothly. Round up your final number for safety.
Credit: yeswrap.com
Types Of Vinyl Wraps
Choosing the right type of vinyl wrap is important for your project. Different wraps have different qualities and uses. Knowing these types helps you pick the best one for your needs. This section explains the main types of vinyl wraps.
Standard Vs. Premium Vinyl
Standard vinyl wraps are affordable and good for short-term use. They work well on smooth surfaces and are easy to apply. Premium vinyl wraps cost more but last longer. They resist fading, cracking, and peeling better. Premium wraps also allow easier removal without damage.
Matte, Glossy, And Satin Finishes
Matte vinyl has a flat, non-shiny look. It hides fingerprints and minor scratches well. Glossy vinyl shines and makes colors pop. It gives a clean, bright appearance. Satin vinyl offers a soft shine between matte and glossy. It adds a smooth, modern touch to surfaces.
Specialty Wraps And Textures
Specialty wraps include textures like carbon fiber, brushed metal, and chrome. These wraps create unique looks and add style. Textured wraps can hide surface flaws. They are often used for accents or full vehicle wraps. Each texture has its own feel and visual effect.
Estimating Material Requirements
Estimating how much vinyl wrap you need is key for a smooth project. You must measure carefully and plan ahead. Buying too little causes delays and extra costs. Too much material leads to waste. Let’s break down how to estimate the right amount of vinyl wrap for your vehicle.
Adding Extra For Errors
Always add extra vinyl to your total estimate. Mistakes happen. Cuts or bubbles can waste material. Adding about 10-15% extra covers these errors. This cushion helps avoid running out mid-project. It saves time and money on last-minute purchases.
Considering Overlaps And Seams
Vinyl wrap needs overlaps for a clean finish. Overlaps prevent gaps and peeling edges. Plan for 1-2 inches extra on each edge. Seams also require extra length for smooth blending. Factor these overlaps into your total vinyl length.
Calculating Wrap For Different Vehicle Parts
Measure each vehicle part separately. Doors, hoods, roofs, and bumpers vary in size and shape. Note the width and height of each section. Add extra length for curves and edges. Combine all parts’ measurements for the total vinyl amount.
Tools And Supplies Needed
Having the right tools and supplies makes vinyl wrapping easier and better. Proper tools help you cut, apply, and finish the wrap with less trouble. Preparing the surface and working carefully leads to a smooth, lasting result.
Cutting Tools
Sharp cutting tools are a must for clean edges. Use a utility knife or a vinyl wrap knife. Replace blades often to keep cuts neat. A cutting mat can protect surfaces and help measure straight lines.
Application Tools
A squeegee is key to applying vinyl wrap smoothly. It removes bubbles and wrinkles during application. Use a soft felt edge squeegee to avoid scratches. A heat gun helps stretch the vinyl around curves. Keep a microfiber cloth handy to clean the wrap after application.
Cleaning And Preparation Materials
Clean surfaces improve vinyl wrap adhesion. Use isopropyl alcohol or a mild cleaner to remove dirt and oils. Avoid wax or silicone-based products. Dry the surface completely with a lint-free cloth before starting. Proper cleaning prevents bubbles and peeling later.
Common Mistakes To Avoid
Knowing how much vinyl wrap you need is important for a smooth project. Many people make simple mistakes that cause problems. Avoiding these common errors saves time, money, and frustration. Here are some key mistakes to watch out for.
Underestimating Material Needs
Buying less vinyl wrap than needed is a frequent error. It’s smart to buy extra material for mistakes and overlaps. Wrapping curves and edges uses more vinyl than flat surfaces. Not having enough wrap causes delays and extra trips to the store. Always add at least 10-20% more than your measurements.
Ignoring Surface Preparation
Skipping surface cleaning leads to poor wrap adhesion. Dirt, dust, and grease prevent the vinyl from sticking well. The wrap may peel or bubble over time. Use soap and water or a special cleaner before wrapping. Dry the surface completely for the best results.
Poor Measurement Practices
Relying on rough or single measurements causes errors. Measuring twice or thrice improves accuracy. Measure width and height of each section carefully. Use a flexible tape measure for curves and corners. Write down all measurements to avoid confusion during cutting.

Credit: www.carlawrap.com
Tips For Efficient Wrapping
Efficient wrapping saves time and makes the vinyl look smooth. Follow these tips to get the best results. Each step helps avoid common problems like bubbles and wrinkles. Working carefully and in order makes the job easier and cleaner.
Working In Sections
Divide the surface into small, manageable parts. Wrap one section at a time to control the vinyl better. This method reduces mistakes and keeps the vinyl from stretching too much. It also helps spot problems early and fix them quickly.
Using Heat For Better Adhesion
Use a heat gun or hair dryer on low heat to warm the vinyl. Warm vinyl becomes softer and sticks better to curves and edges. Heat helps the vinyl form to the surface without tearing. Avoid overheating; it can damage the vinyl or cause bubbles.
Avoiding Air Bubbles And Wrinkles
Start applying vinyl from one edge, slowly pressing out air as you go. Use a squeegee or soft cloth to push bubbles toward the edges. Work gently to prevent wrinkles or creases. If bubbles appear, lift the vinyl carefully and reapply.
Credit: metrorestyling.com
Frequently Asked Questions
How To Calculate Vinyl Wrap Size For A Car?
Measure the car’s length, width, and height. Add extra for curves and overlaps. Most use 50-60% more vinyl than the car’s surface area to ensure full coverage.
How Much Vinyl Wrap For A Full Vehicle?
A full vehicle wrap usually requires about 50-75 feet of vinyl. This depends on the vehicle’s size and shape. Compact cars need less, while trucks and SUVs need more vinyl.
Can I Use Vinyl Wrap For Small Parts Only?
Yes, vinyl wrap works well on small parts like mirrors or spoilers. Measure these parts precisely and order slightly more vinyl than the exact size for easier application.
Does Vinyl Wrap Shrink After Application?
Quality vinyl wrap may shrink slightly when heated during installation. This helps it conform to curves. Expect minimal shrinkage, which does not reduce overall vinyl needed but improves fit.
Conclusion
Calculating vinyl wrap size depends on your vehicle’s shape and parts. Measure carefully for doors, hood, roof, and bumpers. Add extra material to cover mistakes or overlaps. Choose quality vinyl for easier application and lasting results. Planning well saves money and frustration later.
Take your time, double-check measurements, and prepare your surface. This helps achieve a smooth, neat finish every time. Simple steps lead to great results. Now, you know how much vinyl wrap you need. Ready to start your project?


