Your porch posts play a big role in your home’s curb appeal. If your posts are looking worn or outdated, wrapping them with vinyl can give your porch a fresh, clean look without the hassle of full replacement.
You might think this project is complicated, but it’s easier than you expect—and you don’t need special skills to do it. In this guide, you’ll discover simple steps to wrap your porch posts with vinyl, saving time and money while boosting your home’s charm.
Ready to transform your porch? Let’s get started!

Credit: www.youtube.com
Choosing Vinyl For Porch Posts
Choosing vinyl for porch posts is a smart way to improve your home’s look. Vinyl wraps protect posts from weather and damage. They also create a clean and fresh appearance. Picking the right vinyl ensures your porch stays beautiful for years. Consider key factors like durability, style, and maintenance before buying.
Understanding the types of vinyl and available colors helps make a better choice. This section explains the benefits, material options, and design styles of vinyl wraps for porch posts.
Benefits Of Vinyl Wrapping
Vinyl wraps resist moisture and prevent wood rot. They are easy to clean with just soap and water. Vinyl does not need painting or staining. It saves time and money on upkeep. The material also hides cracks and imperfections. Vinyl wrapping adds a smooth, polished look to posts.
Types Of Vinyl Materials
There are solid and textured vinyl options. Solid vinyl offers a sleek, smooth surface. Textured vinyl mimics wood grain for a natural feel. Some vinyl wraps have UV protection to stop fading. Choose thicker vinyl for more durability. Self-adhesive vinyl is simple to apply without extra glue.
Color And Texture Options
Vinyl wraps come in many colors like white, beige, and gray. Light colors brighten porch spaces. Dark colors add contrast and style. Textured vinyl can look like real wood or stone. Matte and glossy finishes are available. Select a color and texture that match your home’s style.
Preparing The Porch Post
Preparing the porch post is an important first step before wrapping it with vinyl. This stage helps ensure the vinyl sticks well and looks smooth. Proper preparation makes the final result neat and long-lasting.
Start by cleaning and sanding the post. Next, fix any imperfections on the surface. Finally, measure the post carefully to cut the vinyl correctly.
Cleaning And Sanding
Clean the porch post using soap and water. Remove dirt, dust, and old paint. Let the post dry completely before moving on.
Sand the surface lightly with fine-grit sandpaper. This creates a rough texture for better vinyl adhesion. Wipe away sanding dust with a dry cloth.
Repairing Imperfections
Check the post for cracks, holes, or dents. Use wood filler or putty to fill these spots. Smooth the filler with a putty knife and let it dry.
After drying, sand the filled areas until smooth. This step prevents bumps under the vinyl wrap.
Measuring The Post
Measure the height and width of the porch post. Add extra inches for overlap and trimming. Write down the measurements clearly.
Accurate measurements help cut the vinyl wrap to the right size. This reduces waste and makes installation easier.
Gathering Tools And Materials
Preparing to wrap a porch post with vinyl starts with gathering the right tools and materials. Having everything ready makes the process smooth and quick. Missing tools can cause delays and frustration. Below is a list of what you need to collect before starting your project.
Essential Tools
Start with measuring tape to get exact post dimensions. A utility knife helps cut the vinyl cleanly. Use a level to keep the wrap straight on the post. A hammer and finishing nails secure the vinyl in place. Sandpaper smooths rough wood surfaces before wrapping. A carpenter’s square ensures sharp vinyl edges.
Recommended Adhesives
Vinyl adhesive is best for strong, lasting bonds. Construction adhesive works well on wood and vinyl. Double-sided tape offers quick hold for temporary fixes. Use a caulking gun to apply adhesive evenly. Avoid glue that may damage vinyl or wood over time.
Safety Gear
Protect your hands with work gloves to avoid cuts. Safety glasses shield eyes from dust and flying debris. A dust mask keeps you from inhaling wood particles. Wear closed-toe shoes to protect your feet. Keep a first aid kit nearby for emergencies.

Credit: www.youtube.com
Cutting Vinyl To Size
Cutting vinyl to size is an important step in wrapping porch posts. Getting the right measurements and clean cuts ensures a neat and professional look. Vinyl panels that are too large or uneven can cause gaps or wrinkles. Precise cutting saves time and materials. Follow these steps for accurate cutting.
Measuring Vinyl Panels
Start by measuring the height and width of your porch post. Measure all sides carefully to cover the entire post. Add a little extra length for overlap and trimming. Write down each measurement clearly. Double-check your numbers before cutting. Accurate measuring helps avoid mistakes.
Marking Cut Lines
Use a pencil or fine-tip marker to mark the vinyl. Draw straight lines along your measurements. Mark both length and width cuts on the panel. Use a ruler or straightedge for clean, straight lines. Marking cut lines guides your cutting tools. It keeps cuts precise and neat.
Using The Right Cutting Tools
Choose sharp tools like a utility knife or heavy-duty scissors. A straightedge or metal ruler helps guide cuts. Cut on a flat surface for better control. Make slow, steady cuts to avoid jagged edges. Replace dull blades for cleaner cuts. Proper tools make cutting easier and safer.
Applying Vinyl To The Post
Applying vinyl to a porch post is a key step for a clean, polished look. It protects the post and adds style. This process takes patience and attention to detail. Follow these simple steps for a smooth finish.
Starting The Wrap
Begin by cleaning the post surface. Make sure it is dry and free of dirt. Peel a small section of the vinyl backing. Align the vinyl with the post edge. Press it gently to stick. Work slowly around the post for even coverage.
Smoothing Out Bubbles
Use a soft cloth or squeegee to smooth the vinyl. Push air bubbles toward the edges. Work from the center outwards. Apply firm, steady pressure. Small bubbles may disappear with time. Large bubbles need careful lifting and reapplying.
Trimming Excess Material
Use a sharp utility knife for trimming. Cut close to the post edges. Take care around corners and joints. Trim slowly to avoid tearing the vinyl. Remove all excess for a clean edge. Check all sides for neatness before finishing.
Securing Vinyl Edges
Securing vinyl edges is a key step in wrapping porch posts. It keeps the vinyl tight and neat. Properly secured edges stop water from seeping in. This prevents damage and extends the life of your wrap. Simple tools and materials make this task easier. Follow these tips to protect your vinyl wrap well.
Using Sealants Or Caulk
Sealants or caulk create a strong barrier around vinyl edges. Apply a thin bead along all seams and corners. Smooth it out with a wet finger or tool. This seals gaps and blocks moisture. Choose a clear, weatherproof caulk for best results. Let it dry fully before touching or painting.
Adding Trim Or Molding
Trim or molding covers raw vinyl edges neatly. It adds a clean, finished look to your porch post. Use trim made for outdoor use and vinyl compatibility. Attach it with nails or adhesive for a secure hold. Trim also protects edges from peeling or damage. Measure and cut carefully to fit each side.
Ensuring Weather Resistance
Vinyl edges face rain, sun, and wind daily. Protect them with weather-resistant materials and methods. Seal all joints and overlaps tightly. Use exterior-grade caulk and trim to withstand weather. Check edges periodically for cracks or gaps. Fix issues quickly to avoid water damage and warping.
Maintenance Tips For Vinyl Posts
Taking care of vinyl posts is important for keeping them looking good. Proper maintenance helps them last longer and stay strong. Simple steps can protect your investment and keep your porch neat.
Cleaning Vinyl Surfaces
Wash vinyl posts regularly with mild soap and water. Use a soft cloth or sponge to avoid scratches. Rinse well to remove all soap residue. Avoid harsh cleaners that can damage the surface. Cleaning prevents dirt buildup and keeps the vinyl shiny.
Preventing Damage
Keep sharp objects away from vinyl posts. Avoid leaning heavy items against them. Trim nearby plants to prevent scratches and stains. Use protective covers during storms or harsh weather. These steps stop cracks and discoloration over time.
Touching Up Scratches
Small scratches can be fixed with a vinyl repair kit. Clean the area before applying the repair compound. Follow the instructions for best results. For deeper scratches, consider professional help. Prompt repair keeps posts looking fresh and new.
Enhancing The Look
Enhancing the look of your porch post wrapped with vinyl can transform your outdoor space. Simple changes can create a fresh, inviting feel. Small touches bring big style and charm. Focus on details that match your personal taste and home design.
Adding Decorative Elements
Decorative elements add personality to vinyl-wrapped posts. Use trim pieces to create clean lines and shapes. Attach decorative brackets or corbels for a classic look. Consider vinyl post caps to protect and beautify. These elements make posts stand out and look polished.
Lighting Ideas
Lighting improves both safety and beauty around porch posts. Install small LED spotlights at the base for upward glow. Wrap string lights around posts for a cozy feel. Solar-powered lights offer easy, wire-free options. Good lighting highlights the vinyl wrap and enhances evening ambiance.
Coordinating With Porch Design
Match the post wrap color with porch elements like railings and siding. Choose vinyl that complements your home’s style and color palette. Consider the overall theme—modern, rustic, or traditional. Balanced coordination creates a seamless and attractive porch look.
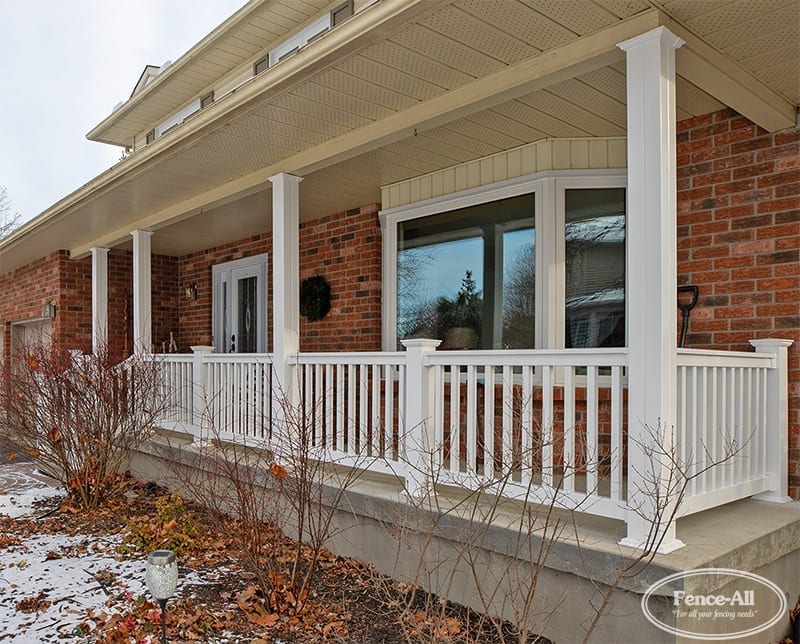
Credit: fenceall.com
Frequently Asked Questions
How Do You Prepare A Porch Post For Vinyl Wrapping?
Clean the post thoroughly to remove dirt and debris. Sand the surface lightly for better vinyl adhesion. Ensure the post is dry before applying vinyl wrap.
What Tools Are Needed To Wrap A Porch Post With Vinyl?
You need vinyl wrap, a utility knife, a squeegee, measuring tape, and a heat gun. These tools help in precise cutting and smooth application.
Can Vinyl Wraps Withstand Outdoor Weather On Porch Posts?
Yes, vinyl wraps are designed to be weather-resistant. They protect posts from rain, sun, and wind damage. Proper installation enhances durability.
How Long Does It Take To Wrap A Porch Post With Vinyl?
Wrapping a porch post typically takes 1 to 2 hours. Time varies based on post size and experience level. Patience ensures a smooth finish.
Conclusion
Wrapping porch posts with vinyl gives your home a fresh look. It protects the posts from weather damage. The process is simple and does not take much time. You only need basic tools and materials. Vinyl covers are easy to clean and maintain.
They also last a long time without fading. This project adds value and curb appeal to your home. Try it yourself and enjoy the improved porch appearance. Small changes can make a big difference. Give your porch a neat and polished finish today.