Have you ever wanted to give your car a fresh, new look without spending a fortune or committing to a permanent paint job? Using vinyl wrap on your car is a smart, affordable way to transform its appearance quickly and easily.
But if you’ve never tried it before, the process might seem a bit overwhelming. Don’t worry—this guide will walk you through every step, helping you avoid common mistakes and achieve a smooth, professional finish. Ready to make your car stand out on the road?
Let’s dive in and show you how to use vinyl wrap like a pro.
Choosing The Right Vinyl
Choosing the right vinyl for your car wrap is very important. The vinyl you pick affects how your car looks and how long the wrap lasts. Different types of vinyl offer different benefits. You must understand these differences before starting your project. This helps you get the best results and avoid problems later.
Types Of Vinyl Wraps
There are mainly two types of vinyl wraps: cast and calendared. Cast vinyl is thin and flexible. It molds well to curves and lasts longer. Calendared vinyl is thicker and cheaper. It works best on flat surfaces. For cars, cast vinyl is usually the better choice.
Color And Finish Options
Vinyl wraps come in many colors. You can find bright, matte, gloss, and satin finishes. Matte finish hides dirt well. Glossy finish shines and looks like paint. Satin finish is between matte and gloss. Pick a color and finish that matches your style and car design.
Durability And Quality Factors
Good quality vinyl lasts longer and resists damage. Look for vinyl with UV protection to stop fading. Check how strong the adhesive is. Strong glue keeps the wrap in place during weather changes. High-quality vinyl also resists scratches and tears better.

Credit: www.turtlewax.com
Preparing Your Car
Preparing your car is the first step to a smooth vinyl wrap application. It helps the vinyl stick better and last longer. A clean, obstacle-free surface means fewer bubbles and wrinkles. Proper preparation saves time and ensures a neat finish.
Take your time with this step. Rushing can cause problems later on. Follow these tips to get your car ready for wrapping.
Cleaning And Degreasing
Start by washing your car thoroughly. Use soap and water to remove dirt and dust. After washing, dry the surface completely. Next, apply a degreaser to remove oils and wax. Oils can stop the vinyl from sticking well. Wipe the car with a clean cloth until no residue remains.
Removing Obstacles
Remove parts that block the wrap. Take off mirrors, badges, and trim if possible. These parts can cause bubbles and wrinkles under the vinyl. Keep screws and small parts safe for reassembly. Clear the area so the vinyl can lay flat and smooth.
Temperature And Environment Tips
Choose a warm, dry place for wrapping. Vinyl sticks better between 60°F and 80°F (15°C to 27°C). Avoid windy or dusty areas to prevent dirt on the surface. A garage or covered space works best. Good lighting helps spot any imperfections while applying the vinyl.
Tools You Need
Using vinyl wrap on a car needs the right tools. Good tools make the work easier and give better results. Prepare all items before starting. This saves time and avoids mistakes. Below are the tools needed for a smooth wrapping process.
Essential Wrapping Tools
Start with a good quality vinyl wrap film. You need a squeegee to smooth out air bubbles. A heat gun helps to stretch and fit the vinyl on curves. Use a sharp utility knife for clean cuts. A measuring tape or ruler ensures accurate size and fit. Clean cloths or alcohol wipes remove dirt and grease before applying the wrap.
Optional Accessories
Use a felt edge squeegee to avoid scratches on vinyl. A pair of gloves helps keep the wrap clean. Masking tape can hold the vinyl in place during application. A plastic scraper removes any leftover glue or dirt. A soft brush helps press vinyl into tight spots.
Safety Equipment
Wear gloves to protect your hands from cuts and chemicals. Use safety glasses to shield your eyes from flying debris. Work in a well-ventilated area to avoid breathing fumes from adhesives. Keep a first aid kit nearby for any small accidents. Safety ensures your wrapping project stays smooth and safe.
Credit: stonercarcare.com
Measuring And Cutting
Measuring and cutting vinyl wrap are important steps in the wrapping process. These steps help ensure the wrap fits perfectly on your car. Taking time to measure carefully reduces mistakes and waste.
Cutting the vinyl correctly helps in smooth application. It also prevents wrinkles and bubbles later on. Planning for seams is key when using multiple sheets of vinyl. Proper planning keeps the wrap looking clean and professional.
Accurate Measurements
Start by cleaning the car surface to get clear edges. Use a measuring tape to find the length and width of each section. Write down all measurements to avoid forgetting. Add a few extra inches for safety. This extra space helps during the fitting and trimming.
Cutting Techniques
Use a sharp utility knife or vinyl cutter for clean cuts. Cut on a flat surface to keep the vinyl steady. Always cut slowly and follow the lines carefully. Avoid cutting too close to the edge to prevent mistakes. Keep the knife blade fresh for smooth cutting.
Planning For Seams
Plan seams in less visible areas like door edges or panel gaps. Overlap edges by about half an inch for better adhesion. Press seams firmly to avoid lifting over time. Use a heat gun to soften vinyl near seams for better fit. Proper seams make the wrap look seamless and neat.
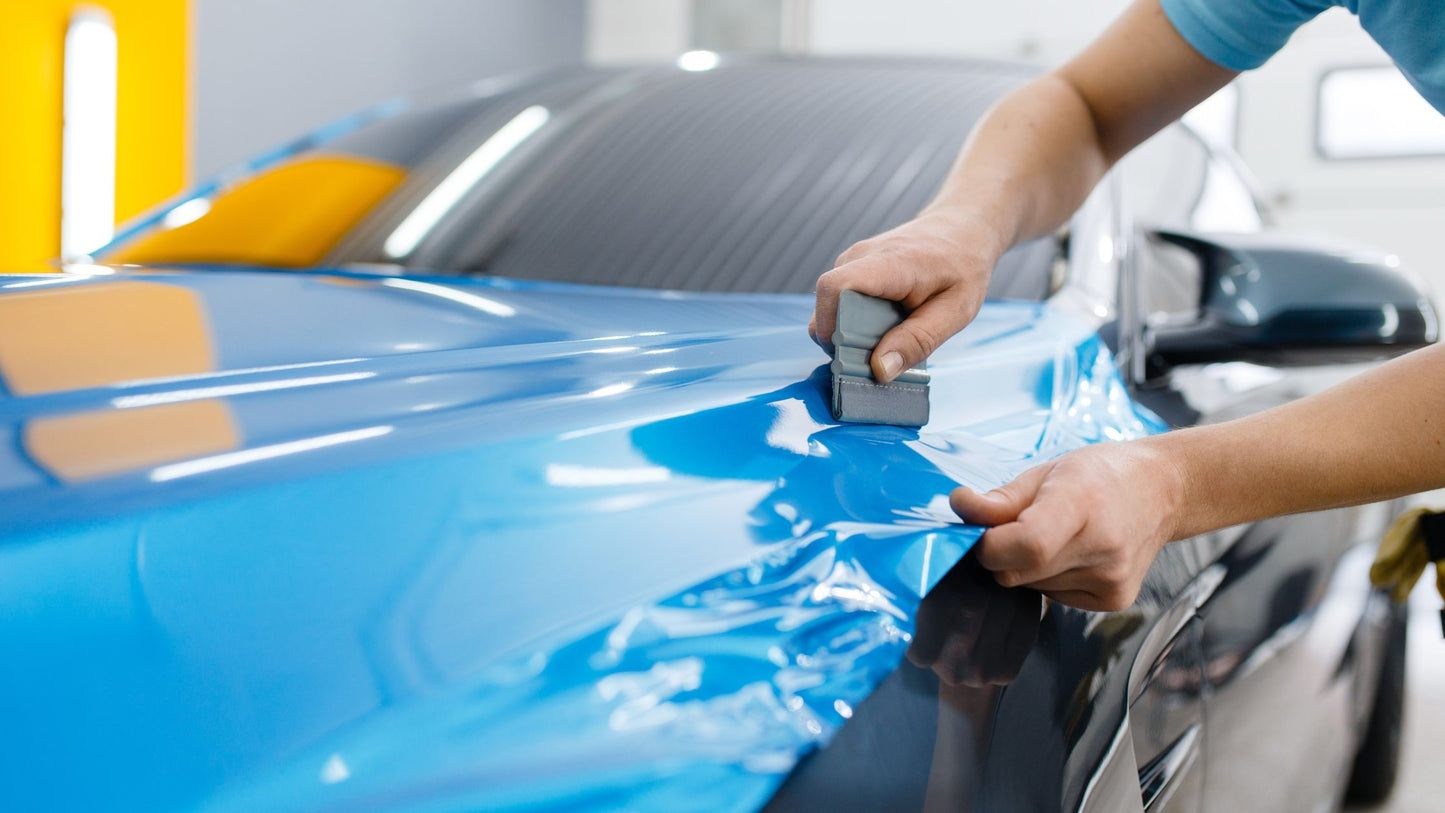
Applying The Vinyl Wrap
Applying vinyl wrap to your car is a careful process that needs patience and precision. The goal is to cover the car smoothly without wrinkles or bubbles. This section will guide you through the key steps to apply the wrap correctly.
Starting Points
Begin with a clean and dry car surface. Dirt or moisture can cause the wrap to peel. Choose a flat area to place your first piece. This starting point helps control the wrap’s direction. Peel a small section of the backing paper. Stick the vinyl gently on the surface. Check alignment before pressing firmly.
Stretching And Positioning
Vinyl wrap is flexible but must not overstretch. Use your hands to pull the vinyl gently. Stretch it just enough to cover curves and edges. Avoid sharp pulls that can cause tears. Move slowly and reposition as needed. Smooth the wrap using a squeegee to remove air pockets.
Using Heat For Flexibility
Heat makes vinyl easier to shape around curves. Use a heat gun or hair dryer on low heat. Warm the vinyl evenly without overheating. Heat softens the material, allowing better stretch and fit. Press the wrap firmly while warm to secure it. Allow it to cool to hold its shape well.
Smoothing And Securing
Smoothing and securing your vinyl wrap is key to a clean, lasting finish. This step removes imperfections and ensures the wrap sticks well. Proper smoothing keeps the vinyl tight and neat on your car’s surface. Securing the edges prevents peeling over time. Small details make a big difference in the final look.
Removing Air Bubbles
Air bubbles appear when trapped under the vinyl. Use a squeegee to push them out gently. Start from the center and move toward the edges. Work slowly to avoid tearing the wrap. For tiny bubbles, use a pin to release air carefully. Press the area flat after releasing the air.
Handling Wrinkles
Wrinkles happen when the vinyl folds during application. Warm the vinyl slightly with a heat gun. This makes the material soft and flexible. Stretch and smooth the vinyl using a squeegee or your hand. Avoid harsh stretching to prevent damage. Work from the center outward to flatten wrinkles.
Sealing Edges
Edges are prone to lifting without proper sealing. Use a heat gun to warm edges gently. Press edges firmly with a squeegee to secure them. Make sure edges are clean and dry before sealing. Consider using edge sealant for extra hold. Proper sealing protects your wrap from dirt and moisture.
Finishing Touches
Finishing touches are key to a clean and lasting vinyl wrap on your car. This stage ensures the wrap looks smooth and stays in place. Taking time here can prevent peeling and damage later. Follow these steps carefully for the best results.
Trimming Excess Vinyl
Use a sharp blade to trim extra vinyl around edges. Cut slowly to avoid damaging the paint. Hold the blade at a low angle for smooth cuts. Focus on door edges, mirrors, and bumpers. Remove all loose vinyl to prevent lifting over time.
Post-application Heating
Heat the vinyl with a heat gun or hair dryer. Warm it evenly to help it stick better. Heat softens the vinyl, allowing it to stretch around curves. Avoid overheating as it can cause bubbles or damage. Gently press the wrap down as it cools.
Protecting The Wrap
Keep your car away from harsh weather for the first few days. Wash gently using mild soap and water. Avoid automatic car washes with brushes. Apply a vinyl-safe sealant to add extra protection. This helps maintain color and prevents dirt buildup.
Maintaining Your Wrap
Maintaining your vinyl wrap helps keep your car looking fresh and new. Proper care extends the life of the wrap and protects your investment. Simple steps can prevent damage and keep the colors bright.
Cleaning Tips
Use a soft cloth or sponge for cleaning your wrap. Wash with mild soap and water only. Avoid harsh chemicals or abrasive cleaners. Clean your car gently to avoid scratching the wrap. Rinse well to remove all soap residue. Dry with a soft towel to prevent water spots.
Avoiding Damage
Park your car in shaded areas to avoid sun damage. Keep away from sharp objects that can scratch the surface. Avoid automatic car washes with brushes. Use touchless car washes or wash by hand. Do not use high-pressure water too close to the edges.
Repairing Minor Issues
Small tears or bubbles can appear over time. Use a heat gun on low setting to smooth bubbles. Gently lift edges to fix minor tears and press back carefully. For larger problems, seek professional help. Quick repairs prevent bigger damage later.
Common Mistakes To Avoid
Applying a vinyl wrap on your car can change its look instantly. Many try this DIY project but make common mistakes. These errors can cause bubbles, wrinkles, or peeling. Avoiding these pitfalls ensures a smooth, lasting finish. Below are key mistakes to watch out for.
Skipping Preparation
Preparation is the most important step. Clean the car surface thoroughly. Dust, dirt, or grease stop the vinyl from sticking well. Use soap and water, then dry completely. Remove old wax or polish with a cleaner. Without proper prep, the wrap can peel quickly.
Improper Application
Applying vinyl too fast leads to bubbles and wrinkles. Work slowly and carefully. Use a squeegee to smooth out air pockets. Stretch the vinyl only a little to avoid damage. Cut excess vinyl with a sharp blade. Wrong application spoils the wrap’s look and durability.
Ignoring Maintenance
Vinyl wrap needs care to last long. Wash your car gently with mild soap. Avoid harsh chemicals or abrasive brushes. Park in shaded areas to protect from sun damage. Regular care keeps the wrap bright and intact. Neglecting maintenance causes fading and cracking.

Credit: wrapguys.com
Frequently Asked Questions
What Tools Do I Need To Apply Vinyl Wrap On My Car?
You need a squeegee, heat gun, utility knife, cleaning solution, and microfiber cloth. These tools help smooth out bubbles and ensure proper adhesion during application.
How Long Does Vinyl Wrap Last On A Car?
Vinyl wraps typically last 5 to 7 years with proper care. Longevity depends on material quality, installation, and exposure to weather conditions.
Can I Remove Vinyl Wrap Without Damaging My Car’s Paint?
Yes, if applied correctly, vinyl wrap can be removed without paint damage. Use heat to soften the adhesive and peel slowly to avoid harm.
Is Professional Installation Better Than Diy Vinyl Wrapping?
Professional installation ensures a smooth, bubble-free finish and saves time. DIY wrapping is cost-effective but requires skill and patience to avoid errors.
Conclusion
Vinyl wrapping a car can refresh its look without much cost. Take your time to clean and prepare the surface well. Use the right tools and heat to apply the wrap smoothly. Small bubbles or wrinkles? Smooth them out gently as you go.
Practice patience; the process gets easier with experience. A well-done vinyl wrap protects your car’s paint and adds style. Try it yourself and enjoy a fresh, new car appearance.