
If you own a 2019 Equinox, you know how important it is to keep your vehicle looking sharp and protected. Adding body side moldings is a simple upgrade that can prevent dings and scratches while giving your car a sleek, finished look.
But how do you attach these moldings correctly so they stay secure and look great? You’ll find step-by-step guidance that makes the process easy, even if you’re new to car modifications. By the end, you’ll have the confidence to enhance your Equinox’s style and protection in no time.
Keep reading to discover the best way to attach body side moldings and avoid common mistakes that could cost you later.

Credit: www.ebay.com
Tools And Materials Needed
Attaching body side moldings to your 2019 Equinox requires some basic tools and materials. Having the right items ready makes the job easier and safer. You will save time and avoid mistakes with proper preparation.
Gather everything before starting. This keeps the process smooth and helps you stay focused. Each tool and material plays an important role in getting the moldings attached correctly.
Required Tools
- Clean cloth or microfiber towel
- Isopropyl alcohol or surface cleaner
- Measuring tape or ruler
- Masking tape
- Plastic trim removal tool or flat tool
- Heat gun or hairdryer
- Rubber gloves
These tools help clean, measure, and apply the moldings safely. A heat gun warms the adhesive for better sticking. Use gloves to avoid fingerprints or damage.
Choosing The Right Moldings
Pick moldings made for the 2019 Equinox model. Exact fit moldings avoid gaps or loose spots. Look for OEM or high-quality aftermarket options.
Check the color and finish match your vehicle’s paint. Some moldings come with adhesive pre-applied. This makes installation faster and neater.
Ensure the moldings come with clear instructions. This guides you through the steps without confusion.
Preparing The Vehicle
Preparing your 2019 Equinox for new body side moldings is essential. A clean, smooth surface helps the moldings stick properly. This step saves time and prevents future problems. Start by making sure the vehicle is ready for work.
Cleaning The Surface
Use soap and water to wash the area where moldings will go. Dirt and grease stop the adhesive from sticking well. Dry the surface completely with a clean cloth. For best results, wipe the spot with rubbing alcohol. This removes any leftover oils or wax. A clean surface ensures the moldings stay firm and last long.
Removing Old Moldings
Check for any old moldings or adhesive on your Equinox. Gently pull off old moldings to avoid damage. Use a plastic scraper to lift stubborn pieces. Clean off sticky residue with an adhesive remover. Take your time to avoid scratching the paint. Removing old moldings creates a smooth base for new ones.
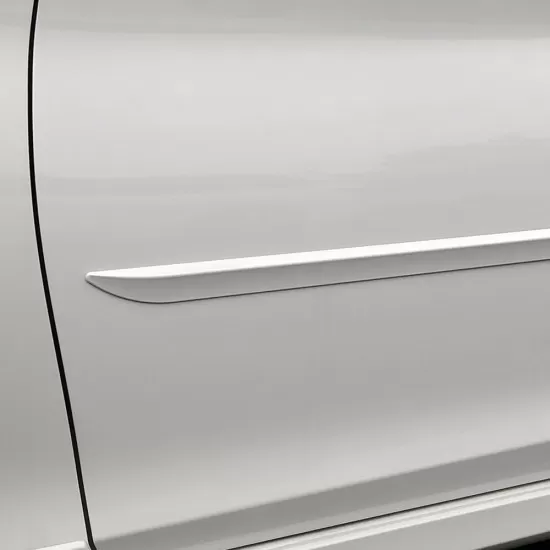
Positioning The Moldings
Positioning the body side moldings on your 2019 Equinox is a key step for a clean look. Proper placement ensures the moldings stick well and look natural. Take your time to place them carefully before attaching.
Aligning The Moldings
Start by holding the molding near the door where it will go. Check the edges and curves of the car body. Make sure the molding matches the shape without bending or gaps. Keep the molding straight and even along the door panel. This step helps avoid crooked or loose fitting moldings.
Marking Placement Points
Use a pencil or masking tape to mark where the molding will sit. Mark spots at the start, middle, and end of the molding. These points guide you during attachment and keep the molding in the right place. Double-check marks on both sides for symmetry. Accurate marks save time and prevent mistakes.
Attaching The Moldings
Attaching the body side moldings on a 2019 Equinox needs care and precision. Proper attachment ensures the moldings stay firm and look great. The process involves applying adhesive and then securing the moldings carefully to the vehicle. Follow these steps for a strong, clean fit.
Applying Adhesive
Start with a clean surface. Wash the area where the moldings will go. Dry it completely to help the adhesive stick better. Use an adhesive designed for automotive moldings. Apply a thin, even layer on the back of each molding piece. Avoid putting too much adhesive; it can cause mess and weak bonds.
Wait a few minutes after applying the adhesive. This helps it become tacky. Tackiness improves the grip on the car’s surface. Do not let the adhesive dry out completely before attaching.
Securing The Moldings
Place the molding carefully on the car. Align it with the original marks or edges. Press firmly along the entire length to remove air bubbles. Use gentle pressure to avoid bending or damaging the molding. Hold the molding in place for a few minutes. This gives the adhesive time to bond.
For extra security, use painter’s tape to hold the moldings while the adhesive cures. Leave the tape on for at least 24 hours. Avoid washing the car or exposing it to rain during this time. This ensures the moldings stay attached and look perfect.
Finishing Touches
Finishing touches are important after attaching body side moldings on your 2019 Equinox. They ensure the moldings fit well and look neat. These final steps help avoid problems later. Taking time here makes your work last longer and look professional.
Checking For Gaps
Check the edges of the moldings closely. Look for any spaces between the molding and the car body. Small gaps can cause water leaks or dirt buildup. Press the molding gently to see if it sticks firmly. If you find gaps, apply more adhesive or adjust the molding carefully. A tight fit keeps the molding secure and improves the car’s appearance.
Cleaning Excess Adhesive
Clean any glue that has squeezed out from under the molding. Use a soft cloth dampened with rubbing alcohol or a gentle cleaner. Avoid harsh chemicals that may damage the paint. Remove all sticky residue to keep the surface smooth. This step helps the molding look clean and well-installed. It also stops dirt from sticking to leftover adhesive.

Credit: www.shopsar.com
Tips For Long-lasting Attachment
Attaching body side moldings to your 2019 Equinox needs care to last long. Proper steps help keep the moldings in place and prevent damage. Simple tips make the attachment stronger and more durable. Follow these ideas to protect your vehicle and keep it looking sharp.
Avoiding Common Mistakes
Clean the surface thoroughly before attaching the molding. Dirt or oil stops the adhesive from sticking well. Use rubbing alcohol or a mild cleaner for best results. Avoid touching the adhesive side with your fingers. This can reduce its stickiness.
Do not attach moldings in very cold or hot weather. Extreme temperatures affect the glue’s strength. Aim for a dry day with mild temperatures. Press the molding firmly for at least 30 seconds. This ensures a good bond with the car surface.
Maintenance Advice
Check the moldings regularly for loose spots or damage. Clean them gently with soap and water. Avoid harsh chemicals that can weaken the adhesive. Dry the area completely after washing.
Park your car in shade when possible. Direct sunlight can weaken the glue over time. If moldings start to peel, fix them quickly using adhesive tape or glue made for car parts. Timely care keeps moldings tight and secure.
Credit: www.dawn-ent.com
Frequently Asked Questions
How Do I Prepare The 2019 Equinox For Body Side Molding?
Clean the surface thoroughly with soap and water. Dry it completely. Remove old adhesive residue using rubbing alcohol. This ensures strong adhesion for the new moldings.
What Tools Are Needed To Attach Body Side Moldings?
You will need adhesive promoter, cleaning cloth, masking tape, and the moldings themselves. A heat gun can help with adhesion. These tools make installation easier and more secure.
How Long Does It Take To Install Body Side Moldings?
The installation typically takes 30 to 45 minutes. This includes surface preparation and precise placement. Drying time for adhesive may vary, so avoid driving immediately.
Can I Attach Moldings Without Professional Help?
Yes, the process is straightforward and suitable for DIY. Follow the instructions carefully for proper adhesion. Using the right tools ensures a neat finish.
Conclusion
Attaching body side moldings on your 2019 Equinox is simple and clear. Clean the surface well before starting. Align the molding carefully to avoid mistakes. Press firmly to secure it in place. Taking your time makes the job easier and better.
This small upgrade protects your car and improves its look. Now, you can enjoy a neat, finished appearance without stress. Try it yourself and see the difference it makes.


