If you love keeping your car spotless, you’ve probably seen those thick, fluffy foam layers from auto wash foam cannons and wondered how they make that magic happen. Getting that rich foam isn’t just about looking cool—it helps clean your vehicle better, saving you time and effort.
You’ll discover exactly how foam cannons create that perfect foam, so you can use yours like a pro and get the best results every time. Ready to unlock the secret behind those foamy clouds? Let’s dive in!
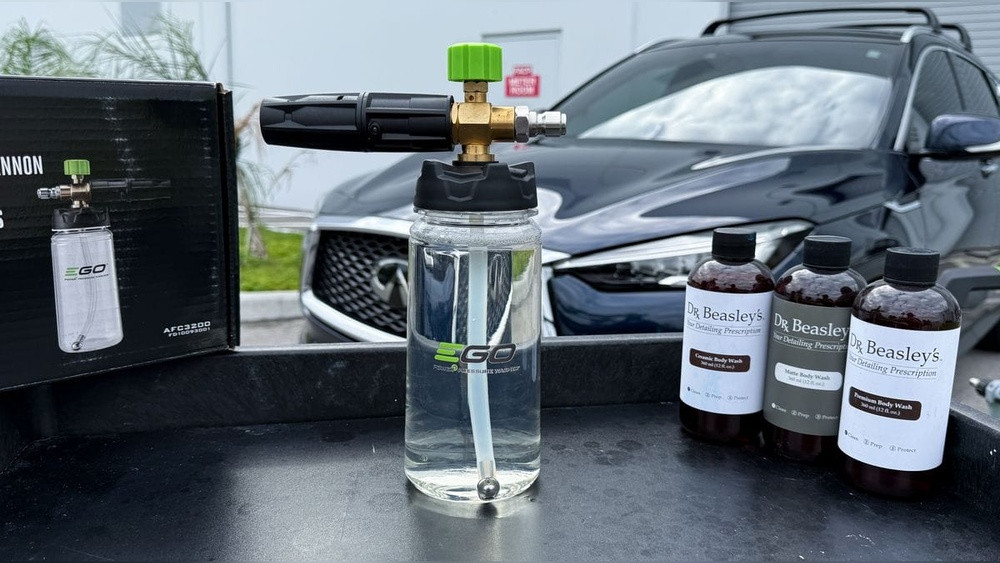
Credit: adamspolishes.com
Foam Cannon Basics
Understanding foam cannon basics helps you get the best car wash results. Foam cannons create thick foam that clings to your vehicle. This foam lifts dirt and grime gently from the surface. Knowing how they work makes washing easier and safer for your car’s paint.
Let’s explore what a foam cannon is, its key parts, and how it produces foam.
What Is A Foam Cannon
A foam cannon is a tool for car cleaning. It attaches to a pressure washer or garden hose. The cannon mixes soap and water to create foam. This foam covers the car in a thick, bubbly layer. It helps break down dirt before rinsing.
Key Components
A foam cannon has a few main parts. There is a soap container to hold cleaning solution. A nozzle controls the spray pattern and foam thickness. A mixing chamber blends air, soap, and water. A connector links the cannon to the water source.
How Foam Cannons Work
Water flows into the foam cannon under pressure. It pulls soap from the container into the mixing chamber. Air mixes with the soap and water, creating bubbles. The nozzle sprays this bubbly foam onto the car. The thick foam sticks to surfaces, cleaning gently.
Types Of Auto Wash Foam Cannons
Auto wash foam cannons come in several types. Each type uses a different method to create thick foam. Choosing the right foam cannon depends on your cleaning needs and tools. Understanding these types helps you pick the best one for your car wash routine.
Pressure Washer Foam Cannons
Pressure washer foam cannons connect directly to a pressure washer. They use high water pressure to mix soap and air. This creates dense foam that sticks well to surfaces. These cannons deliver a powerful spray, perfect for tough dirt. They require a pressure washer for operation.
Garden Hose Foam Cannons
Garden hose foam cannons attach to a regular garden hose. They use water pressure from the hose to make foam. The foam is lighter compared to pressure washer types. These cannons work well for light cleaning tasks. They are easy to use and affordable.
Electric Foam Cannons
Electric foam cannons have a built-in pump to create foam. They do not need a pressure washer or hose pressure. Simply fill the tank with soap and water, then turn it on. These cannons produce consistent foam at the push of a button. They are convenient for quick and easy car washes.
Choosing The Right Foam Solution
Choosing the right foam solution is key to getting the best results from your auto wash foam cannon. The right soap helps create thick foam that sticks well to your vehicle. It also protects your paint and makes cleaning easier. Understanding the basics of foam soap ingredients, pH levels, and dilution ratios will help you pick the best product.
Foam Soap Ingredients
Foam soaps contain surfactants that trap air and water to form foam. These surfactants lift dirt and grime without scratching surfaces. Look for biodegradable and gentle ingredients. Harsh chemicals can damage paint and clear coats. Some soaps also have conditioners to protect wax or sealants on your car.
Ph Levels And Safety
The pH level of your foam solution affects its safety on paint. A neutral pH around 7 is safe for most finishes. Acidic or highly alkaline soaps might clean well but can harm your car’s surface. Choose a foam soap with a balanced pH to avoid dulling or stripping wax layers. Always check the label for pH information.
Dilution Ratios
Dilution ratio means how much water you mix with the foam soap. Follow the instructions on the soap bottle carefully. Too much soap can leave residue. Too little soap makes weak foam. Correct dilution ensures thick foam and proper cleaning power. Adjust the ratio slightly for your foam cannon’s pressure and nozzle size.
Setting Up Your Foam Cannon
Setting up your foam cannon correctly is key to getting thick, rich foam for your car wash. It ensures that the foam mixes well and sprays evenly. This section guides you through the basic steps for a proper setup.
Attaching To Your Equipment
Start by connecting the foam cannon to your pressure washer. Make sure the connection is tight to avoid leaks. Attach the cannon’s quick-connect fitting to the pressure washer’s spray gun. Check that the O-ring is in place to prevent water from escaping. A secure fit helps maintain pressure and foam quality.
Adjusting Nozzle Settings
Adjust the nozzle to control foam thickness and spray pattern. Turn the knob on top to change foam density. A wider spray covers more area but may produce thinner foam. A narrow spray targets small spots with thicker foam. Experiment with settings to find what works best for your cleaning task.
Mixing Foam Solution
Fill the foam cannon’s bottle with water and add foam soap. Use the recommended soap amount on the product label. Too much soap can clog the cannon or create weak foam. Mix gently to avoid bubbles before spraying. Proper mixing helps create thick, lasting foam for a better wash.
Creating Thick Foam
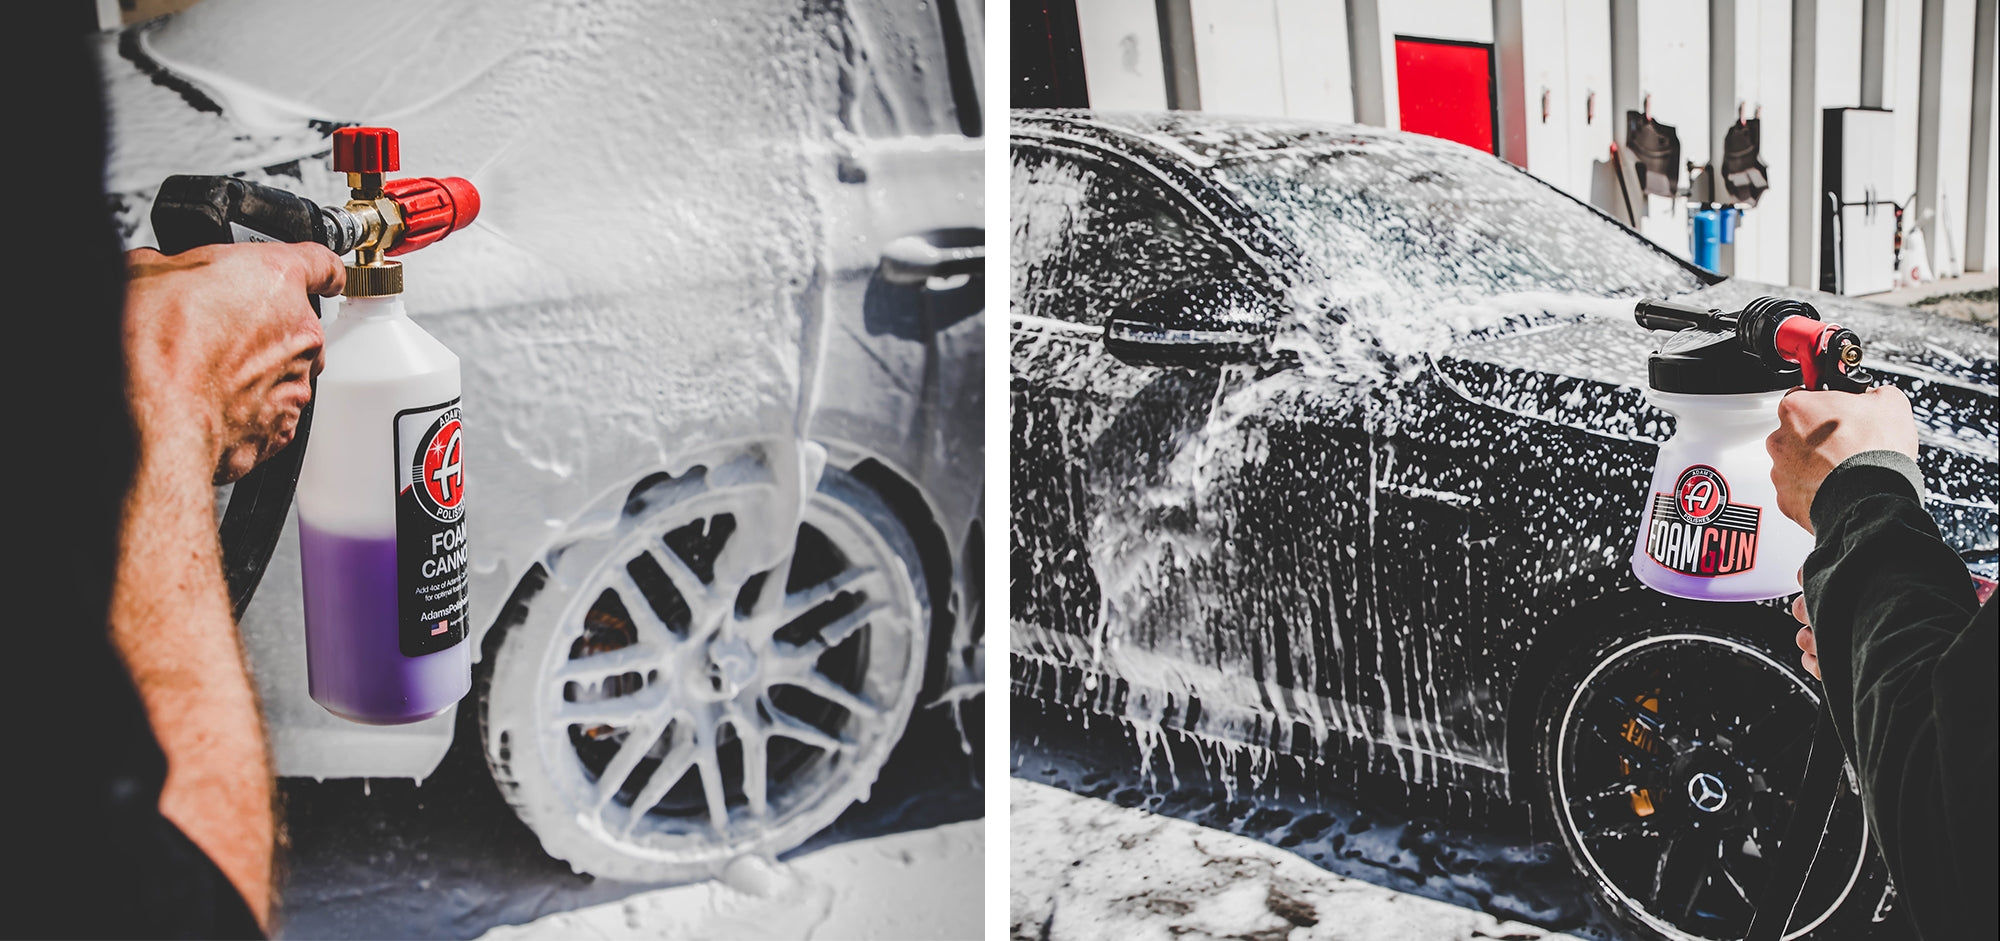
Creating thick foam is key to effective car washing with foam cannons. The foam clings to the vehicle’s surface, lifting dirt and grime safely. The quality of foam depends on several factors. Understanding these helps you get the best results from your foam cannon.
Pressure And Water Flow
Pressure pushes the foam out of the cannon. Higher pressure creates finer bubbles. This leads to thicker, denser foam. Water flow must balance with pressure. Too much flow thins the foam. Too little flow stops foam production. A steady, strong pressure and flow work best.
Foam Solution Concentration
The soap mix affects foam thickness. More soap in the solution makes richer foam. Use the recommended soap concentration on the label. Overloading soap can cause runny foam. Too little soap results in weak foam. Find the right balance for thick, lasting foam.
Temperature Effects
Water temperature changes foam quality. Warm water helps soap dissolve better. It creates smoother, creamier foam. Cold water can make foam thin and weak. Avoid very hot water; it breaks foam bubbles. Use lukewarm water for the best foam texture.
Applying Foam To Your Vehicle
Applying foam to your vehicle is the first step in a thorough car wash. Foam cannons create thick foam that clings to the car’s surface. This foam lifts dirt and grime, making cleaning easier and safer for your paint. Understanding how to apply foam correctly helps protect your vehicle and gets better results.
Optimal Spray Techniques
Hold the foam cannon about 12 to 18 inches from the car. Spray evenly in slow, sweeping motions. Avoid staying in one spot too long to prevent foam from running off. Cover the entire car, including hard-to-reach areas like mirrors and wheels. Use a consistent speed for uniform foam coverage.
Coverage Tips
Start spraying from the top and work your way down. The foam slides down, carrying dirt with it. Check for missed spots and spray again if needed. Use enough foam to create a thick layer but not so much it drips immediately. Proper coverage ensures all dirt loosens before rinsing.
Allowing Foam Dwell Time
Let the foam sit on the car for 5 to 10 minutes. This dwell time breaks down dirt and grime gently. Avoid letting foam dry on the surface, as it can leave marks. Rinse off the foam thoroughly with water after the dwell time ends. This step helps keep your paint clean and safe.
Common Foam Cannon Issues
Foam cannons are great tools for washing cars quickly and effectively. Yet, they can face common problems that stop them from working well. Knowing these issues helps you fix them fast and keep your foam thick and strong. Below are some frequent problems users face with foam cannons.
Weak Foam Production
Weak foam happens when the foam mix is too thin or the soap is not strong enough. Low water pressure also causes weak foam. Check the soap type and amount. Make sure the pressure washer is working well.
Leaking And Drips
Leaks happen if the seals or connectors are loose or broken. Drips waste soap and reduce foam. Tighten all connections. Replace worn-out seals or O-rings. Keep the foam cannon clean after use to prevent leaks.
Clogged Nozzles
Nozzles clog due to dirt or soap residue build-up. This blocks foam flow and reduces pressure. Clean nozzles often with warm water. Use a small brush or needle to clear blockages. Regular cleaning keeps foam strong and smooth.
Maintenance And Care
Proper maintenance and care keep your auto wash foam cannon working well. Regular attention prevents damage and ensures smooth foam production. Simple steps after each use extend the life of your device.
Cleaning After Use
Flush the foam cannon with clean water after every wash. This removes soap residue and stops clogs. Use warm water to rinse all parts thoroughly. Avoid harsh chemicals that can damage seals. Dry the cannon before storing to prevent rust.
Storing Your Foam Cannon
Store the foam cannon in a dry, cool place. Keep it away from direct sunlight to protect plastic parts. Make sure no water is left inside to avoid mold. Use a container or bag to keep dust out. Proper storage helps maintain foam quality.
Replacing Parts
Check the nozzle and seals regularly for wear. Replace any damaged parts quickly to keep foam strong. Use only parts made for your model. Keep spare parts handy for quick repairs. Regular replacement saves money and avoids bigger problems.
Enhancing Foam Performance
Enhancing the foam performance of auto wash foam cannons improves cleaning results. Better foam clings longer to surfaces. It captures dirt and grime more effectively. Small changes can make a big difference in foam quality and thickness.
Using Additives
Additives help create thicker and longer-lasting foam. Some additives increase foam stability and shine. Use them carefully to avoid damaging the paint or finish. Test new additives on a small area first. Follow manufacturer instructions for the best results.
Upgrading Equipment
Better nozzles and pumps improve foam output. High-quality foam cannons create denser foam. Choose equipment that matches your water pressure. Upgraded gear uses less soap and water. It saves money and protects the environment.
Seasonal Adjustments
Weather affects foam performance. Cold water reduces foam thickness in winter. Use warmer water or adjust soap concentration. In hot weather, foam can dry too fast. Increase water flow to keep foam wet longer. Adjust settings to match seasonal needs.

Credit: 3dproducts.com

Credit: www.swiftjetusa.com
Frequently Asked Questions
How Do Auto Wash Foam Cannons Create Thick Foam?
Auto wash foam cannons mix soap and water with air under pressure. This process creates dense foam that clings well to surfaces, improving cleaning efficiency and reducing water usage.
What Soap Type Works Best For Foam Cannons?
Use high-quality, pH-balanced car wash soap. Avoid harsh detergents or dish soaps as they can damage paint and reduce foam quality.
Can I Adjust Foam Thickness In Foam Cannons?
Yes, you can adjust the foam by changing soap concentration and water pressure. Higher soap levels and lower pressure usually produce thicker foam.
How Often Should I Clean My Foam Cannon?
Clean your foam cannon after every use. Rinse thoroughly with clean water to prevent soap buildup and maintain optimal performance.
Conclusion
Auto wash foam cannons create thick foam using air, water, and soap. They mix these elements inside the cannon quickly. The foam sticks to surfaces, helping to clean better. Using the right soap and pressure improves foam quality. Regular cleaning of the cannon keeps it working well.
Knowing how foam cannons work helps you get cleaner results. Foam cannons save time and make washing easier. Simple steps lead to better car washing with foam. Try to keep your foam cannon in good shape for best use.


