
If you’ve just installed new rotors and brakes on your vehicle, you might be wondering how to make sure they last longer and work their best. Properly breaking in your new brakes isn’t just a good idea—it’s essential for your safety and your car’s performance.
In this guide, you’ll discover simple steps that help you avoid common mistakes, reduce noise, and get smooth, reliable stopping power every time you hit the road. Keep reading to learn exactly how to break in your new rotors and brakes like a pro.
Why Break-in Matters
Breaking in new rotors and brakes is a crucial step after installation. It helps the parts work well and last longer. Proper break-in improves how the brakes respond and keeps driving safe. Skipping this step can reduce brake power and cause uneven wear. Understanding why break-in matters helps you care for your vehicle better.
Impact On Brake Performance
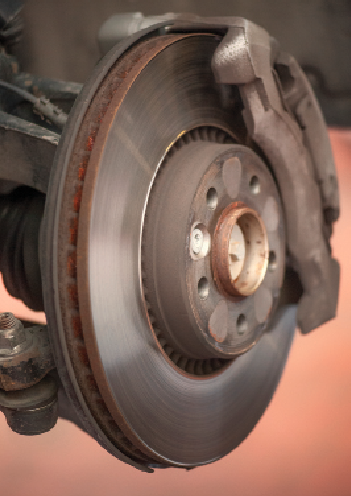
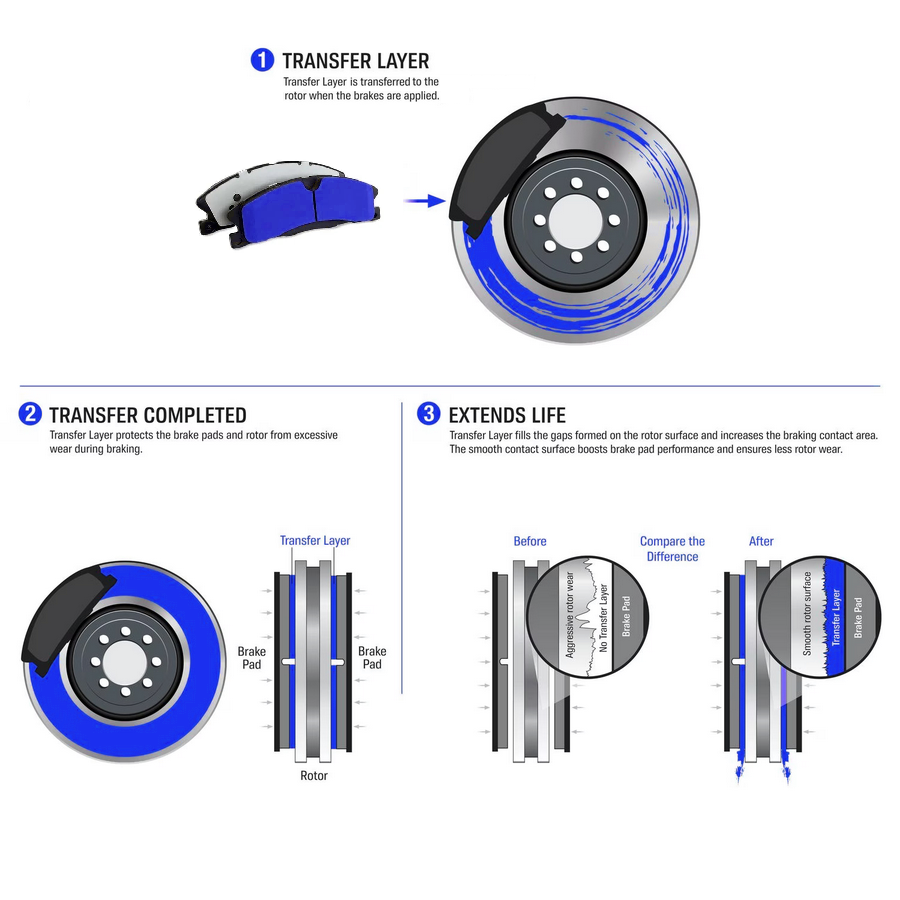
New rotors and pads have rough surfaces. They need to wear evenly to create smooth contact. Proper break-in helps build a thin layer of brake pad material on the rotor. This layer improves grip and stopping power. Without break-in, brakes may feel weak or make noises. Good break-in means better control and smoother stops.
Longevity Of Rotors And Pads
Breaking in rotors and pads reduces the chance of warping. Warped rotors cause vibration and uneven wear. Proper break-in spreads heat evenly during stops. This prevents cracks and extends part life. Brake pads wear down more evenly too. Careful break-in saves money by making parts last longer.
Safety Considerations
New brakes may not perform fully right after installation. Proper break-in ensures brakes reach full strength quickly. This improves your ability to stop safely in emergencies. Uneven brake surfaces can cause pulling or skidding. Break-in reduces these risks. Safe braking protects you, passengers, and others on the road.
Credit: www.buybrakes.com
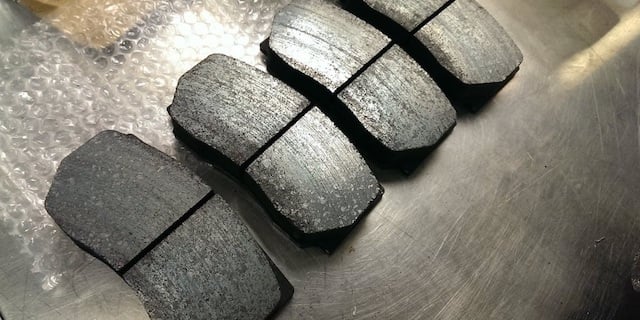
Preparing For Break-in
Preparing for the break-in of new rotors and brakes is a key step. This stage helps ensure the parts work well and last longer. Proper preparation also improves your safety on the road. Taking time now saves problems later.
Tools And Equipment Needed
Gather the right tools before starting. You will need a jack and jack stands to lift the car. A lug wrench helps remove the wheels. Have a torque wrench to tighten bolts correctly. Keep brake cleaner and a clean cloth ready. These tools make the job easier and safer.
Safety Precautions
Safety is very important. Work on a flat surface and use wheel chocks. Wear safety glasses to protect your eyes. Use gloves to keep your hands clean and safe. Never rely only on the jack; always use jack stands. Check that the car is stable before starting work.
Initial Inspection Steps
Start by checking the new rotors and brake pads. Look for any damage or dirt on the parts. Clean the rotors with brake cleaner and a cloth. Inspect the brake lines for leaks or cracks. Make sure all bolts are tight but not over-tightened. This step ensures everything is ready for break-in.
Step-by-step Break-in Process
Breaking in new rotors and brakes is vital for safety and performance. This process helps parts fit together well. It also prevents damage and uneven wear. Follow these clear steps for a smooth break-in.
Gradual Speed Increases
Start driving slowly. Avoid sudden stops or fast speeds. Gradually increase your speed over several miles. This lets brake parts warm up evenly. It helps build a smooth surface on the rotors. Take your time during this phase.
Controlled Braking Techniques
Use gentle, steady pressure on the brake pedal. Avoid hard or sudden braking at first. Press brakes firmly but smoothly several times. This helps the brake pads and rotors bond. Repeat this process to create even wear. Controlled braking improves brake grip and lifespan.
Cooling Periods Between Stops
Allow brakes to cool between stops. Avoid stopping for long times with brakes applied. Cooling prevents overheating and warping of rotors. Drive slowly for a short distance after braking. This helps air flow cool the brake parts. Cooling periods protect your brakes from damage.
Credit: www.counterman.com
Common Mistakes To Avoid
Breaking in new rotors and brakes is important for safety and performance. Many people make mistakes that can cause problems later. Avoiding these common errors helps your brakes last longer and work better.
Hard Braking Too Soon
Stopping very hard right after installing new brakes is a big mistake. It can cause uneven wear and reduce brake life. Give the brakes time to settle by braking gently for the first few hundred miles.
Ignoring Manufacturer Recommendations
Manufacturers provide clear instructions for breaking in brakes. Ignoring these can lead to poor braking and damage. Follow their advice carefully to keep your brakes in good shape.
Overheating Rotors
Overheating happens when brakes are used too hard without rest. It can warp the rotors and cause vibrations. Avoid long, heavy braking during the break-in period to keep rotors cool.
Signs Of Proper Break-in
Knowing the signs of a proper break-in helps you check if your new rotors and brakes work well. Proper break-in means better safety and longer brake life. This section explains what to watch for after installing new brake parts. These signs show that the brakes are settling in correctly.
Improved Brake Responsiveness
Your brakes should feel sharper and more responsive. Press the pedal lightly and notice how quickly the car slows down. Smooth, quick stopping means the rotors and pads are bonding well. No delay or softness in the brake pedal is a good sign.
Even Pad Wear
Check the brake pads after several uses. Pads should wear evenly on both sides of the rotor. Uneven wear means the brakes are not working properly. Even wear shows the pads and rotors are making consistent contact.
Reduced Noise And Vibration
New brakes may sound noisy at first. Listen for less squealing or grinding after some use. Vibrations in the brake pedal or steering wheel should also decrease. Quiet and smooth braking means the parts are fitting well together.
Credit: www.brakes-shop.com
Maintaining Brakes After Break-in
Maintaining brakes after break-in is key to long-lasting performance. New rotors and pads need care to stay effective. Proper upkeep helps avoid costly repairs and keeps driving safe.
Clean parts and check regularly. Small issues become big problems if ignored. A simple routine can extend brake life and improve stopping power.
Routine Inspection Tips
Look at your brakes every month. Check pads for thickness and rotors for damage. Listen for strange noises like squeaking or grinding. Feel for vibrations when braking. These signs show wear or trouble.
Use a flashlight to see brake parts clearly. Remove dirt and dust gently. Tighten any loose bolts. Early checks catch problems fast.
When To Replace Pads Or Rotors
Replace pads if thickness falls below 3 millimeters. Thin pads reduce braking power and damage rotors. Change rotors if warped or scored deeply. Warped rotors cause shaking during braking.
Also replace parts if braking noise is loud or constant. Delayed replacement risks bigger damage and more cost.
Cleaning And Care Advice
Keep brakes clean for best performance. Use brake cleaner spray to remove dust and grease. Avoid water or household cleaners that may cause rust.
Do not touch rotor surface with bare hands. Oils from skin reduce brake grip. Wipe with a clean cloth if needed.
Store vehicles in dry places to prevent rust. Regular cleaning keeps brakes ready and safe.
Frequently Asked Questions
How Long Does It Take To Break In New Rotors And Brakes?
Breaking in new rotors and brakes typically takes about 300 to 500 miles. This process ensures optimal performance and longevity. Gradually apply brakes with moderate pressure to evenly bed the pads and rotors. Avoid hard braking during this period to prevent uneven wear or damage.
What Is The Best Way To Break In New Brakes?
The best way to break in new brakes is through gentle, repetitive braking. Apply brakes smoothly from moderate speeds without coming to a complete stop initially. This method helps transfer an even layer of brake pad material onto the rotor surface, improving braking efficiency and reducing noise.
Can I Drive Normally After Installing New Rotors?
You should drive cautiously after installing new rotors. Avoid hard stops and high speeds for the first few hundred miles. This careful driving helps properly bed the brakes and rotors, preventing premature wear and ensuring safe, reliable braking performance over time.
Why Is Breaking In New Rotors Important?
Breaking in new rotors ensures even pad material transfer and rotor surface conditioning. This process reduces brake noise, vibrations, and improves overall braking efficiency. Proper break-in extends rotor and brake pad life, providing safer and more consistent stopping power on the road.
Conclusion
Breaking in new rotors and brakes takes care and time. Start slowly and avoid hard stops at first. This helps parts fit together and work well. Good brake bedding improves safety and extends part life. Remember, patience now saves you trouble later.
Follow the steps carefully for smooth, quiet braking. Your car will respond better and last longer. Simple actions make a big difference on the road. Take your time and drive safely every day.


