

If you own a Kawasaki Mule, keeping it running smoothly is probably one of your top priorities. One key part that often gets overlooked is the fuel filter.
A clogged or dirty fuel filter can cause your Mule to lose power or even stall when you need it most. But don’t worry—you don’t need to be a mechanic to change it yourself. In this guide, you’ll learn exactly how to change the fuel filter on your Kawasaki Mule step-by-step, saving you time and money.
Keep reading, and you’ll have your Mule performing at its best in no time.
Tools And Materials Needed
Changing the fuel filter on a Kawasaki Mule requires specific tools and materials. Having the right items makes the job easier and safer. Prepare everything before starting to avoid interruptions. This section lists all essentials for the task.
Basic Hand Tools
You need a set of wrenches, usually metric sizes. A screwdriver, both flathead and Phillips, helps remove clamps. Pliers are useful for gripping and pulling hoses. Keep these tools within reach for quick access.
Replacement Fuel Filter
Choose the correct fuel filter for your Kawasaki Mule model. Using the exact replacement ensures proper fit and function. Check the part number before buying to avoid mistakes.
Fuel Container
Use a container to catch any fuel that spills during the change. This helps keep the workspace clean and safe. Avoid open flames nearby to prevent accidents.
Rags And Gloves
Rags help wipe up fuel spills quickly. Wear gloves to protect your hands from fuel and dirt. This keeps you clean and reduces skin irritation risks.
Safety Glasses
Safety glasses protect your eyes from fuel splashes. Always wear them during the fuel filter change. Eye protection is crucial for safety.

Credit: www.powersportskawasaki.com
Locate The Fuel Filter
Before changing the fuel filter on a Kawasaki Mule, you must find its exact location. The fuel filter cleans the fuel before it reaches the engine. A clogged filter can cause poor engine performance. Knowing where the filter sits makes the replacement easier and faster.
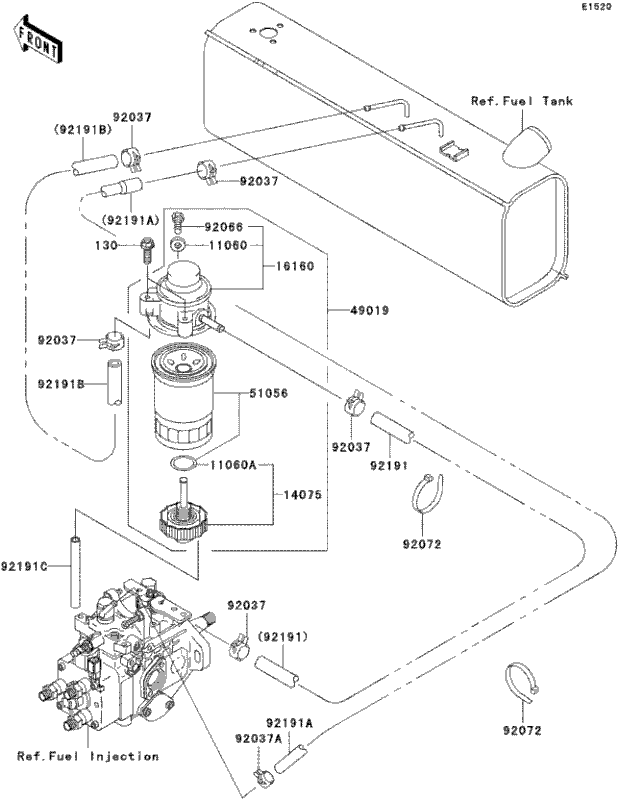
The fuel filter on a Kawasaki Mule is usually near the fuel tank or along the fuel line. It looks like a small, clear or metal cylinder. Sometimes it has plastic fittings on each end. Identifying the right part helps avoid mistakes.
Check Near The Fuel Tank
Start by opening the hood or side panel of your Mule. Look close to the fuel tank area. The filter often attaches to the fuel line coming out of the tank. It should be visible without removing many parts.
Follow The Fuel Line
Trace the fuel line from the tank towards the engine. The fuel filter is installed along this line. It can be closer to the tank or near the carburetor or fuel injection system. Follow the hose carefully to spot the filter.
Identify The Fuel Filter Shape
The fuel filter is small and cylindrical. Some models have a transparent plastic body. Others use a metal case. The key sign is its position in the fuel line and the fittings at both ends.
Use The Owner’s Manual
The Kawasaki Mule owner’s manual has a diagram of the fuel system. It shows the exact location of the fuel filter. This guide helps confirm what you see. Manuals are easy to find online if lost.
Prepare The Mule For Maintenance
Preparing your Kawasaki Mule for fuel filter maintenance is a key step. It ensures safety and smooth work. Taking time to get ready saves problems later.
Follow these steps carefully. They help protect you and your Mule during the process.
Park The Mule On A Flat Surface
Choose a flat and stable area to park your Mule. This stops it from moving or tipping. A level surface also helps fuel drain properly.
Turn Off The Engine And Remove The Key
Switch off the engine completely. Take out the key to avoid accidental starts. This step keeps you safe while working.
Allow The Engine To Cool Down
Wait at least 30 minutes for the engine to cool. Hot parts can burn your skin. Cooling makes the job safer and easier.
Gather Necessary Tools And Materials
Collect all tools before starting. You will need wrenches, screwdrivers, and a new fuel filter. Having everything ready speeds up the work.
Wear Safety Gear
Put on gloves and safety glasses. Fuel can irritate skin and eyes. Protect yourself from spills and splashes.
Remove The Old Fuel Filter
Changing the fuel filter on your Kawasaki Mule starts with removing the old one. This step is important to keep the engine clean and running well. The fuel filter catches dirt and debris from the fuel before it reaches the engine.
Removing the old filter carefully helps avoid fuel spills and damage. Follow these simple steps to disconnect the fuel lines and remove the filter housing.
Disconnect Fuel Lines
First, locate the fuel lines connected to the filter. Use pliers to squeeze the clamps gently. Slide the clamps away from the filter to free the hoses. Pull the fuel lines off slowly to avoid breaking them. Keep a cloth handy to catch any spilled fuel.
Remove Filter Housing
Next, find the bolts or clips holding the filter housing in place. Use a wrench or screwdriver to remove them carefully. Lift the housing straight off to avoid spilling fuel. Take out the old fuel filter from the housing. Dispose of the old filter properly.
Install The New Fuel Filter
Installing the new fuel filter on your Kawasaki Mule is a simple but important step. It helps keep the engine clean and running smoothly. Follow each step carefully to ensure proper installation.
Position The New Filter
Hold the new fuel filter upright. Make sure the arrow on the filter points in the direction of fuel flow. This usually means pointing toward the engine. Slide the filter into the filter bracket or holder. Check that it fits snugly without force. A correct position prevents leaks and ensures good fuel flow.
Reconnect Fuel Lines
Attach the fuel lines to the new filter. Push the hose ends firmly onto the filter’s inlet and outlet. Use new clamps or tighten the old ones securely. Make sure the lines do not twist or bend sharply. Secure connections stop fuel leaks and keep the engine running well.

Credit: www.youtube.com
Check For Leaks And Test
After changing the fuel filter on your Kawasaki Mule, checking for leaks and testing the system is crucial. This step ensures your vehicle runs smoothly and prevents fuel spills that can cause damage or hazards. Take your time to verify every connection and part before using the Mule.
Inspect Fuel Lines And Connections
Look closely at all fuel lines and connections around the new filter. Make sure clamps are tight and hoses fit well. Any loose connection can lead to leaks. Use a flashlight to see hidden spots clearly.
Start The Engine And Observe
Turn on the engine and let it run for a few minutes. Watch the fuel filter area carefully. Check for any drips or wet spots that show fuel leaks. If you see any leaks, stop the engine immediately.
Check For Fuel Smell
Smell around the fuel filter and lines. A strong fuel odor may mean a small leak. Fuel leaks can be dangerous and need fixing right away. Do not ignore even a faint smell of fuel.
Test Drive And Final Check
Take the Kawasaki Mule for a short drive. Listen for any unusual engine sounds or hesitation. After the drive, check the fuel filter again. Confirm there are no leaks and the filter stays dry.
Maintenance Tips For Fuel Filters
Maintaining the fuel filter on a Kawasaki Mule is important for smooth engine performance. Clean filters help the engine get pure fuel without dirt or debris. This section offers simple tips to keep the fuel filter in good shape. Regular care extends the life of your Mule and prevents engine problems.
Check The Fuel Filter Regularly
Inspect the fuel filter every few months. Look for dirt, rust, or damage. A clogged filter can cause poor engine performance. Replace the filter if it looks dirty or worn out. This small step saves time and money.
Use Clean Fuel
Always use fresh, clean fuel. Dirty fuel can clog the filter quickly. Store fuel in a clean container. Avoid old or contaminated gasoline. Clean fuel helps the filter last longer and keeps the engine running well.
Replace Fuel Filter On Schedule
Follow the Kawasaki Mule manual for filter replacement times. Changing the filter at the right time prevents engine trouble. Do not wait for the filter to fail. Timely replacement ensures steady fuel flow and better engine health.
Handle Fuel Filter With Care
Remove and install the fuel filter gently. Avoid dropping or damaging it. Use proper tools for removal and installation. Careful handling prevents leaks and filter damage. This keeps the fuel system safe and efficient.
Clean Fuel Lines Periodically
Check fuel lines connected to the filter. Remove any dirt or buildup. Clean lines help fuel flow smoothly. This reduces strain on the filter. Regular cleaning supports overall fuel system health.
Credit: www.powersportskawasaki.com
Frequently Asked Questions
How Often Should I Change The Fuel Filter On A Kawasaki Mule?
Change the fuel filter every 12 months or after 200 hours of use. Regular replacement ensures optimal engine performance and prevents clogging.
What Tools Do I Need To Change The Fuel Filter?
You need a screwdriver, pliers, a new fuel filter, and a container to catch fuel. These tools make the job quick and safe.
Can I Change The Fuel Filter Myself On A Kawasaki Mule?
Yes, changing the fuel filter is a simple DIY task. Follow the steps carefully to avoid fuel spills and ensure correct installation.
What Are Signs Of A Clogged Fuel Filter On Kawasaki Mule?
Symptoms include engine hesitation, poor acceleration, and difficulty starting. These signs indicate the fuel filter needs immediate replacement.
Conclusion
Changing the fuel filter on your Kawasaki Mule keeps the engine running smooth. Clean fuel helps avoid engine problems and saves money on repairs. Follow the steps carefully and take your time. A well-maintained Mule performs better and lasts longer.
Check the filter regularly and replace it as needed. Simple care goes a long way in keeping your vehicle ready for work or fun. Now, your Mule is ready to go with fresh fuel flow. Easy and worth the effort.


