
Are your brakes making strange noises or feeling less responsive? It might be time to change your brake pads and rotors.
Knowing how to do this yourself can save you money and give you confidence behind the wheel. In this guide, you’ll learn simple, step-by-step instructions to replace your brake parts safely and effectively. By the end, you’ll feel empowered to handle this essential car maintenance task on your own.
Keep reading to discover how easy it can be to improve your car’s braking performance today.
Tools And Materials Needed
Changing brake pads and rotors requires the right tools and materials. Having everything ready makes the job easier and safer. This section lists what you need before starting.
Prepare these tools and materials to avoid delays and frustration during the repair. Each item plays an important role in the process.
Basic Hand Tools
Wrenches and sockets are essential for removing bolts and screws. A ratchet set with various sizes helps you work faster. A flathead screwdriver can pry off clips or covers.
Brake Caliper Tool
This tool pushes the caliper piston back into place. It prevents damage and makes room for new pads. A C-clamp can work too but may be harder to control.
Jack And Jack Stands
Use a car jack to lift the vehicle safely. Jack stands hold the car steady while you work underneath. Never rely on the jack alone for support.
New Brake Pads And Rotors
Choose quality brake pads and rotors that fit your car model. Check the specifications carefully before buying. Using the right parts ensures proper braking performance.
Brake Cleaner And Rags
Brake cleaner removes dust and grease from parts. Clean surfaces help new parts fit better and last longer. Use rags to wipe off dirt and cleaner residue.
Lug Wrench
A lug wrench loosens and tightens wheel nuts. It is vital for removing wheels before brake work. Make sure it fits your car’s lug nut size.
Protective Gear
Wear gloves to protect your hands from dirt and chemicals. Safety glasses keep your eyes safe from dust and debris. Safety first keeps accidents away.
Preparing Your Vehicle
Preparing your vehicle is the first step to changing brake pads and rotors safely. It sets the stage for a smooth, efficient job. Take your time to get everything ready. This helps avoid mistakes and keeps you safe. Follow these simple steps before starting the brake work.
Safely Lifting The Car
Park your car on a flat surface. Engage the parking brake to stop the car from moving. Use wheel chocks on the opposite wheels for extra safety. Locate the car’s jacking points, usually near the wheels. Place the jack under these points. Lift the car slowly until the wheel is off the ground. Always use jack stands to support the car. Never rely on the jack alone. This keeps the car steady while you work underneath.
Removing The Wheel
Loosen the lug nuts with a wrench before lifting the car. After lifting, remove the lug nuts completely. Pull the wheel straight off the hub. Set the wheel aside safely. This gives clear access to the brake pads and rotors. Check the brake area for dirt or damage before starting the replacement.
Removing Old Brake Pads
Removing old brake pads is the first step in changing your brakes safely. It lets you check the condition of the parts and prepare for new ones. This process needs care and the right tools. Follow each step carefully to avoid damage and ensure good brake performance.
Locating The Brake Caliper
The brake caliper holds the brake pads against the rotor. Find it by looking behind the wheel. It is a metal part near the disc. You might need to lift the car and remove the wheel first. This gives clear access to the brake system.
Detaching The Caliper
Use a wrench to loosen the bolts holding the caliper. Be careful not to drop the caliper. Support it with a hook or rest it on a strong surface. This avoids strain on the brake hose. Removing the caliper frees the brake pads.
Extracting The Brake Pads
The brake pads sit inside the caliper bracket. Slide them out gently. Sometimes they may stick from dirt or wear. Use a flat tool to pry them loose if needed. Check the pads for cracks or uneven wear before discarding.
Credit: www.advicsaftermarket.com
Replacing Brake Rotors
Replacing brake rotors is a key part of maintaining your vehicle’s brake system. Worn or damaged rotors can cause poor braking and noise. Changing rotors improves safety and smooth braking. The process requires care but is manageable with basic tools.
Follow clear steps to remove old rotors and fit new ones properly. This guide breaks down each step for easy understanding.
Removing The Caliper Bracket
Start by lifting the car and removing the wheel. Locate the caliper bracket holding the brake caliper. Use a wrench to remove the bolts securing the bracket. Take off the bracket carefully and set it aside. Avoid letting the caliper hang by the brake line. Support it with a hanger or rest it on a solid surface.
Taking Off The Old Rotor
With the caliper bracket removed, the rotor is exposed. Check for screws or clips holding the rotor in place. Remove any fasteners found. If the rotor is stuck, tap it gently with a rubber mallet. Avoid using too much force to prevent damage. Slide the old rotor off the hub and clean the surface before installing a new one.
Installing The New Rotor
Place the new rotor onto the hub, aligning it correctly. Reinstall any screws or clips to secure the rotor. Put the caliper bracket back and tighten the bolts firmly. Double-check all parts are tight and positioned well. Lower the car and test the brakes carefully before driving normally.
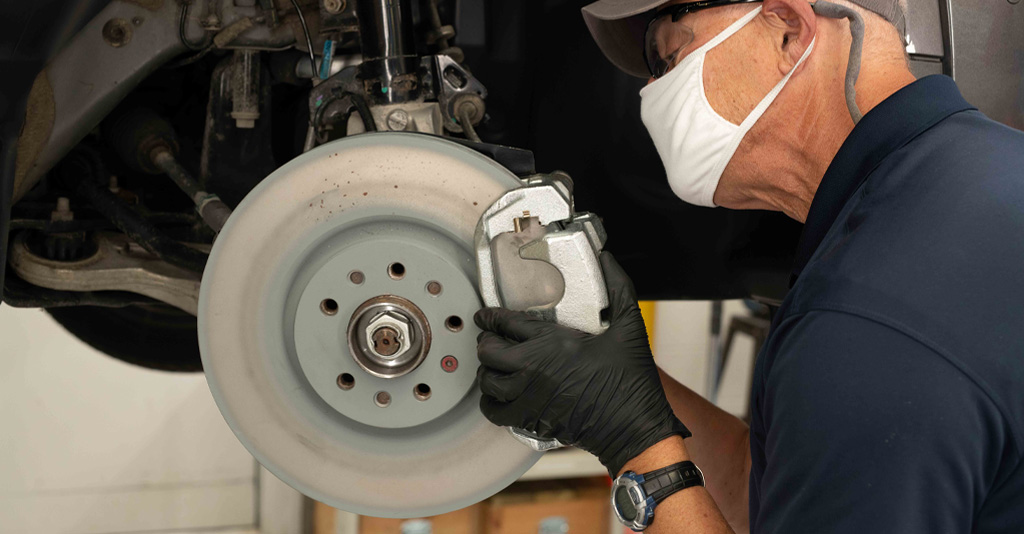
Installing New Brake Pads
Installing new brake pads is a key step in changing your brake system. This process ensures your vehicle stops safely and smoothly. Follow the steps carefully to fit the pads correctly and avoid damage.
Preparing The Caliper
Start by cleaning the caliper. Remove dirt and old brake dust using a brush. This helps the new pads fit well. Next, press the caliper piston back into its place. Use a C-clamp or brake tool to do this gently. This step creates space for the new, thicker pads.
Fitting New Pads
Place the new brake pads into the caliper bracket. Make sure the friction surface faces the rotor. Check that the pads fit snugly without forcing them. Align the pads with the clips or pins that hold them in place. This keeps the pads secure during braking.
Reassembling The Caliper
After fitting the pads, slide the caliper back over the rotor. Line up the bolts with their holes. Tighten the bolts evenly and firmly to secure the caliper. Avoid over-tightening to prevent damage. Finally, check the brake lever or pedal for proper pressure before driving.
.jpg)
Credit: www.cbac.com
Final Steps Before Driving
After replacing your brake pads and rotors, some important steps remain before driving. These final tasks ensure your vehicle is safe and ready. Take your time and follow each step carefully.
Reattaching The Wheel
Place the wheel back onto the hub. Align it with the bolts carefully. Hand-tighten the lug nuts in a star pattern. This keeps the wheel balanced. Use a wrench to tighten the nuts firmly. Avoid over-tightening to prevent damage.
Lowering The Vehicle
Slowly lower the car using the jack. Remove the jack once the car is fully down. Double-check the lug nuts for tightness. The car must sit stable on the ground. Never drive while the car is still lifted.
Testing The Brakes
Press the brake pedal several times. This helps the pads settle against the rotors. Start the engine and move slowly. Test the brakes in a safe area. Make sure they feel firm and responsive. Stop immediately if you notice any issues.
Tips For Brake Maintenance
Proper brake maintenance keeps your car safe and saves money. Regular checks help find problems early. Simple habits can extend the life of your brake pads and rotors. Understanding signs and care tips is key to good brake health.
Signs To Replace Pads And Rotors
Listen for squeaking or grinding sounds when braking. These noises often mean worn pads or damaged rotors. Feel for vibration or pulsing in the brake pedal. This can show rotor warping. Check for reduced braking power. Longer stopping distances are a clear warning. Look at the pads through the wheel spokes. Thin or cracked pads need replacement. Inspect rotors for deep grooves or rust spots. These signs mean the rotors should be changed.
Extending Brake Life
Drive smoothly and avoid hard braking. Gentle stops reduce brake wear. Keep your wheels clean from dust and dirt. This prevents extra rotor damage. Check brake fluid regularly and top it up. Old or low fluid harms brake parts. Replace pads and rotors on time to avoid bigger issues. Use quality brake parts that match your car. Proper brake care means safer driving and fewer repairs.

Credit: www.youtube.com
Frequently Asked Questions
How Often Should I Change Brake Pads And Rotors?
Brake pads typically last 30,000 to 70,000 miles. Rotors may need replacement every 50,000 to 70,000 miles. Inspect regularly for wear, noise, or vibration to ensure safety and optimal braking performance.
What Tools Are Needed To Change Brake Pads And Rotors?
You will need a jack, lug wrench, socket set, C-clamp, screwdriver, and brake cleaner. Having gloves and safety glasses is recommended for protection during the process.
Can I Change Brake Pads And Rotors Myself Safely?
Yes, with basic mechanical skills and proper tools, you can change them safely. Follow the vehicle manual and safety precautions carefully to avoid injury or damage.
How Do I Know When Brake Pads And Rotors Need Replacement?
Signs include squeaking noises, reduced braking power, vibration, or visible wear. If rotors are scored or warped, and pads are thin, it’s time to replace them.
Conclusion
Changing brake pads and rotors can save money and time. Follow each step carefully to stay safe. Use the right tools and parts for your car. Take your time to avoid mistakes. Testing your brakes after the job is very important.
Regular brake maintenance keeps your vehicle running well. Practice these skills to build confidence. Your car will stop better and feel smoother. Keep learning and stay safe on the road.


