Your car’s safety depends a lot on your brakes, and knowing how to check brake rotor thickness can save you from costly repairs or dangerous situations. If you’ve ever wondered whether your rotors are still good or need replacing, you’re in the right place.
You’ll learn simple, step-by-step ways to measure your brake rotor thickness quickly and accurately. By the end, you’ll feel confident about maintaining your brakes and keeping your rides safe and smooth. Keep reading—your safety and your wallet will thank you!
Credit: brakeperformance.com
Importance Of Brake Rotor Thickness
Brake rotor thickness affects how well your brakes work and your safety on the road. Measuring it helps find worn parts before they cause problems. Using a micrometer or caliper gives a quick and accurate check.
Brake rotor thickness plays a key role in vehicle safety. It affects how well your brakes work and how long they last.
Thin rotors can cause poor braking performance and longer stopping distances. This can be dangerous, especially in emergencies.
Maintaining the right rotor thickness ensures your brake system stays strong and reliable. It also prevents damage to other brake parts.
Ensures Effective Braking
Thick rotors absorb and release heat better during braking. This helps prevent brake fade and keeps stopping power consistent.
Thin rotors heat up quickly and lose strength. This reduces braking ability and can lead to accidents.
Prevents Brake Failure
Rotors that are too thin can crack or warp easily. This puts your safety at risk on the road.
Regularly checking rotor thickness helps avoid unexpected brake failure. It keeps your vehicle safe for driving.
Protects Other Brake Components
Worn rotors can damage brake pads faster. They also cause uneven pad wear, leading to costly repairs.
Proper rotor thickness helps brake pads last longer. This saves money and keeps your brake system balanced.
Credit: www.allrotors.com
Tools Needed For Measurement
Measuring brake rotor thickness requires a few specific tools. These tools help check if the rotors are safe to use or need replacement. Using the right tools ensures an accurate measurement. This prevents brake problems and keeps driving safe.
Micrometer
A micrometer is a precise tool that measures small distances. It shows the exact thickness of the rotor. This tool fits around the rotor edge for an accurate reading. Micrometers are easy to use and provide clear results.
Caliper
A caliper can measure inside and outside dimensions. It is useful for checking rotor thickness quickly. Digital calipers give a direct reading on a screen. Manual calipers need you to read the scale carefully.
Brake Rotor Thickness Gauge
This gauge is made specifically for rotors. It fits around the rotor to measure thickness. It often shows if the rotor is below the safe limit. This tool is simple and made for this task only.
Torque Wrench (optional)
A torque wrench helps when removing or installing rotors. It ensures bolts are tightened to the right level. Proper torque prevents rotor damage and keeps brakes working well.
Preparing Your Vehicle
Preparing your vehicle is the first step to check brake rotor thickness safely. This step ensures you can work without risks and access the brake parts easily. Taking time to prepare helps prevent accidents and makes the job smoother.
Secure The Car
Park your car on a flat surface. Engage the parking brake to stop movement. Place wheel chocks behind the wheels. This stops the car from rolling. Always double-check the car is stable before starting work.
Remove The Wheel
Loosen the lug nuts with a wrench before lifting the car. Use a jack to raise the car safely. Support the car with jack stands for extra safety. Remove the lug nuts completely and take off the wheel. This gives full access to the brake rotor.
Measuring The Rotor Thickness
Measuring the rotor thickness is a key step in checking brake rotor health. It shows if the rotor is too thin and needs replacement. This process helps keep your brakes safe and effective. Follow clear steps to measure the thickness correctly. Use the right tools and compare results to factory standards.
Locate The Measuring Points
First, find the correct spots on the rotor to measure. These points are usually on the flat surface where the brake pads touch. Avoid the edges or areas with rust. Look for smooth, clean sections for accurate readings. Check both sides of the rotor to get a full picture.
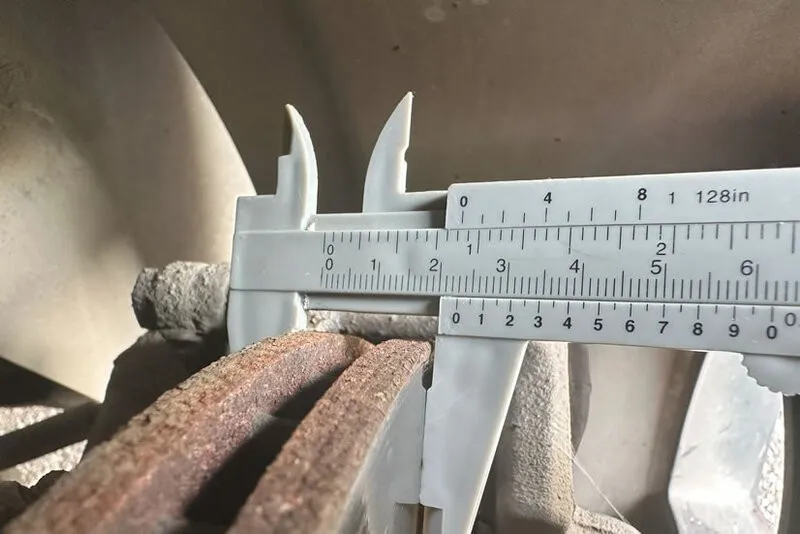
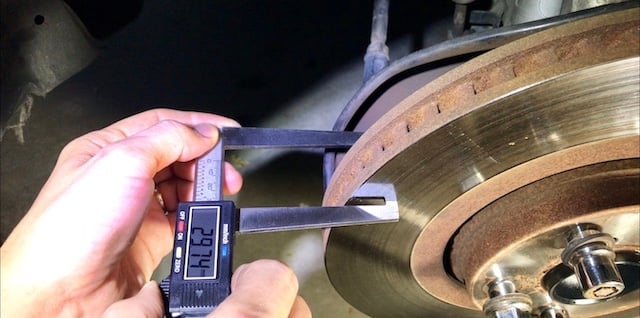
Use A Micrometer Or Caliper
Use a micrometer or caliper to measure the rotor thickness. These tools give precise measurements in millimeters or inches. Place the tool gently on the rotor surface. Read the measurement carefully and write it down. Repeat at different points to check for uneven wear.
Compare To Manufacturer Specs
Find the minimum thickness allowed by the rotor’s manufacturer. This information is in the vehicle’s manual or online. Compare your measurements to this number. If the rotor is thinner than the limit, it must be replaced. Staying above this limit ensures safe braking performance.
Signs Of Worn Rotors
Worn brake rotors affect your car’s safety and performance. Knowing the signs helps you spot problems early. This saves money and avoids dangerous driving conditions.
Rotors wear out over time from heat and friction. Signs of worn rotors can be subtle or clear. Watch for changes in how your brakes feel and sound.
Vibration Or Pulsation When Braking
You may feel shaking or pulsing in the brake pedal. This happens because uneven rotor surfaces cause vibration. The steering wheel might also shake during braking.
Squealing Or Grinding Noises
High-pitched squeals mean the brake pads are worn and rotor damage is possible. Grinding sounds mean metal is rubbing on metal. This damages rotors quickly.
Visible Grooves Or Cracks On The Rotor
Look at the rotor surface for deep grooves or cracks. These signs show the rotor is worn or damaged. Such rotors need replacement to work safely.
Longer Stopping Distances
Your car takes more time or distance to stop. Worn rotors reduce braking power. This can put you and others at risk on the road.
Brake Warning Light
The brake warning light on your dashboard may turn on. This alerts you to brake system problems. It often means rotor or pad issues require attention.
When To Replace Brake Rotors
Knowing when to replace brake rotors is key for safe driving. Rotors wear out over time. Worn rotors reduce braking power. This can lead to longer stopping distances and dangerous situations.
Checking rotor thickness helps decide if replacement is needed. Rotors have a minimum thickness limit set by manufacturers. Below this limit, rotors can crack or warp easily. Driving with thin rotors risks brake failure.
Signs Of Worn Brake Rotors
Listen for squealing or grinding noises when braking. Feel for vibrations or pulsations in the brake pedal. Notice if stopping takes longer than usual. These signs show rotor wear or damage.
Measuring Rotor Thickness
Use a micrometer or caliper to measure rotor thickness. Compare the measurement to the minimum thickness specification. If the rotor is thinner than the limit, it needs replacement.
Visual Inspection Of Rotors
Look for deep grooves or scoring on rotor surfaces. Check for cracks or rust spots. Uneven wear or discoloration also means rotor damage. Such rotors should be replaced immediately.
Safety Tips During Inspection
Checking brake rotor thickness requires care and attention. Safety during inspection prevents injuries and ensures accurate results. Follow simple safety rules to protect yourself and your vehicle.
Wear Protective Gear
Always wear safety glasses to protect your eyes from dust and metal shards. Use gloves to keep your hands safe from sharp edges and dirt. Wear closed-toe shoes to protect your feet from falling tools or parts.
Ensure Vehicle Stability
Park the vehicle on a flat surface before starting. Use wheel chocks to block the wheels and prevent movement. Apply the parking brake firmly for added safety.
Use Proper Tools
Select the right tools for measuring rotor thickness. Avoid using damaged or worn tools that can give wrong readings. Handle tools carefully to avoid slips or cuts.
Avoid Hot Rotors
Do not inspect rotors immediately after driving. Hot rotors can cause burns and affect measurement accuracy. Wait at least 30 minutes for rotors to cool down.
Follow Manufacturer Guidelines
Check your vehicle’s manual for specific rotor thickness limits. Follow the recommended procedures for inspection. Use the correct measuring points as advised by the manufacturer.
Credit: www.buybrakes.com
Frequently Asked Questions
What Tools Do I Need To Measure Brake Rotor Thickness?
You need a micrometer or a vernier caliper to measure brake rotor thickness accurately. These tools provide precise readings essential for safety checks.
How Often Should Brake Rotor Thickness Be Checked?
Check brake rotor thickness every 12,000 miles or during routine brake inspections. Regular checks prevent brake failure and ensure vehicle safety.
What Is The Minimum Brake Rotor Thickness Limit?
The minimum thickness varies by vehicle but is usually stamped on the rotor. Always replace rotors if thickness falls below this limit.
Can I Measure Brake Rotor Thickness Without Removing Wheels?
Yes, but removing wheels offers better access for accurate measurement. Measuring without removal is possible but less precise.
Conclusion
Checking your brake rotor thickness keeps your car safe on the road. Thin rotors can cause poor braking and accidents. Use a micrometer or caliper to measure the thickness. Compare your reading with the manufacturer’s minimum limit. Replace rotors that are too thin or worn out.
Regular checks save money and prevent bigger repairs. Stay safe by paying attention to your brakes. Simple steps can make a big difference. Keep your vehicle in good shape for smooth driving.