If your motorcycle isn’t running as smoothly as it used to, the problem might be hiding in your fuel filter. A clogged fuel filter can cause poor engine performance, hesitation, or even stall your bike unexpectedly.
But don’t worry—cleaning it yourself is easier than you think. In this guide, you’ll learn simple, step-by-step tips to get your fuel filter clean and your motorcycle running like new again. Keep reading, and you’ll save time, money, and avoid unnecessary trips to the mechanic.

Credit: www.youtube.com
Signs Of A Dirty Fuel Filter
A dirty fuel filter can cause many problems for your motorcycle. It stops fuel from flowing properly. Dirt and debris block the filter, which affects how your engine runs. Recognizing the signs of a dirty fuel filter helps you fix issues early. This keeps your bike running smoothly and safely.
Reduced Engine Performance
Your motorcycle may lose power while riding. It might feel slow or weak when accelerating. The engine can sputter or hesitate. These happen because the dirty filter limits fuel supply. Less fuel means the engine cannot work at full strength.
Starting Issues
Starting the bike becomes harder or takes longer. The engine might crank but not start right away. A clogged fuel filter restricts the fuel flow to the engine. This makes ignition difficult and causes delays in starting.
Fuel Flow Problems
Fuel may flow unevenly or stop suddenly. You may notice the engine cutting out during rides. A blocked filter causes fuel starvation to the engine. This interruption leads to rough running and stalling problems.
Credit: motor.onehowto.com
Tools And Materials Needed
Cleaning a fuel filter on a motorcycle requires the right tools and materials. Having everything ready makes the task easier and safer. This section lists the essential items needed before starting the cleaning process.
Basic Tools
- Screwdrivers (flathead and Phillips) for removing screws
- Pliers to disconnect fuel lines
- Wrenches for bolts or clamps
- A small container to catch fuel spills
- A clean cloth for wiping parts
Cleaning Supplies
- Fuel filter cleaner or carburetor cleaner spray
- Fresh gasoline for rinsing the filter
- A soft brush to scrub dirt gently
- Compressed air or a hairdryer to dry the filter
Safety Gear
- Gloves to protect your hands from fuel
- Safety goggles to shield your eyes
- A well-ventilated area to avoid inhaling fumes
- Fire extinguisher nearby for emergencies
Preparing The Motorcycle
Preparing your motorcycle is the first step to clean the fuel filter. This step helps you work safely and avoid damage. Proper preparation makes the whole process easier and faster. Follow these simple steps to get ready.
Ensuring Safety
Turn off the motorcycle engine completely. Remove the key to stop accidental starting. Work in a well-ventilated area to avoid fuel fumes. Wear gloves to protect your hands. Keep a fire extinguisher nearby in case of emergencies.
Locating The Fuel Filter
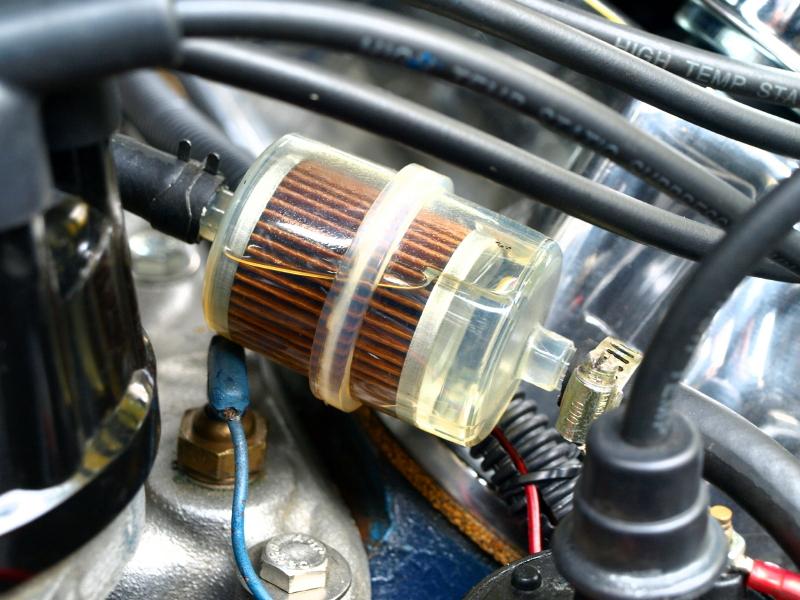
Find the fuel filter before starting. It is usually near the fuel tank or engine. Check your motorcycle manual for exact location. The filter looks like a small cylinder or plastic case. Knowing its place saves time and effort.
Draining The Fuel System
Empty the fuel from the system before removing the filter. Use a container to catch the fuel safely. Open the fuel valve or drain plug to release fuel. Avoid spills to keep the area clean. This step prevents fuel leaks during cleaning.
Removing The Fuel Filter
Removing the fuel filter is an important step in cleaning it properly. This part helps keep dirt and debris from reaching your engine. You need to handle the fuel lines and the filter with care to avoid damage. Follow these steps to remove the fuel filter safely and correctly.
Detaching Fuel Lines
Start by locating the fuel lines connected to the filter. Use pliers to loosen the clamps holding the lines. Gently pull the fuel lines off the filter. Be ready for some fuel to spill out, so have a cloth nearby. Avoid stretching or twisting the lines too much.
Extracting The Filter
Once the fuel lines are detached, check how the filter is fixed in place. It might be held by clips or screws. Use a screwdriver if needed to remove any fasteners. Carefully pull the filter out without damaging it. Keep track of how it fits for easier reinstallation.
Inspecting The Filter
Look closely at the filter for dirt or damage. If it looks clogged or worn out, it needs cleaning or replacement. Check for cracks or holes that can let fuel leak. A clean filter ensures better engine performance and fuel flow. Decide if you will clean the filter or get a new one.
Cleaning The Fuel Filter
Cleaning the fuel filter is a key step in motorcycle maintenance. It keeps the fuel flow smooth and the engine running well. Dirt and debris can clog the filter over time. This can cause poor engine performance or stalling. Regular cleaning helps avoid these problems and extends the filter’s life.
Soaking And Rinsing
Start by soaking the fuel filter in a fuel-safe cleaner or fresh gasoline. Let it sit for about 15 to 20 minutes. This loosens dirt and grime inside the filter. After soaking, rinse the filter gently with clean gasoline. Avoid using water or harsh chemicals that can damage the filter.
Using Compressed Air
Next, blow compressed air through the filter to remove any remaining dirt. Hold the filter firmly and direct the air from the inside out. Use short bursts to avoid damaging the filter material. This step clears out small particles stuck inside the filter mesh.
Drying The Filter
After cleaning, let the filter dry completely before reinstalling. Place it in a well-ventilated area at room temperature. Do not use heat sources like hair dryers or direct sunlight. A dry filter prevents fuel contamination and ensures proper flow in the engine.
Reinstalling The Fuel Filter
Reinstalling the fuel filter is a key step after cleaning it. This process ensures your motorcycle runs smoothly. Careful handling helps avoid damage and leaks. Follow these steps to fit the filter back correctly and safely.
Placing The Filter Back
Start by positioning the fuel filter in its original spot. Make sure the filter fits snugly and aligns with the fuel line. Check the filter’s direction. Most filters have arrows showing fuel flow direction. Place it exactly as before for proper function.
Reattaching Fuel Lines
Reconnect the fuel lines to the filter carefully. Push the hoses fully onto the filter’s ends. Use clamps or clips to secure the hoses tightly. Loose connections can cause leaks or fuel loss. Tighten clamps just enough to hold, not too tight.
Checking For Leaks
Turn on the motorcycle’s fuel valve or pump. Look closely around the filter and hoses. Watch for any signs of fuel dripping or wet spots. If you see leaks, tighten connections again. Run the engine briefly to confirm no fuel escapes.
Post-cleaning Checks
After cleaning your motorcycle’s fuel filter, checking the bike is very important. This step ensures the cleaning was successful and the bike runs well. Skipping these checks can cause engine problems or poor performance. Follow these simple steps to confirm everything works perfectly.
Starting The Engine
Turn the key and start the engine. Listen closely for unusual sounds like sputtering or stalling. The engine should start smoothly without hesitation. If it struggles, turn off the engine and recheck the fuel filter installation. Proper fuel flow is key for easy starting.
Monitoring Performance
Ride the motorcycle slowly at first. Notice if the engine runs evenly and feels strong. Watch for any loss of power or rough idling. Smooth acceleration means the fuel filter is clear. If the bike hesitates or stalls, inspect the filter and fuel lines again.
Regular Maintenance Tips
Clean the fuel filter every 6 months or 3,000 miles. Check it more often in dusty or wet conditions. Replace the filter if it shows damage or clogging. Keep fuel fresh and avoid letting the tank run empty. Regular care keeps your motorcycle running smoothly and saves costly repairs.

Credit: adelaideepic.org
Frequently Asked Questions
What Tools Do I Need To Clean A Motorcycle Fuel Filter?
You need basic tools like screwdrivers, pliers, a container, and clean rags. Also, have fresh fuel ready for flushing. Safety gloves and eye protection are recommended to avoid injuries during the cleaning process.
How Often Should I Clean My Motorcycle Fuel Filter?
Clean the fuel filter every 6,000 to 12,000 miles or as recommended in your motorcycle’s manual. Regular cleaning ensures optimal fuel flow and engine performance. If you notice fuel flow issues, clean the filter immediately.
Can I Clean A Fuel Filter Without Removing It?
It is best to remove the fuel filter for thorough cleaning. Some filters can be flushed in place, but removal ensures all dirt and debris are removed. Always follow your motorcycle’s service manual instructions.
What Signs Indicate A Dirty Fuel Filter?
Common signs include engine hesitation, stalling, reduced power, or difficulty starting. A clogged fuel filter restricts fuel flow, affecting engine performance. If you observe these symptoms, inspect and clean or replace the fuel filter promptly.
Conclusion
Cleaning your motorcycle’s fuel filter keeps your engine running smooth. Regular care prevents dirt from blocking fuel flow. Follow the steps carefully to avoid damage. A clean filter helps save money on repairs. Check the filter often, especially after long rides.
Taking time now means fewer problems later. Your bike will perform better and last longer. Simple maintenance like this makes riding more fun. Keep your fuel filter clean for a safer, smoother ride.