

Are your outdoor posts looking worn out or outdated? Installing vinyl post wraps is a simple way to give them a fresh, polished look without the hassle of replacing the entire post.
You don’t need special skills or expensive tools to transform your space. In this guide, you’ll discover easy steps to install vinyl post wraps yourself, saving time and money while boosting your home’s curb appeal. Keep reading, and you’ll be surprised at how quickly you can upgrade your posts with a sleek, durable finish.
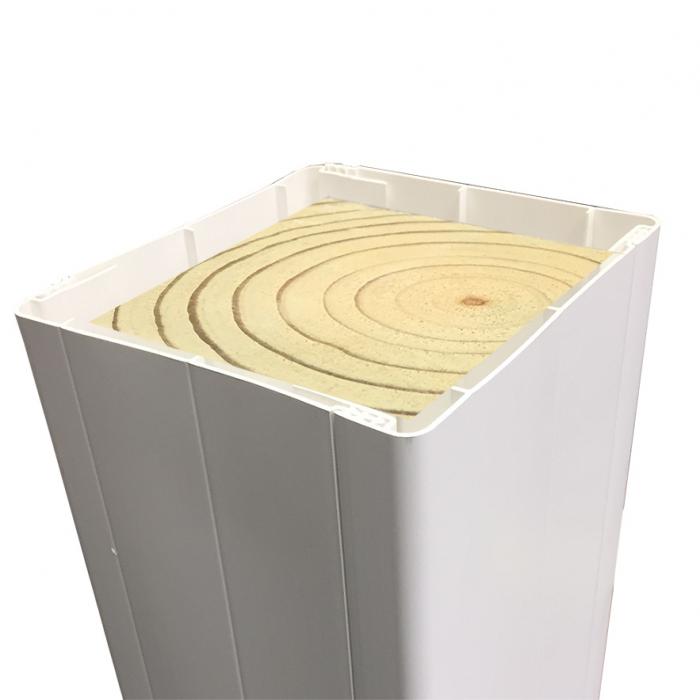
Credit: www.weatherables.com
Choosing The Right Vinyl Post Wraps
Choosing the right vinyl post wraps is key for a good look and lasting protection. The right wrap fits well, looks great, and lasts through weather changes. This section helps you pick the best vinyl wraps for your posts.
Types Of Vinyl Wraps
Vinyl wraps come in many types. Some have smooth surfaces, while others mimic wood grain. Choose solid vinyl for easy cleaning. Wood-look vinyl adds natural beauty. Some wraps have extra thickness for better durability.
Measuring Your Posts
Measure your posts carefully before buying wraps. Measure the width and height of each post. Note if posts are square or round. Add a little extra length to cover the post fully. Correct measurements avoid gaps or overlaps.
Color And Style Options
Vinyl wraps come in many colors and styles. Pick colors that match your home or garden. Light colors keep posts cooler in sunlight. Dark colors hide dirt better. Styles range from plain to textured finishes. Choose a style that fits your outdoor theme.
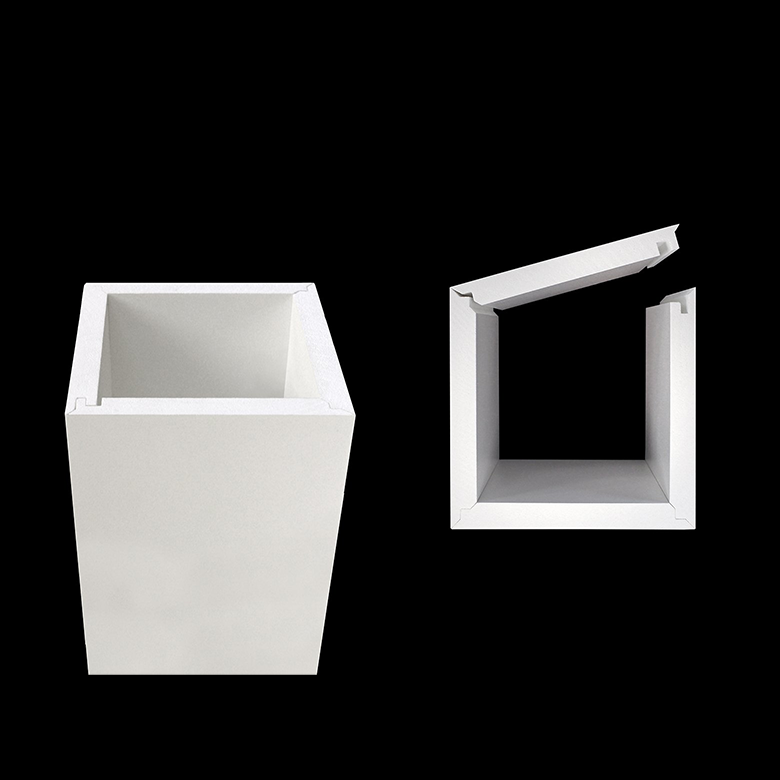
Credit: versatex.com
Preparing The Posts
Preparing the posts is the first step before installing vinyl post wraps. Proper preparation helps the wraps stick better and last longer. It also gives a smooth, clean look to the finished posts. This process includes cleaning, fixing damages, and sanding the surface.
Cleaning The Surface
Start by removing dirt, dust, and old paint from the posts. Use a mild soap and water solution with a soft brush or cloth. Rinse well and let the posts dry completely. Clean surfaces help the vinyl wrap stick firmly and prevent bubbles or peeling.
Repairing Damages
Check the posts for cracks, holes, or rotted wood. Fill small holes with wood filler and let it dry. Replace or repair any damaged wood before wrapping. Smooth, solid posts ensure the vinyl wrap fits tightly and looks neat.
Sanding For Adhesion
Lightly sand the entire post surface using fine-grit sandpaper. Sanding removes gloss and roughens the surface. This step helps the adhesive on the vinyl wrap grip the post better. Wipe off any dust with a clean, dry cloth before wrapping.
Tools And Materials Needed
Before starting to install vinyl post wraps, gather all the tools and materials. Having everything ready makes the job easier and faster. This section lists the essential tools and some additional supplies you might need.
Essential Tools
- Measuring tape – to measure the post accurately
- Utility knife – to cut the vinyl wrap cleanly
- Caulking gun – for applying adhesive or sealant
- Level – to ensure the wrap is straight
- Rubber mallet – to gently tap the wrap into place
- Cleaning cloth – to wipe the post before wrapping
Additional Supplies
- Vinyl post wraps – the main material for wrapping
- Adhesive or construction glue – to secure the wrap
- Sealant or caulk – to seal edges and prevent water entry
- Sandpaper – to smooth rough surfaces on the post
- Gloves – to protect your hands during installation
- Painter’s tape – to hold the wrap temporarily if needed
Cutting The Vinyl Wraps
Cutting vinyl post wraps is a crucial step in the installation process. Precise cuts ensure the wrap fits perfectly around your posts. Taking time to measure and cut correctly saves effort later. Avoid rushing. Careful cutting helps achieve a smooth, professional look.
Measuring For Accuracy
Measure the post height carefully before cutting the vinyl wrap. Use a tape measure for exact numbers. Double-check measurements to avoid mistakes. Mark the vinyl with a pencil or light marker. Accurate marks guide your cutting and prevent waste. Measure twice, cut once is the best rule.
Using The Right Cutting Tools
Select sharp scissors or a utility knife for clean cuts. Dull blades can cause jagged edges and damage the vinyl. Use a straight edge or ruler as a guide. Cut slowly and steadily for better control. Clean cuts make the wrap easier to install and look neat.
Installing The Wraps
Installing vinyl post wraps is a simple process that enhances the look of your outdoor posts. It protects the posts from weather and wear. Follow these steps carefully for the best results.
Positioning The Wrap
Start by placing the vinyl wrap around the post. Make sure the edges line up evenly. Check that the wrap fits snugly without gaps. Align the seams so they are straight. Proper positioning prevents future problems.
Securing With Adhesive Or Fasteners
Use an adhesive designed for vinyl to secure the wrap. Apply glue evenly along the edges. Press the wrap firmly onto the post. Some wraps come with fasteners or screws. Fasten these carefully to avoid damage.
Smoothing Out Bubbles And Wrinkles
Use a flat tool to smooth the surface. Start from the center and move outward. Push out any air bubbles trapped beneath. Work slowly to prevent new wrinkles. A smooth finish looks clean and lasts longer.

Credit: www.decksdirect.com
Finishing Touches
Finishing touches make your vinyl post wraps look complete and last longer. These final steps protect your work and improve appearance. Pay close attention to every detail to ensure a neat finish.
Sealing Edges
Seal all edges of the vinyl wrap to prevent water damage. Use a clear, outdoor-grade sealant around seams and corners. This keeps moisture out and stops dirt from building up. Smooth the sealant with a finger or tool for a clean look.
Adding Post Caps
Place post caps on top of each wrapped post. Post caps protect the posts from rain and sun damage. They also add a polished and stylish appearance. Choose caps that fit snugly and match your wrap color.
Cleaning Up
Remove any dust, dirt, or leftover materials from the posts. Use a soft cloth and mild soap if needed. Clean surfaces show off the vinyl wrap better. Dispose of scraps and tools properly to finish the job tidy.
Maintenance Tips For Longevity
Proper care extends the life of vinyl post wraps. Simple steps keep them looking new and strong. Regular attention helps avoid costly repairs. Follow these tips to maintain your post wraps well.
Regular Cleaning
Clean vinyl post wraps often to remove dirt and grime. Use a soft cloth and mild soap with water. Avoid harsh chemicals that can damage the surface. Rinse well and dry to prevent water spots. Clean posts help maintain their color and shine.
Inspecting For Damage
Check your vinyl post wraps regularly for cracks or chips. Look closely at corners and edges where damage may start. Early detection stops small issues from growing. Inspect after storms or strong winds. Keeping an eye on damage saves time and money.
Repairing Minor Issues
Fix small cracks or dents quickly to protect your posts. Use vinyl repair kits available at hardware stores. Follow instructions carefully for the best results. Repairing minor problems prevents water damage and warping. Take action as soon as you notice any flaws.
Frequently Asked Questions
What Tools Are Needed To Install Vinyl Post Wraps?
You need measuring tape, saw, adhesive, screws, drill, and a level for proper installation. These tools ensure a secure and precise fit.
How Do You Prepare Posts Before Wrapping?
Clean posts thoroughly, remove old paint or rust, and ensure they are dry. Proper preparation helps the vinyl wrap adhere better and last longer.
Can Vinyl Post Wraps Fit Any Post Size?
Vinyl wraps come in standard sizes but can be trimmed to fit various post dimensions. Measure carefully for a snug, professional appearance.
How Long Does Vinyl Post Wrap Installation Take?
Most installations take 1-3 hours depending on the number of posts and skill level. Proper steps ensure durability and a neat finish.
Conclusion
Installing vinyl post wraps can refresh your outdoor space easily. The process is simple and saves time. Choose the right size and color for your posts. Measure carefully before cutting the wraps. Fit them snugly to avoid gaps or peeling.
Use basic tools you likely already have. A neat finish improves your home’s look instantly. Regular cleaning keeps the wraps looking new longer. Enjoy your updated posts without costly replacements. Try this project for a quick, affordable upgrade.

