
If you want your car to stop safely and smoothly, knowing how to measure your brake rotors’ thickness is crucial. Worn-out rotors can lead to poor braking performance and costly repairs.
But don’t worry—measuring rotor thickness isn’t as hard as it sounds. You’ll discover simple, step-by-step tips to check your brake rotors quickly and accurately. By learning this skill, you’ll save money, avoid unexpected breakdowns, and keep your vehicle running safely.
Keep reading to find out exactly how to do it right.
Credit: www.allrotors.com
Tools Needed
Measuring brake rotor thickness requires specific tools to get accurate results. Using the right instruments helps maintain safety and ensures your brakes work well. Here are the tools you need to measure brake rotor thickness properly.
Caliper Types
A caliper is essential for measuring thickness. Digital calipers offer easy reading and precise measurements. Dial calipers have a round dial that shows the measurement clearly. Vernier calipers are manual but still accurate if used carefully. Choose a caliper that fits your comfort and budget.
Micrometer Use
A micrometer measures very small distances with high accuracy. It is perfect for brake rotors because it shows exact thickness. Use the micrometer’s spindle to gently touch the rotor surface. Read the scale or digital display to find the thickness. Micrometers work best for precise checks on brake rotors.
Additional Equipment
Besides calipers and micrometers, a clean cloth helps remove dirt from the rotor. A flat surface to place the rotor steady is useful. A flashlight can improve visibility in dark areas. Having these extra tools makes measuring easier and more reliable.
Prepare The Vehicle
Preparing the vehicle is the first step to measure brake rotor thickness accurately. This phase ensures you have clear access to the brake components. Proper preparation also keeps you safe during the process. Follow these steps carefully to get ready.
Safety Precautions
Park the vehicle on a flat, stable surface. Engage the parking brake firmly. Use wheel chocks to block wheels that stay on the ground. Wear safety gloves and eye protection. Avoid loose clothing that might catch on parts.
Wheel Removal
Loosen the lug nuts slightly before lifting the vehicle. Use a jack to raise the vehicle safely. Support it with jack stands for stability. Remove the lug nuts completely. Take off the wheel and place it aside carefully.
Rotor Access
Locate the brake caliper attached to the rotor. Use a wrench to remove the caliper bolts. Slide the caliper off the rotor gently. Hang the caliper using a wire or hook to avoid stress on the brake line. Now the rotor is fully exposed for measurement.
Locate Measurement Points
Measuring brake rotor thickness needs accuracy. Finding the right points to measure is key. This step helps avoid wrong readings that can cause brake problems. Knowing where to check ensures safety and better brake performance.
Identify Rotor Surfaces
Start by locating the flat parts of the rotor. These areas are smooth and free of rust or dirt. Use a flashlight if needed to see clearly. The measurement must be taken on these clean, flat surfaces. This gives the most accurate thickness reading.
Avoiding Warped Areas
Check for any bends or warps on the rotor. Warped parts look uneven or wavy. Do not measure over these damaged spots. Warping can give false thickness results. Measure only on flat, even sections for true accuracy.
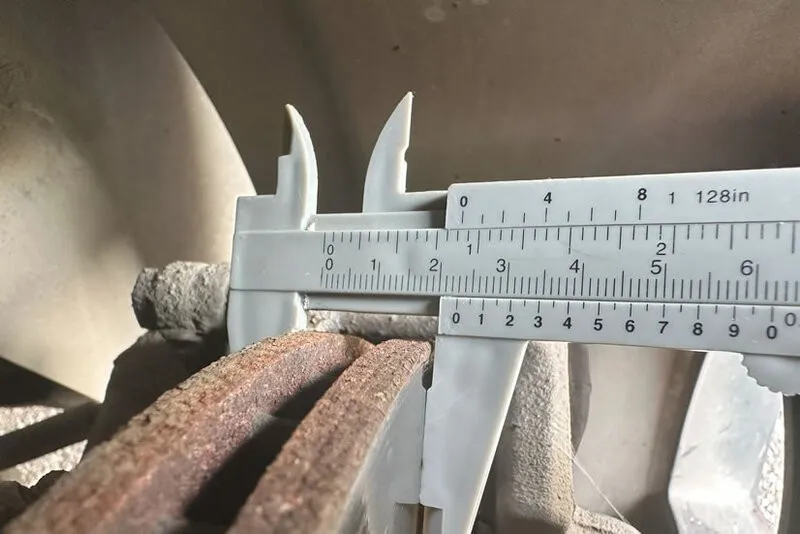
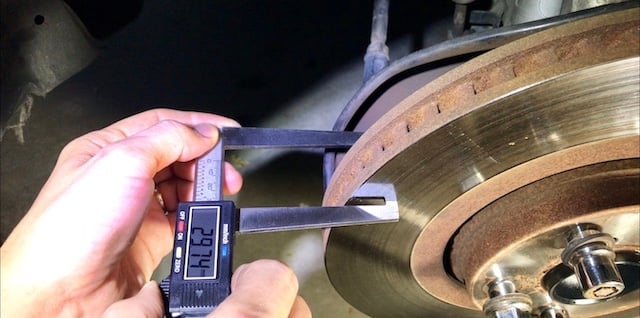
Measure Rotor Thickness
Measuring the thickness of brake rotors is important for safe driving. Thin rotors can cause poor braking and damage. You need the right tools and a clear method to get accurate results. This section explains how to measure rotor thickness step-by-step.
Using A Caliper
A caliper is a simple tool to measure rotor thickness. Place the caliper jaws around the rotor edge. Make sure to measure the rotor surface, not the vent area. Read the measurement on the caliper scale. This gives you a quick thickness value.
Using A Micrometer
A micrometer offers more precise measurements than a caliper. Open the micrometer and place the rotor between its spindle and anvil. Turn the thimble slowly until it touches the rotor surface lightly. Read the exact thickness from the micrometer scale. This method works best for detailed checks.
Recording Measurements
Write down each measurement clearly. Measure in several spots around the rotor. Note the smallest thickness found. Compare these numbers to the rotor’s minimum thickness limit. Keeping accurate records helps decide if the rotor needs replacement.
Compare With Specifications
After measuring the brake rotor thickness, compare your results with the specifications. This step confirms if the rotors are safe to use or need replacement. Checking these values prevents brake failure and ensures proper vehicle performance.
Minimum Thickness Limits
Brake rotors have a minimum thickness limit. This limit is the smallest safe thickness allowed. Using rotors thinner than this limit can cause brake problems. Thinner rotors may overheat or crack under pressure. Always measure the thickness and compare it to this limit. If the rotor is below the minimum, replace it immediately.
Manufacturer Guidelines
Each vehicle or rotor brand has its own guidelines. These include thickness specifications and maintenance tips. Check the vehicle’s manual or rotor packaging for these details. Follow the manufacturer’s advice to keep brakes working well. Ignoring these guidelines can cause poor brake performance or damage. Always trust the manufacturer’s recommendations for safety.
Credit: www.buybrakes.com
Interpreting Results
After measuring the brake rotor thickness, the next step is understanding what the numbers mean. Knowing how to interpret these results helps keep your vehicle safe. It guides you on whether the rotors still work well or need replacing. This section breaks down the key points to watch for in your measurements and condition.
When To Replace Rotors
Brake rotors wear down over time from use. Every rotor has a minimum thickness limit. This limit is usually stamped on the rotor or in your vehicle manual. If your measurement is at or below this limit, replace the rotors. Thin rotors can crack or warp easily. This reduces braking power and increases risk on the road. Always choose new rotors if the thickness is too low.
Signs Of Wear Beyond Thickness
Thickness is not the only sign of rotor wear. Check for deep grooves, cracks, or rust on the surface. These flaws can cause brake noise and vibration. Warped rotors make the brake pedal shake when pressed. Also, look for uneven wear patterns. These signs mean the rotor must be inspected closely. Worn rotors affect your brake safety even if thickness seems okay.
Tips For Accurate Measurement
Measuring brake rotor thickness requires care and precision. Small mistakes can cause wrong readings. Follow simple tips for the best results. These tips help you get accurate and reliable measurements every time.
Consistent Pressure
Use steady pressure when measuring rotor thickness. Pressing too hard or too soft changes the reading. Hold the caliper firmly but gently against the rotor surface. Keep your hand steady to avoid slipping. Consistent pressure ensures reliable and repeatable results.
Multiple Measurements
Measure the rotor thickness in several spots. Rotors can wear unevenly across the surface. Take at least three readings around the rotor edge. Note all measurements and compare them. Use the lowest reading to check rotor health.
Clean Rotor Surface
Remove dirt, rust, and brake dust before measuring. A dirty surface can cause false readings. Wipe the rotor with a clean cloth or brake cleaner. Make sure the surface is dry and smooth. Clean rotors give you more accurate thickness values.
Credit: brakeperformance.com
Frequently Asked Questions
How Do You Measure Brake Rotor Thickness Accurately?
Use a micrometer to measure the rotor’s thickness at multiple points. Ensure the rotor is clean and cool. Take readings near the braking surface but avoid the vent area. Compare measurements with manufacturer specifications to confirm if the rotor is within safe limits.
What Tools Are Needed To Measure Brake Rotor Thickness?
A digital or mechanical micrometer is essential for precise measurement. A caliper can be used but is less accurate. Clean the rotor surface to avoid errors. A flat, stable surface helps in getting consistent readings. Always check the rotor’s minimum thickness from the manual.
Why Is Measuring Brake Rotor Thickness Important?
Measuring rotor thickness ensures safety and optimal braking performance. Thin rotors can overheat, warp, or fail during braking. It helps decide when to replace or resurface rotors. Proper maintenance extends rotor life and prevents costly repairs. Regular checks improve overall vehicle safety.
When Should Brake Rotors Be Replaced Based On Thickness?
Replace rotors when thickness falls below the manufacturer’s minimum limit. This limit is usually stamped on the rotor or found in the manual. Driving with thin rotors risks brake failure and reduced stopping power. Always measure before and after resurfacing to ensure safety compliance.
Conclusion
Measuring brake rotor thickness keeps your car safe on the road. Use a micrometer or caliper for the best results. Always check the measurements against the manufacturer’s minimum thickness. Worn rotors can cause poor braking and accidents. Regular checks help spot problems early and save money.
Stay careful, and your brakes will work well for a long time. Simple steps protect you and others every time you drive.


