

If you own a Harley, you know how important every part of your bike is—especially the brakes. When your floating brake rotor hardware starts to wear out, it’s not something you want to ignore.
But don’t worry, replacing it yourself is easier than you might think. In this guide, you’ll learn exactly how to replace the hardware on your Harley floating brake rotor step-by-step. By the end, you’ll save money, avoid unnecessary trips to the shop, and get your bike back on the road safely and quickly.
Ready to take control of your bike’s maintenance? Let’s dive in.
Preparing For Hardware Replacement
Preparing to replace the hardware on your Harley floating brake rotor is a key step. Proper preparation saves time and prevents damage. It helps you work safely and efficiently.
Before starting, gather all tools and parts you need. Check your workspace for safety. Then, carefully remove the wheel to access the rotor hardware.
Gathering Necessary Tools
Collect all tools before you start. You will need a torque wrench, Allen wrenches, and a socket set. Keep a clean cloth and thread locker nearby. Have new rotor bolts ready to install.
Ensuring Safety Measures
Wear gloves and eye protection. Work on a flat, stable surface to avoid accidents. Use a motorcycle stand to keep the bike steady. Disconnect the battery to prevent electrical issues.
Removing The Wheel
Loosen axle nuts carefully without removing them first. Use the stand to lift the motorcycle securely. Remove the brake caliper bolts and set the caliper aside. Slide the wheel out gently to avoid damage.

Credit: www.getlowered.com
Removing Old Brake Rotor Hardware
Removing old brake rotor hardware is the first step in replacing parts on a Harley floating brake rotor. This process ensures safety and prepares the area for new components. Taking time to do it right helps avoid damage and keeps your bike running smoothly. Follow clear steps to remove the hardware carefully.
Locating Hardware Components
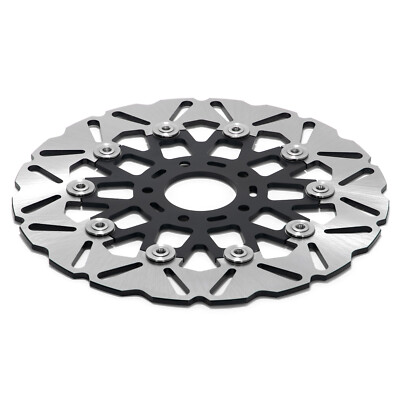
Start by finding all the hardware on the brake rotor. Look closely at the rotor’s edges and center. You will see bolts or screws holding the rotor in place. Identify washers or spacers around the bolts. Knowing these parts helps during removal and replacement.
Loosening And Removing Bolts
Use the correct size wrench or socket for each bolt. Turn bolts counterclockwise to loosen them. Apply steady pressure to avoid stripping the bolt heads. Remove each bolt one at a time. Keep bolts in a safe place if you plan to reuse them.
Inspecting Existing Parts
Check the bolts, washers, and spacers for damage or wear. Look for rust, cracks, or deformities. Replace any part that looks weak or damaged. Clean the hardware area to remove dirt and debris. This step prevents problems with new parts fitting properly.
Selecting Replacement Hardware
Selecting the right hardware is crucial when replacing parts on a Harley floating brake rotor. The hardware must fit perfectly and handle the stress from braking. Using the wrong bolts or nuts can cause damage or unsafe riding conditions.
Choosing hardware that matches the original specifications keeps the rotor secure. It also ensures the brake system works smoothly and lasts longer. Pay attention to bolt size, thread pitch, and material quality.
Choosing Compatible Bolts And Nuts
Select bolts and nuts that match the original size and thread type. Using bolts with the wrong thread pitch can strip the rotor holes. Choose hardware designed for motorcycle brake rotors to ensure safety.
Check the length of bolts carefully. Too long or too short bolts can affect brake performance. Use the exact specifications from the Harley manual or trusted parts sources.
Understanding Material Options
Hardware material affects strength and corrosion resistance. Stainless steel bolts resist rust and last longer outdoors. Steel bolts are strong but may rust without proper coating.
Titanium bolts are lightweight and strong but cost more. Aluminum bolts are light but less durable for brake rotors. Select materials based on your riding conditions and budget.
Sourcing Quality Parts
Buy hardware from trusted dealers or official Harley suppliers. Cheap or generic parts may not meet safety standards. Authentic parts guarantee compatibility and durability.
Inspect new bolts and nuts for defects before installation. Check threads and heads to avoid installation problems. Quality parts protect your brake system and ensure safe rides.
Installing New Hardware
Replacing hardware on a Harley floating brake rotor requires careful removal of old parts. Start by loosening bolts, then fit new hardware securely. Tighten everything evenly to ensure proper brake function and safety.
Aligning The Floating Rotor
Start by placing the floating rotor correctly on the hub. Make sure the rotor holes line up with the mounting points. A proper fit ensures smooth brake performance. Take your time to avoid misalignment. Misaligned rotors can cause brake noise or uneven wear.
Proper Torque Specifications
Use a torque wrench to tighten the rotor bolts. Follow the manufacturer’s torque settings exactly. Over-tightening can damage the rotor or hardware. Under-tightening may cause bolts to loosen during rides. Tighten bolts in a star pattern to spread pressure evenly. This method prevents warping and ensures safety.
Using Threadlocker Correctly
Apply a small drop of threadlocker on each bolt’s threads. Threadlocker helps keep bolts secure against vibrations. Avoid putting too much; excess can make future removal difficult. Choose a medium-strength threadlocker for easy maintenance. Let the threadlocker dry before riding to ensure full strength.
Reassembling And Testing
Reassembling and testing your Harley floating brake rotor hardware is a key step. This ensures your brake system works safely and smoothly. Careful attention during this stage prevents problems on the road.
Reattaching The Wheel
Start by placing the wheel back onto the axle carefully. Align the brake rotor with the caliper to avoid damage. Tighten the axle nut to the correct torque. Use a torque wrench for accuracy. Spin the wheel to check it moves freely without rubbing.
Performing Brake Function Checks
Press the brake lever several times. Feel for firm resistance each time. Check that the brake pads engage the rotor evenly. Listen for unusual noises like squeaks or grinding. Test the brake by rolling the bike slowly and applying the brake. The bike should stop smoothly and quickly.
Final Safety Inspection
Inspect all hardware for tightness and proper fit. Look for any loose bolts or parts. Ensure the brake rotor is centered between the pads. Check the brake fluid level and condition. Confirm no leaks or damage around the brake system. Only ride after completing this thorough inspection.

Credit: krausmotorco.com
Common Issues And Troubleshooting
Replacing hardware on a Harley floating brake rotor can be tricky. Common problems may slow down the process or cause damage. Understanding these issues helps fix them quickly. This section covers common problems and how to solve them.
Identifying Hardware Wear Signs
Check bolts and pins for rust or corrosion. Worn hardware may look shiny or scratched. Loose bolts can cause brake noise or vibration. Inspect for cracks or bends in the rotor. Replace any parts that look damaged or weak.
Handling Stuck Or Stripped Bolts
Bolts may get stuck from rust or over-tightening. Use penetrating oil to loosen stuck bolts. Let the oil sit for 10 to 15 minutes. Use the correct size tool to avoid stripping bolts. If a bolt is stripped, try a bolt extractor. Avoid forcing bolts to prevent damage.
Addressing Rotor Alignment Problems
Misaligned rotors cause uneven brake wear and noise. Check rotor position after installing new hardware. Use a dial indicator to measure rotor run-out. Adjust or replace hardware to fix alignment. Ensure all bolts are tightened evenly to the right torque.
Credit: www.ebay.com
Frequently Asked Questions
How Do I Remove A Harley Floating Brake Rotor?
To remove the rotor, first lift the bike and secure it. Then, loosen and remove the bolts holding the rotor. Carefully pull the rotor off the wheel hub without damaging the wheel or brake components.
What Tools Are Needed For Rotor Hardware Replacement?
You will need a torque wrench, Allen keys or Torx drivers, a socket set, and possibly thread locker. These tools help safely remove and reinstall hardware on the floating brake rotor.
How To Ensure Proper Torque On Rotor Bolts?
Use a torque wrench to tighten bolts to the manufacturer’s specified torque. This prevents over-tightening or loosening, ensuring safety and optimal brake performance.
Can I Reuse Old Hardware When Replacing The Rotor?
It is best to replace old hardware with new bolts and washers. Reusing old hardware may compromise the rotor’s stability and safety due to wear or corrosion.
Conclusion
Replacing hardware on a Harley floating brake rotor keeps your bike safe. Use the right tools and follow each step carefully. Take your time to avoid mistakes. Check all parts for wear before installing new hardware. Tighten bolts to the correct torque for best results.
Regular maintenance helps your brakes work well and last longer. Feel confident riding with fresh, secure brake parts. Simple care makes a big difference in your bike’s performance. Keep your Harley ready for the road ahead.


