

Are your Aero wheel covers looking worn out or damaged? Maybe you want to upgrade your car’s look or need to fix something underneath.
Whatever your reason, removing Aero wheel covers might seem tricky at first. But don’t worry—you can do it yourself quickly and safely. In this guide, you’ll learn the easiest, step-by-step way to take off your wheel covers without causing any damage to your wheels or tires.
Keep reading, and you’ll be ready to handle it like a pro!
Tools Needed
Removing Aero wheel covers requires a few simple tools. Having the right tools makes the job easier and safer. This section lists the essential items you need before starting.
Basic Tools List
Start with a flathead screwdriver or a plastic trim removal tool. These help pry off the wheel cover without damage. A pair of gloves protects your hands during the process. A tire iron or lug wrench is useful to loosen lug nuts if needed. Keep a soft cloth nearby to prevent scratches on the wheel surface.
Safety Gear
Wear gloves to avoid cuts and scrapes. Safety glasses protect your eyes from dust and debris. Closed-toe shoes shield your feet from heavy tools or parts. Work in a well-lit area to see clearly. These simple safety steps reduce the risk of injury.

Credit: www.youtube.com
Preparing Your Vehicle
Preparing your vehicle is the first step before removing Aero wheel covers. This ensures safety and ease during the process.
Taking the right precautions helps avoid accidents or damage to your vehicle. Follow these simple steps to get ready.
Park On A Level Surface
Choose a flat and stable spot to park your vehicle. A level surface keeps your car steady while you work.
This reduces the risk of the vehicle rolling or shifting. It makes removing the wheel covers safer and easier.
Engage Parking Brake
Set the parking brake firmly after parking. This locks the wheels and prevents any movement.
Engaging the brake adds an extra layer of safety. It protects you and your vehicle during the removal process.
Locating The Wheel Cover Clips
Removing Aero wheel covers starts with finding the clips that hold them in place. These clips secure the cover tightly to the wheel. Knowing their exact location makes removal easier and safer. Without locating the clips, you risk damaging the cover or the wheel.
Inspecting The Cover
Begin by examining the wheel cover closely. Look around the edges for small gaps or raised areas. These spots often hide the clips. The cover may have visible marks or indentations where clips sit. Clean the cover if dirt blocks your view. A clean surface reveals clip positions clearly.
Identifying Clip Positions
Feel around the cover edges with your fingers. The clips usually sit evenly spaced along the rim. Count the clips to understand their pattern. Most covers have 4 to 6 clips. Press gently near each suspected clip to check its hold. Knowing clip spots helps you apply pressure correctly during removal.
Removing The Wheel Covers
Removing aero wheel covers is a simple task with the right tools and care. It helps to keep your wheels clean and allows for inspection. This section explains how to remove them safely and easily.
Using A Pry Tool
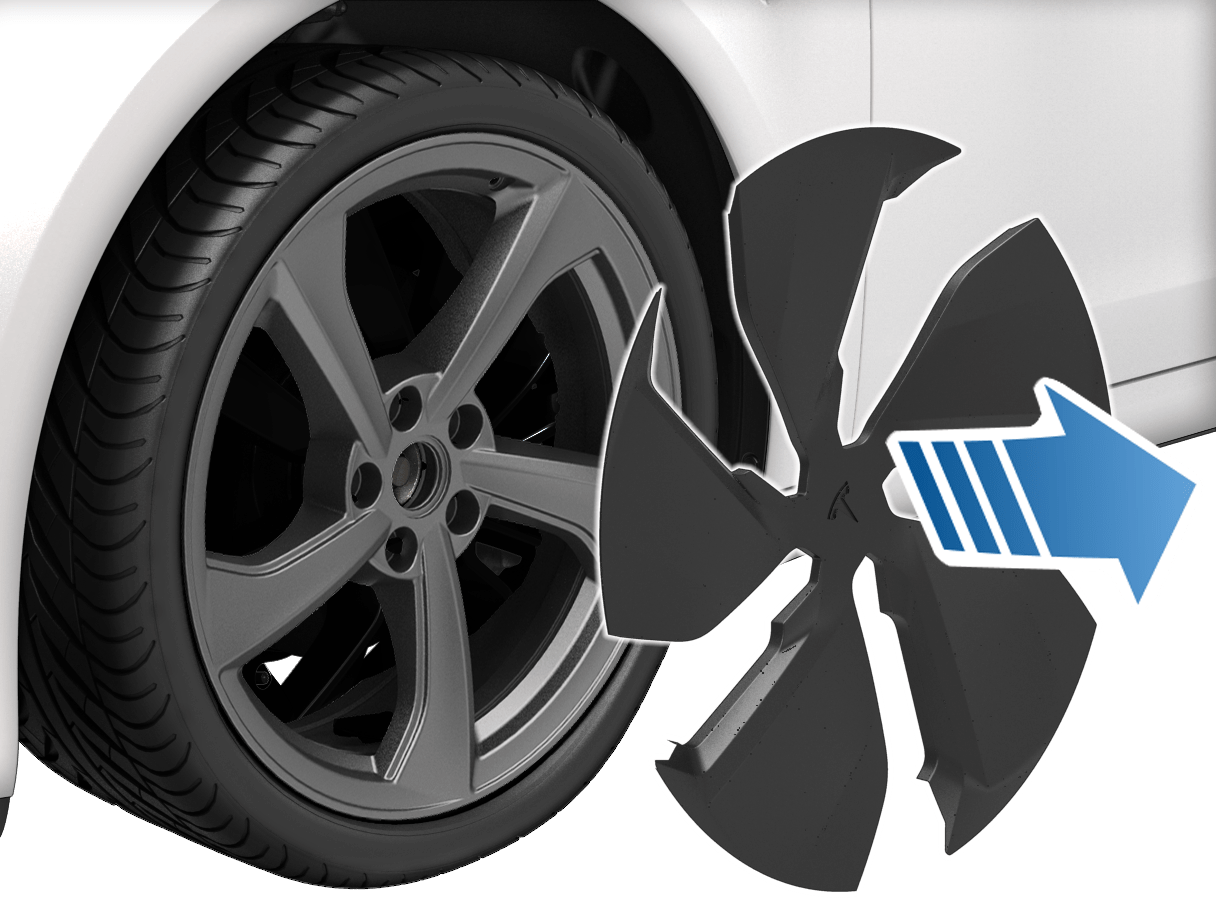
Start by choosing a flat, plastic pry tool. Metal tools might scratch the wheel cover or rim. Insert the pry tool gently between the wheel cover and the wheel.
Work the tool around the edge slowly. Apply light pressure to avoid cracking the cover. The cover will start to pop off in sections. Keep moving the tool until the cover is loose enough to pull off by hand.
Avoiding Damage
Do not force the cover off with too much strength. This can break the plastic clips or crack the cover. Avoid using sharp tools that can scratch or dent the wheel. Always protect the wheel surface by placing a cloth between the tool and the wheel if needed.
Handle the wheel cover with care after removal. Store it in a safe place to prevent damage. Taking these steps helps your wheel covers last longer and look good.
Cleaning The Wheel Surface
Cleaning the wheel surface is a key step after removing aero wheel covers. Dirt and grime can stick to the wheels, causing damage or poor fit of new covers. A clean surface helps new covers stay in place and look good. Take time to clean the wheels well before installing new covers.
Removing Dirt And Debris
Start by rinsing the wheel with water to remove loose dirt. Use a soft brush or cloth to scrub away stubborn grime. Avoid harsh tools that can scratch the wheel surface. Clean all around the wheel, including the edges and lug nut areas. Make sure no dirt or debris remains.
Preparing For New Covers
Dry the wheel completely using a clean towel. Check the surface for any damage or rust spots. Lightly sand rough spots to create a smooth area for the new cover. Wipe the surface with a cloth dipped in rubbing alcohol. This removes oils and helps the covers stick better.
Credit: service.tesla.com
Installing Aero Wheel Covers
Installing aero wheel covers is a simple task that anyone can do. These covers improve your car’s look and protect the wheels. Follow the right steps to fit them securely. Proper installation helps avoid damage and keeps covers in place while driving.
Aligning Clips Properly
Start by checking the clips on the back of the cover. Each clip must line up with the wheel rim. Hold the cover close to the wheel and match the clips to the rim edges. Make sure all clips fit over the rim evenly. Proper alignment prevents the cover from falling off.
Securing The Cover
Once clips are aligned, press the cover firmly against the wheel. Push around the edges to lock all clips in place. You may hear small clicks as clips snap onto the rim. Check the cover by gently pulling it. It should stay tight without moving or rattling.
Checking The Fit
Checking the fit of your aero wheel covers is a key step before full removal. It helps you avoid damage to both the covers and the wheels. A proper fit ensures the covers stay secure during driving and come off smoothly without extra force.
Take your time to inspect the edges and clips. Notice if the cover sits evenly and firmly on the wheel. A loose or uneven fit might mean the cover is already damaged or improperly installed.
Ensuring Stability
Press gently around the cover’s edges to check for movement. The cover should feel tight and not wiggle. Loose covers can fall off while driving, causing safety risks.
Look for broken clips or cracks. These signs mean the cover may need replacement instead of removal. Fixing stability issues first saves trouble later.
Test Driving Tips
Drive slowly for a short distance after checking the fit. Listen for unusual sounds like rattling or scraping. These noises indicate a loose cover.
Stop and inspect the cover again if you notice any issues. Ensure the cover is secure before driving longer distances. This simple step protects your wheels and ensures safety.
Credit: electrek.co
Troubleshooting Common Issues
Troubleshooting common issues with aero wheel covers helps avoid damage and saves time. Problems often arise from poor fit or damaged clips. Knowing how to handle these can make removal easier. Below are key solutions to frequent problems.
Cover Not Fitting Correctly
Sometimes the cover feels loose or too tight. This can happen if the cover size does not match the wheel. Check the size printed on the cover and compare it to the wheel diameter.
Try aligning the cover’s clips with the wheel’s rim holes. Press evenly around the edges. Avoid forcing the cover as it can break the clips or the cover itself.
Clean the wheel rim before fitting the cover. Dirt or grease can stop the cover from fitting well. Use a cloth and mild cleaner to wipe the rim.
Clip Damage Solutions
Clips hold the cover securely. Broken clips cause the cover to fall off or not fit right. Inspect clips for cracks or bends before removal.
Use plastic tools to pry the cover gently. Metal tools can damage clips easily. If clips break, replace them with new ones from the manufacturer.
Keep spare clips handy. They are inexpensive and easy to install. Replace damaged clips promptly to avoid losing the cover while driving.
Frequently Asked Questions
How Do I Safely Remove Aero Wheel Covers?
To remove Aero wheel covers safely, use a flathead screwdriver or pry tool. Gently insert it between the cover and the rim. Carefully pry the cover off, working around the wheel evenly to avoid damage.
What Tools Are Needed To Remove Aero Wheel Covers?
You need a flathead screwdriver or a plastic pry tool. These tools help to gently lift and remove the Aero wheel covers without scratching the wheel or cover.
Can I Remove Aero Wheel Covers Without Damaging Them?
Yes, by using gentle pressure and the right tools. Avoid using excessive force or metal tools that can cause scratches or cracks on the covers.
How Often Should Aero Wheel Covers Be Removed?
Remove Aero wheel covers when cleaning, maintenance, or tire replacement is needed. Frequent removal is not necessary and can increase wear on the clips.
Conclusion
Removing Aero wheel covers is simple with the right steps. Take your time and follow the instructions carefully. Use the proper tools to avoid damage. Check the covers for clips or screws before pulling. Keep the covers in a safe place after removal.
Cleaning the wheels becomes easier without the covers. This task saves money and helps with vehicle maintenance. Practice makes the process faster and more confident. Try it yourself and see how easy it can be.


