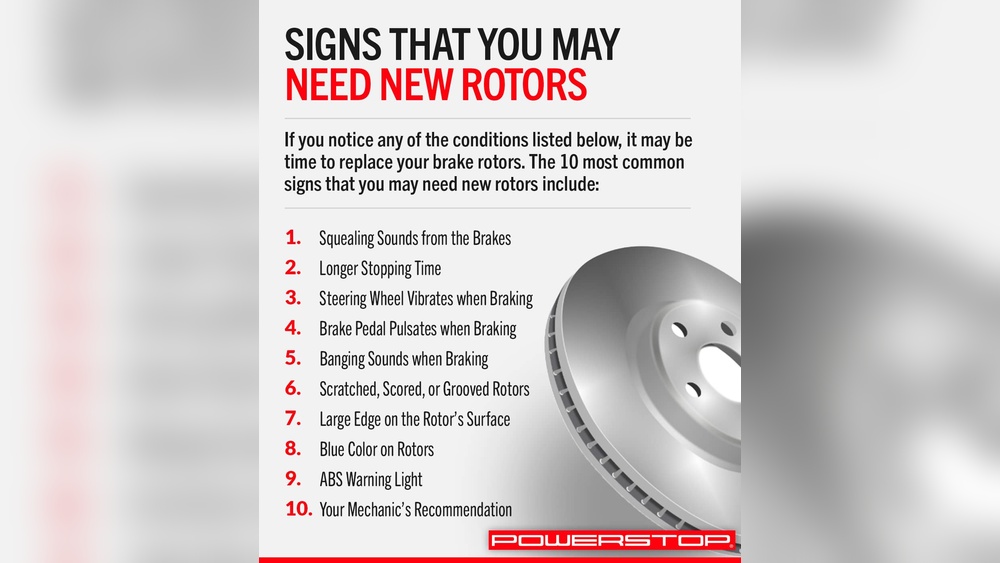
If your brakes feel less responsive or make strange noises, your brake rotors might be glazed. This glazing can reduce your braking power and make driving unsafe.
But don’t worry—you can fix this yourself with the right steps. You’ll learn exactly how to remove glazing from your brake rotors quickly and safely. Keep reading to restore your brakes’ performance and drive with confidence again.
Signs Of Glazed Brake Rotors
Glazed brake rotors show clear signs that affect your car’s safety. Spotting these signs early helps avoid bigger problems. The surface of the rotors becomes smooth and shiny. This change affects how brakes work and how the car feels during stops.
Common Symptoms
Brakes may feel less responsive or soft. You might hear squealing or squeaking noises. The pedal can vibrate when pressed. Sometimes, the car pulls to one side while braking. These signs point to glazing on the rotors.
Effects On Braking Performance
Glazed rotors reduce the grip of brake pads. This leads to longer stopping distances. Brakes can feel weak or uneven in power. Heat builds up faster, causing more wear. Overall, glazing lowers brake safety and control.
Tools Needed For Removal
Removing glazing from brake rotors requires the right tools. These tools help you work safely and effectively. Preparing your workspace with proper equipment ensures a smoother process and better results.
Essential Equipment
Start with a sturdy jack to lift the vehicle safely. Use jack stands to support the car securely. A lug wrench helps remove the wheel bolts. A wire brush removes rust and debris from the rotor surface. Sandpaper or a brake rotor resurfacing tool smooths out the glaze. Clean rags or brake cleaner wipes off dust and residue. A torque wrench ensures bolts are tightened to the right level.
Safety Gear
Wear safety goggles to protect your eyes from dust and metal particles. Use gloves to keep your hands safe from sharp edges. A dust mask prevents inhaling brake dust, which can be harmful. Closed-toe shoes protect your feet from heavy objects. Always work in a well-ventilated area to avoid breathing in fumes or dust.
Preparing Your Vehicle
Preparing your vehicle is the first step to safely remove glazing from brake rotors. Taking time to get your car ready helps avoid accidents. It also makes the process smoother and faster.
Start by making sure the car is stable and secure. This gives you a safe working space. Then, remove the wheel to access the brake rotor easily. These steps are important for a proper job.
Securing The Car
Park your car on a flat surface. Turn off the engine and set the parking brake. Place wheel chocks behind the wheels that stay on the ground.
Use a jack to lift the car. Follow your vehicle’s manual for the right lift points. Once lifted, place jack stands under the car for extra support. Never work under a car supported only by a jack.
Removing The Wheel
Loosen the lug nuts with a wrench before lifting the car. After the car is on jack stands, remove the lug nuts completely. Take off the wheel and set it aside carefully.
Now, you can see the brake rotor clearly. This access is necessary to check and remove glazing properly.
Cleaning The Brake Rotors
Cleaning the brake rotors is a key step to remove glazing and restore proper braking. Dirt, dust, and old brake fluid can build up on the rotors. This buildup causes uneven braking and noise. Proper cleaning makes the surface smooth and ready for use. Follow these simple steps to clean your brake rotors safely and effectively.
Using Brake Cleaner
Start by spraying the brake cleaner directly on the rotor surface. The cleaner removes grease, oil, and grime quickly. Use a good quality brake cleaner for best results. Spray evenly and cover all areas of the rotor. Let the cleaner sit for a few seconds to break down dirt. Avoid touching the rotor after spraying to keep it clean.
Wiping Off Debris
Take a clean, lint-free cloth to wipe off the debris. Use firm but gentle strokes to avoid scratching the rotor. Remove all the dirt and residue left by the cleaner. Repeat spraying and wiping if needed for stubborn grime. Make sure the rotor is dry and clean before reassembling the brakes. Clean rotors help maintain smooth and safe braking.
Removing Glaze With Sandpaper
Removing glaze from brake rotors with sandpaper is a simple and effective method. Glazing happens when the rotor surface becomes smooth and shiny. This causes poor braking performance. Sandpaper helps to roughen the surface and restore proper friction. This process saves money and extends the life of your rotors.
Choosing The Right Grit
Start by selecting the right sandpaper grit. Use medium grit sandpaper, such as 120 to 150 grit. This grit removes the glaze without damaging the rotor. Avoid very coarse sandpaper. It can create deep scratches. Fine grit sandpaper will not remove the glaze effectively. Medium grit offers the best balance for this job.
Proper Sanding Technique
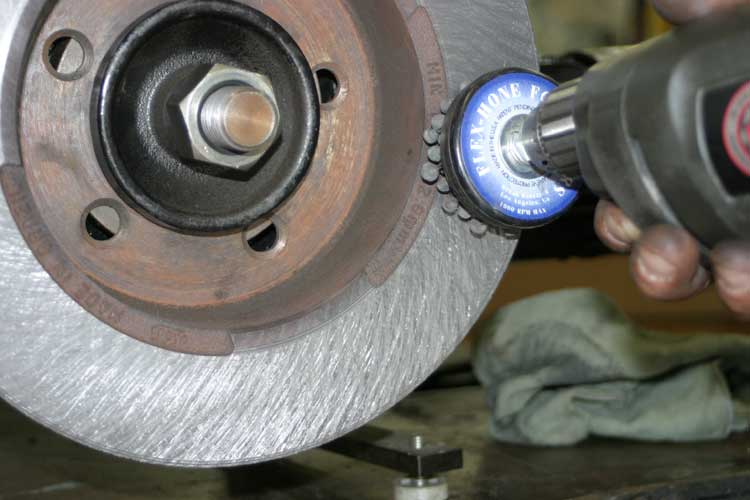
Begin sanding with light, even pressure. Move the sandpaper in a circular motion across the rotor surface. Cover the entire rotor face evenly. Do not sand too hard or for too long in one spot. This prevents uneven rotor thickness. Wipe the rotor clean with a cloth after sanding. This removes dust and particles before reinstallation.
Credit: www.renntech.org
Using A Brake Rotor Resurfacer
Using a brake rotor resurfacer is a common method to remove glazing from brake rotors. This tool smooths the rotor surface, restoring proper brake function. It helps remove the shiny, hardened layer caused by excessive heat or wear.
The resurfacer can extend the life of your rotors and improve braking performance. Learning to use this tool correctly ensures a safe and effective repair.
How To Use The Tool
First, remove the wheel and brake caliper. Secure the rotor on a stable surface or the resurfacer machine. Turn on the tool and gently press the resurfacer against the rotor surface. Move the tool evenly across the rotor to avoid uneven wear. Continue until the rotor surface looks smooth and matte. Clean the rotor with a cloth before reassembling the brake system.
Safety Tips
Wear safety goggles and gloves to protect eyes and hands. Work in a well-ventilated area to avoid dust inhalation. Keep the tool away from loose clothing or hair. Disconnect the battery if working on an electric vehicle. Inspect the rotor for cracks or severe damage before resurfacing. Stop immediately if the tool feels hot or catches on the rotor.
Reassembling And Testing
After removing glazing from your brake rotors, putting everything back correctly is key. Careful reassembly ensures your brakes work safely and smoothly. Testing the brakes after reassembly helps confirm the fix.
Putting Components Back
Begin by placing the brake rotor back onto the wheel hub. Align it carefully to avoid damage. Next, reinstall the brake caliper over the rotor. Secure the caliper bolts tightly but do not overtighten. Reattach the brake pads in their correct slots. Make sure all parts fit snugly and move freely. Double-check every bolt and clip for firmness. Proper reassembly prevents noise and brake failure.
Performing A Brake Test
Start the vehicle and press the brake pedal slowly. Feel for any unusual resistance or noise. Drive at a low speed in a safe area. Apply brakes gently several times to test response. Listen for squeaks or grinding sounds. If brakes feel soft or unsteady, stop and inspect again. A good brake test ensures safety and proper function.

Credit: www.reddit.com
Preventing Future Glazing
Preventing glazing on brake rotors keeps your brakes working well for a long time. Glazing happens when the brake pads get too hot and leave a smooth, shiny layer on the rotors. This layer reduces braking power and causes noise. Taking steps to stop glazing saves money and keeps your drives safe.
Driving Habits
Drive with smooth, gentle braking. Avoid hard stops whenever possible. Use engine braking by shifting to lower gears on hills. This reduces heat buildup on brake parts. Do not ride the brakes on long downhill stretches. Give brakes time to cool after heavy use. These habits lower the chance of glazing.
Regular Maintenance
Check your brake pads and rotors often. Replace worn pads before they damage rotors. Clean brake parts to remove dust and debris. Have a mechanic inspect the brakes at least once a year. Proper maintenance helps brakes stay cool and work well. It prevents glazing and other brake problems.

Credit: www.youtube.com
Frequently Asked Questions
What Causes Glazing On Brake Rotors?
Glazing occurs when brake pads overheat, creating a smooth, hardened surface on the rotors. This reduces braking efficiency and causes noise or vibration.
How Can I Tell If Brake Rotors Are Glazed?
Glazed rotors look shiny or glassy. You may also feel reduced braking power, noise, or vibration when applying brakes.
What Tools Are Needed To Remove Glazing From Rotors?
You need sandpaper or a brake rotor resurfacing tool. A clean cloth and brake cleaner help remove debris after sanding.
Can I Remove Glazing From Rotors Without Removing Them?
Yes, light glazing can sometimes be removed by sanding the rotor surface while it’s still on the vehicle, but removal is recommended for thorough resurfacing.
Conclusion
Removing glazing from brake rotors helps improve braking safety and performance. Take your time to follow the steps carefully. Use proper tools and safety gear to avoid injuries. Clean rotors ensure smooth, quiet brakes and longer part life. Regular checks can prevent glazing from causing bigger problems.
Keep your brakes in good shape for safer driving every day. Simple maintenance saves money and stress on the road. Now, you know how to handle glazed brake rotors with ease.