
Are you hearing strange noises when you brake or feeling your car vibrate? It might be time to replace your brake rotors.
Knowing how to replace brake rotors yourself can save you money and give you peace of mind on the road. This guide will walk you through every step, making the process simple and stress-free. By the end, you’ll have the confidence to keep your brakes in top shape and ensure your safety.
Keep reading to learn how to do it right, fast, and without any confusion.

Credit: www.youtube.com
Tools And Materials Needed
Replacing a brake rotor needs the right tools and materials. Prepare all items before starting. This saves time and avoids mistakes. Having everything ready makes the job safer and easier.
Essential Tools
- Socket wrench set for removing bolts
- Torque wrench to tighten bolts correctly
- Brake caliper tool or C-clamp to compress the caliper
- Jack and jack stands to lift and hold the car
- Lug wrench to remove wheel nuts
- Flathead screwdriver to pry off parts gently
- Hammer or rubber mallet for stuck rotors
- Wire brush to clean rust and dirt
Replacement Parts
- New brake rotors matching your vehicle model
- Brake pads, recommended to replace with rotors
- Brake grease to lubricate moving parts
- New bolts if old ones are worn or damaged
Safety Equipment
- Safety glasses to protect your eyes
- Mechanic gloves to protect your hands
- Dust mask to avoid breathing brake dust
- Wheel chocks to prevent the car from moving
Credit: www.buybrakes.com
Preparing Your Vehicle
Preparing your vehicle is the first step in replacing a brake rotor. It helps keep you safe and makes the job easier. Follow these steps carefully to get ready before you start working on the brakes.
Parking And Securing
Park your car on a flat surface. Avoid slopes or soft ground. Turn off the engine and apply the parking brake firmly. Place wheel chocks behind the wheels that stay on the ground. This stops the car from rolling while you work.
Loosening Lug Nuts
Before lifting the car, loosen the lug nuts on the wheel. Use a lug wrench or tire iron. Turn the nuts counterclockwise. Do not remove them fully yet. Just break them loose enough to unscrew later by hand.
Lifting The Vehicle
Use a proper car jack to lift the vehicle. Check your owner’s manual for the right jack points. Place the jack under a strong part of the frame. Lift the car until the wheel is off the ground. Support the car with jack stands. Never work under a car supported only by a jack.
Removing The Old Rotor
Removing the old brake rotor is an important step in brake maintenance. It helps keep your car safe and stops it from making noise. This process requires care and the right tools. Follow each step carefully to avoid damage and make the job easier.
Taking Off The Wheel
First, loosen the lug nuts with a wrench. Do this before lifting the car. Use a jack to raise the vehicle safely. Place jack stands under the car for support. Remove the lug nuts fully. Take the wheel off and set it aside.
Removing The Brake Caliper
Locate the brake caliper next to the rotor. Use a socket or wrench to remove the caliper bolts. Gently pull the caliper away from the rotor. Do not let the caliper hang by the brake line. Use a hook or rest it on a secure surface.
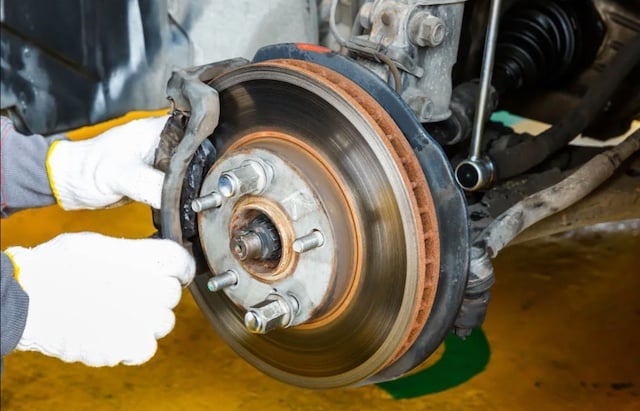
Detaching The Rotor
Check if the rotor is held by screws or clips. Remove any screws with a screwdriver. If the rotor is stuck, tap it lightly with a hammer. Pull the rotor straight off the wheel hub. Clean the hub surface before installing a new rotor.
Installing The New Rotor
Installing the new rotor is a key step in brake rotor replacement. It ensures your vehicle stops smoothly and safely. This part of the process needs care and attention to detail. Follow each step to place the new rotor correctly and prepare for reassembly.
Cleaning The Hub
Start by cleaning the hub surface. Remove all rust, dirt, and debris. Use a wire brush or sandpaper for this task. A clean hub helps the rotor sit flat and prevents vibrations. Wipe the area with a cloth to clear loose particles.
Positioning The New Rotor
Place the new rotor onto the hub carefully. Align it with the bolt holes and the hub center. Make sure the rotor sits flush against the hub surface. Avoid touching the rotor face with oily hands to keep it clean. Secure the rotor temporarily with a lug nut if needed.
Reassembling The Brake Components
Put the brake caliper bracket back over the rotor. Tighten the mounting bolts to the recommended torque. Slide the brake pads into their slots within the caliper. Reattach the brake caliper and secure it firmly. Double-check all bolts and parts for tightness before finishing.
Final Steps And Safety Checks
After installing the new brake rotor, completing the final steps is crucial. These steps ensure your vehicle is safe to drive. Proper tightening, lowering, and testing make sure the brakes work well. Take your time with each task to avoid problems later.
Tightening Lug Nuts
Start by putting the wheel back on the hub. Hand-tighten the lug nuts in a star pattern. This helps the wheel sit evenly on the rotor. Use a torque wrench to tighten the nuts to the correct torque. Check your vehicle’s manual for the right torque value. Tightening nuts unevenly can cause vibrations and damage.
Lowering The Vehicle
Slowly lower the car using the jack. Remove the jack stands carefully. Keep the vehicle steady as you lower it. Once on the ground, tighten the lug nuts again with the torque wrench. This second check ensures they are secure after the car’s weight is on the wheel.
Testing The Brakes
Before driving, press the brake pedal several times. The pedal should feel firm and not sink to the floor. Test the brakes at low speed in a safe area. Listen for strange noises and check for smooth stopping. If anything feels wrong, recheck the installation or seek help.
Common Issues And Troubleshooting
Replacing brake rotors can solve many car braking problems. Yet, some issues may still occur after installation. Knowing common problems helps you fix them fast. This section covers typical rotor issues and how to troubleshoot them. Understanding these problems saves time and keeps your vehicle safe.
Rotor Noise
Noise from the brake rotor can be annoying and unsafe. Squealing or grinding sounds often mean worn brake pads or dirty rotors. Sometimes, rust builds up on the rotor surface, causing noise. Check the rotor and pads for damage or debris. Cleaning or replacing parts usually stops the noise.
Brake Pulsation
Pulsation feels like a shaking or vibration in the brake pedal. This happens when rotors are warped or uneven. Warping occurs from overheating or poor installation. Measure rotor thickness and surface flatness. Resurfacing or replacing the rotor often fixes pulsation problems.
Uneven Wear
Uneven rotor wear causes poor braking and noise. It happens when brake pads wear unevenly or calipers stick. Inspect the brake pads and calipers for damage or dirt. Replacing worn parts and cleaning calipers helps maintain even rotor wear. Proper installation also prevents uneven wear.
Tips For Brake Maintenance
Proper brake maintenance keeps your vehicle safe and saves money. Regular care helps your brakes work well longer. Simple habits prevent damage and costly repairs.
Regular Inspections
Check your brakes often. Look for noise, vibration, or pulling to one side. Inspect brake pads and rotors visually. Early problems are easier to fix.
When To Replace Rotors
Replace rotors if they are cracked or warped. Deep grooves or rust are signs too. Thin rotors reduce braking power and are unsafe. Follow your vehicle’s manual for replacement intervals.
Extending Brake Life
Drive smoothly to avoid hard stops. Avoid riding the brakes on hills. Keep brake fluid clean and at the right level. Store your car in a dry place to reduce rust.

Credit: www.wikihow.com
Frequently Asked Questions
How Do I Know When To Replace Brake Rotors?
Replace brake rotors if you hear squealing, grinding, or feel vibrations. Also, check for visible cracks or warping. Measure thickness to ensure it meets manufacturer specs. Worn rotors reduce braking efficiency and safety.
What Tools Are Needed To Replace Brake Rotors?
You need a jack, lug wrench, socket set, C-clamp, screwdriver, and torque wrench. Safety gloves and eye protection are also essential. Having a service manual for your vehicle helps guide the process.
Can I Replace Brake Rotors Myself Safely?
Yes, with proper tools, knowledge, and safety precautions, you can replace rotors yourself. Follow step-by-step instructions carefully. If unsure, consult a professional to avoid safety risks and damage.
How Long Does It Take To Replace Brake Rotors?
Replacing brake rotors usually takes 1 to 2 hours for both front or rear wheels. Time depends on your experience and tools available. Allow extra time for inspections and adjustments.
Conclusion
Replacing a brake rotor is simpler than it seems. Take your time and follow each step carefully. Use the right tools for safety and accuracy. Check your work before finishing to avoid problems later. Regular brake care keeps your car safe on the road.
Practice makes the process easier and faster next time. Trust yourself and stay calm during the repair. Your car will thank you with better stopping power. Feel proud of doing this task on your own.

