
Are you tired of your steering wheel feeling slippery or worn out? Stitching a steering wheel cover yourself is easier than you think, and it can completely transform your driving experience.
Imagine having a grip that feels just right and adds a touch of style to your car’s interior. In this guide, you’ll learn simple steps to stitch your own steering wheel cover with confidence. Keep reading, and you’ll discover how to make your steering wheel look and feel brand new—without spending a fortune.
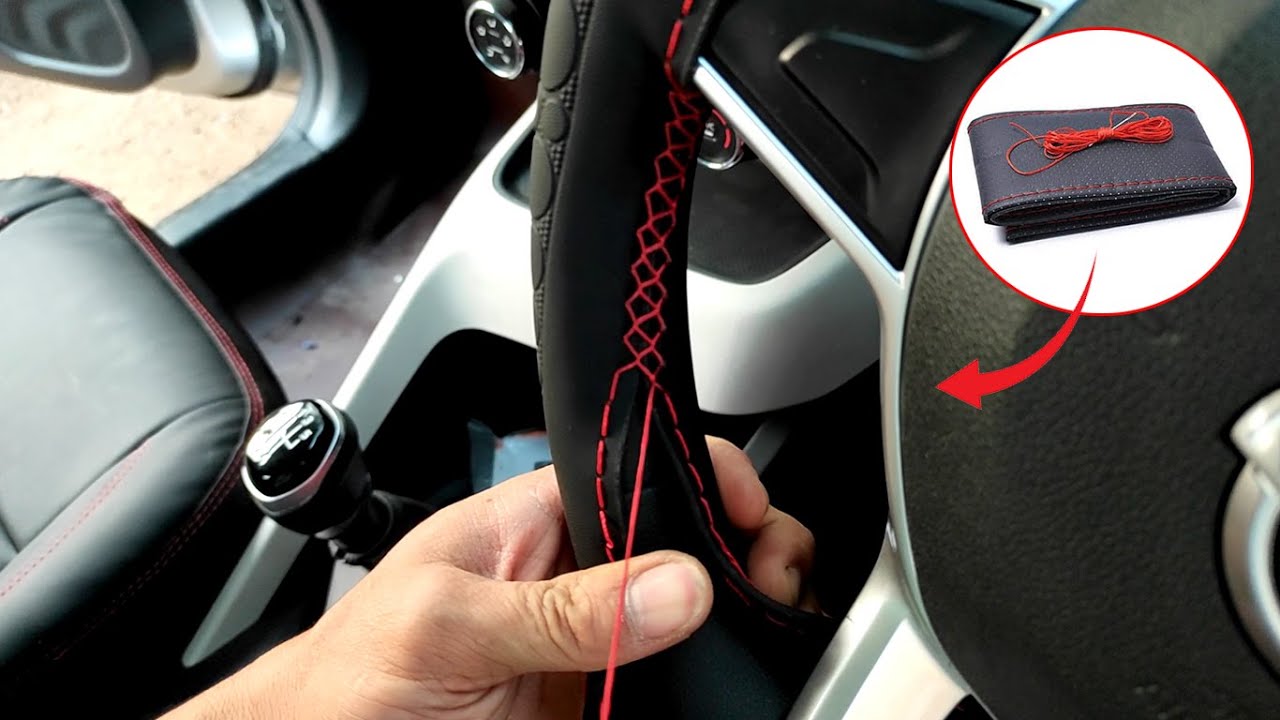
Credit: www.youtube.com
Tools And Materials Needed
Stitching a steering wheel cover needs the right tools and materials. These help you get a neat and strong finish. Preparing well saves time and avoids mistakes.
Choosing The Right Cover Material
Pick a material that feels good in your hands. Leather and faux leather are popular for durability and grip. Fabric covers offer more color choices and comfort. Make sure the material is thick enough to last long.
Essential Stitching Tools
Use a strong needle designed for leather or thick fabric. Heavy-duty thread prevents breaking during use. A stitching awl or thimble helps push the needle through tough material. Scissors and a ruler keep cuts and stitches even.
Preparing Your Workspace
Find a clean, flat surface with good light. Organize your tools and materials close by. Keep extra thread and needles handy. Clear space helps you work faster and avoid losing small parts.
Preparing The Steering Wheel
Preparing the steering wheel is the first step before stitching a new cover. A clean and smooth surface helps the cover fit better. It also makes the stitching last longer. Take time to prepare the wheel carefully. This ensures a neat and strong finish.
Cleaning The Surface
Start by wiping the steering wheel with a damp cloth. Remove dust, dirt, and oils from your hands. Use mild soap and water if needed. Avoid harsh chemicals that can damage the wheel. Let the wheel dry completely before moving on. A clean surface helps the cover stick and prevents slipping.
Removing Old Covers
Check if there is an old cover on the wheel. Carefully pull it off by loosening any fasteners or stitches. If glued, use a plastic scraper to avoid scratching. Remove leftover glue or debris with rubbing alcohol. Make sure the wheel is smooth and free of bumps. This step allows the new cover to fit tightly and look good.
Measuring And Cutting The Cover
Measuring and cutting the steering wheel cover is a key step. This step ensures the cover fits tightly and looks neat. Precise measurements and clean cuts help avoid mistakes.
Take your time to get the right size. A well-cut cover makes stitching easier and gives a professional finish.
Taking Accurate Measurements
First, measure the steering wheel’s diameter. Use a flexible tape measure for best results. Wrap it around the wheel’s outer edge carefully. Note the measurement in inches or centimeters.
Next, measure the width of the wheel. This helps determine the cover’s height. Add a little extra length for seam allowance. Usually, adding one inch on each side works well.
Double-check all measurements before cutting. Small errors can cause a loose or tight fit. Write down the numbers clearly for reference.
Cutting The Material
Choose a sharp pair of scissors or a rotary cutter. Lay the cover material flat on a clean surface. Mark the measurements on the material using chalk or a fabric marker.
Cut slowly along the marked lines. Try to keep the edges smooth and even. Avoid jagged cuts that make sewing difficult.
Cut two pieces: one for the front and one for the back. Make sure both pieces match in size perfectly.
Starting The Stitching Process
Starting the stitching process is the key step to fit your steering wheel cover perfectly. It sets the base for neat and tight stitches that hold the cover in place. Taking time here helps avoid loose or uneven seams later.
Focus on precision and patience. Prepare your materials and workspace for a smooth start. Follow each step carefully to ensure your cover fits well and looks great.
Aligning The Cover On The Wheel
Place the cover evenly around the steering wheel. Match the edges carefully so no part is twisted or stretched. Check that the holes for stitching line up well. This alignment is crucial for smooth stitching and a snug fit.
Hold the cover firmly but gently. Adjust it as needed to get a perfect fit. Small shifts now prevent big problems during stitching.
Threading The Needle
Choose a strong thread that matches the cover color. Cut a length that is easy to handle, about 18 inches long. Thread the needle carefully through the eye without fraying the thread.
Pull the thread halfway through, so both ends are even. Tie a small knot at one end. This knot will stop the thread from slipping during stitching.
Stitching Techniques
Stitching a steering wheel cover needs the right techniques. Good stitching holds the cover tight and looks neat. It also helps the cover last longer. Learning key stitching methods makes the project easier and the result better.
Basic Stitch Patterns
Start with simple stitch patterns. The most common is the running stitch. It goes in and out evenly along the edge. Another easy option is the whipstitch. It wraps around the edge for a clean finish. Both patterns keep the cover secure and look tidy.
Maintaining Even Tension
Keep the thread tension steady. Pull the thread just enough to fit the cover snugly. Too tight will make the cover pucker. Too loose will cause gaps or wrinkles. Consistent tension helps the cover fit smoothly around the wheel.
Securing The Ends
Secure the thread ends to stop unraveling. Tie small knots at the start and finish points. Hide the knots inside the cover edge. Trim excess thread close to the knots. Properly secured ends keep the stitching safe and neat.
Finishing Touches
After stitching your steering wheel cover, the last steps make it look neat and last long. These final touches ensure the cover fits well and feels comfortable. Attention to detail here improves the overall finish and durability. Take time to complete these simple tasks carefully.
Trimming Excess Thread
Cut the extra thread close to the knots. Leave a small tail to avoid unraveling. Use sharp scissors for a clean cut. Trim all loose threads evenly around the cover. This makes your work look tidy and professional.
Checking For Loose Areas
Run your fingers along the stitching. Feel for any loose or weak spots. Tighten or restitch any areas that feel loose. This prevents the cover from coming apart later. A secure stitch keeps the cover in place while driving.
Installing The Cover
Slide the cover onto the steering wheel slowly. Adjust it evenly around the wheel’s edge. Pull the cover tight to avoid wrinkles or gaps. Make sure the cover fits snugly for safety and comfort. Test the steering wheel grip before driving.
Maintenance Tips
Maintaining your steering wheel cover keeps it looking fresh and lasting longer. Simple care steps prevent dirt build-up and damage. Regular attention saves money and effort in the long run.
Cleaning Your Steering Wheel Cover
Remove the cover gently before cleaning. Use a soft cloth with mild soap and water. Avoid harsh chemicals that can damage the material. Wipe the cover lightly to remove dirt and stains. Let it air dry completely before reinstalling. Clean your cover every two weeks to keep it fresh.
Repairing Minor Damages
Check your cover often for small tears or loose stitches. Use a needle and thread to fix minor holes. Match the thread color to keep the repair invisible. Tighten any loose seams carefully. Small repairs stop bigger problems and extend the cover’s life.

Credit: www.reddit.com

Credit: www.reddit.com
Frequently Asked Questions
How Do I Start Stitching A Steering Wheel Cover?
Begin by aligning the cover’s edges around the steering wheel. Use a strong needle and durable thread. Secure the starting point with a knot to prevent unraveling during stitching.
What Type Of Thread Is Best For Steering Wheel Covers?
Use heavy-duty polyester or nylon thread. These threads offer durability and resistance to wear. They also withstand frequent handling and temperature changes in vehicles.
How Long Does It Take To Stitch A Steering Wheel Cover?
It typically takes 30 to 60 minutes. Time varies depending on skill level and stitching method used. Taking your time ensures a neat and secure finish.
Can I Stitch A Steering Wheel Cover Without A Sewing Machine?
Yes, hand stitching is effective and common. Use a strong needle and take small, even stitches. Hand stitching provides better control around curves and edges.
Conclusion
Stitching a steering wheel cover is simple and rewarding. Take your time and follow each step carefully. You will enjoy a better grip and a fresh look for your wheel. Practice makes perfect, so don’t worry if it takes a little time.
Your car feels more personal and comfortable with this small change. Keep your tools ready for future repairs or projects. Enjoy driving with your new cover and feel proud of your work.


