Is your bike’s braking feeling off, or do you hear annoying squeaks every time you hit the brakes? It might be time to true your disc brake rotor.
When your rotor isn’t perfectly straight, it can cause uneven braking, noise, and even damage to your brake system. But don’t worry—you don’t need to be a mechanic to fix this. You’ll learn simple, step-by-step tips to get your rotor back to smooth and safe performance.
Keep reading, and you’ll save money, avoid frustration, and enjoy a quieter, more reliable ride.
Tools Needed
Essential tools include a dial indicator, rotor truing stand, and sandpaper. A wrench set and cleaning supplies help too. These tools make rotor truing easier and more precise.
Basic Tools
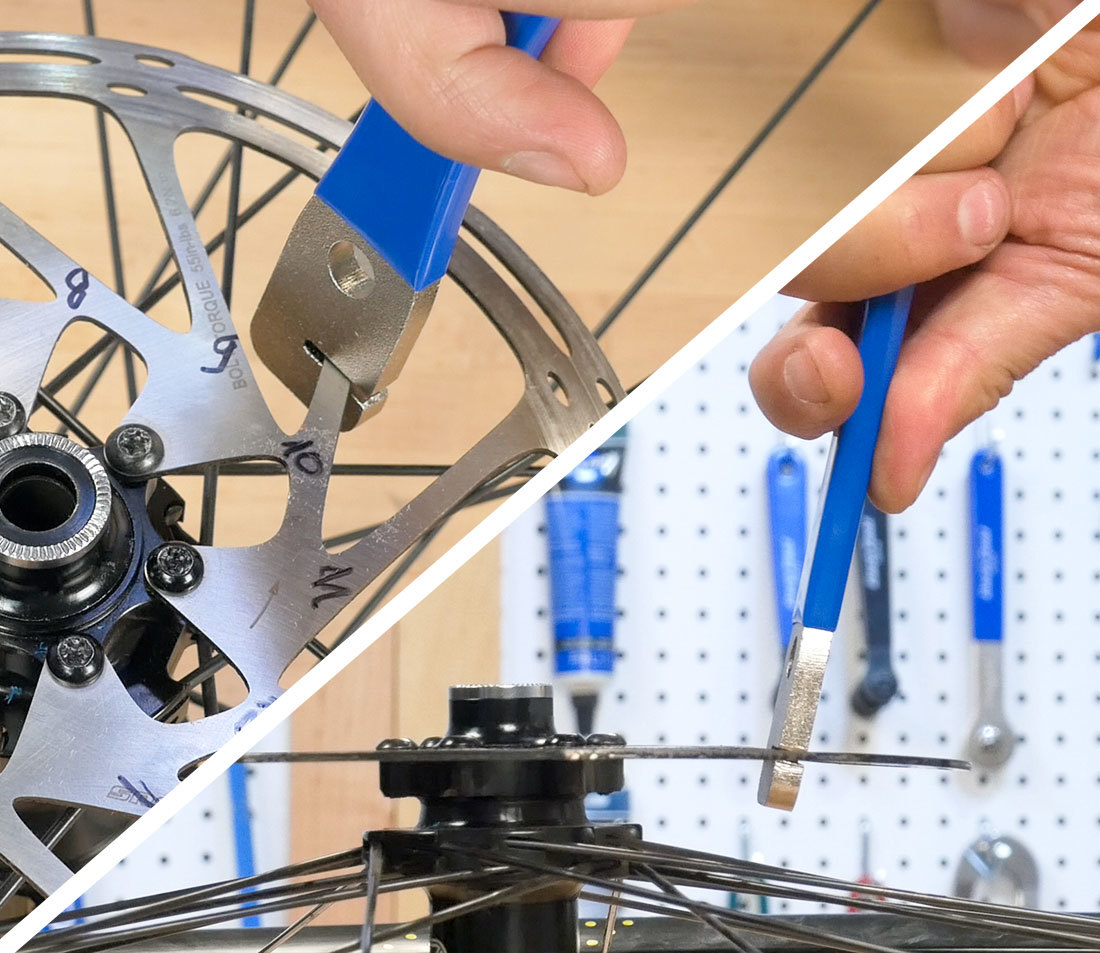
Start with simple tools for truing a disc brake rotor. You need a truing fork or a rotor truing tool. These tools help fix minor bends and warps in the rotor. A clean cloth is useful to wipe off dirt and grease before working.
Measuring Tools
A dial indicator or a rotor gauge shows the rotor’s runout. Runout means how much the rotor wobbles when it spins. These tools help you find where the rotor is bent. They make your work precise and effective.
Wrenches And Screwdrivers
You need a set of Allen wrenches or hex keys. These help remove and reinstall the rotor if needed. A screwdriver might be necessary for some rotor bolts. Keep these tools handy for adjustments and parts removal.
Safety Gear
Wear gloves to protect your hands from sharp edges. Eye protection guards against metal shards or dust. Safety first to avoid any injury while truing the rotor.
Credit: www.parktool.com
Signs Of A Warped Rotor
Warped rotors cause many problems while driving. They affect how your bike or car stops. Detecting signs early helps keep your brakes safe and working well. Knowing these signs saves time and money on repairs.
Vibrations When Braking
Feel your brake pedal or handle shake? Vibrations often mean rotor warping. The rotor surface is uneven. Each time the brake pads hit, it causes shaking.
Brake Noise
Squealing or grinding sounds during braking can signal a warped rotor. These noises happen because the pads do not touch the rotor smoothly. The rough surface makes noise.
Uneven Brake Pad Wear
Check your brake pads. If they wear unevenly, the rotor may be warped. Uneven contact wears pads more on one side than the other. This reduces brake efficiency.
Pulsing Brake Pedal
A pulsing or thumping brake pedal is a clear sign. It means the rotor surface is not flat. The pedal moves up and down while braking, making stopping harder.
Longer Stopping Distance
Your vehicle takes longer to stop. Warped rotors reduce braking power. Pads cannot grip the rotor properly. This increases the distance needed to stop safely.
Removing The Wheel And Caliper
Removing the wheel and caliper is the first step to true a disc brake rotor. This step gives you clear access to the rotor for inspection and adjustment. It is important to handle each part carefully to avoid damage.
Remove The Wheel
Start by loosening the lug nuts while the bike or car is on the ground. Then lift the vehicle using a jack or stand. Remove the lug nuts completely and take off the wheel. Place the wheel aside in a safe spot.
Detach The Brake Caliper
Locate the caliper bolts holding the brake caliper in place. Use the correct tool to unscrew these bolts. Gently pull the caliper away from the rotor. Do not let the caliper hang by the brake hose; support it with a hook or strap.
Prepare For Rotor Adjustment
With the caliper removed, inspect the rotor for dirt or damage. Clean the rotor surface if needed. Make sure the rotor spins freely before proceeding to true it. This clear access helps you spot uneven spots easily.

Credit: www.youtube.com
Inspecting The Rotor Surface
Inspecting the rotor surface is the first step to true a disc brake rotor. This process helps find any damage or uneven spots. A clean and smooth rotor ensures better braking and safety.
Check the rotor carefully before starting any work. Look closely at the surface under good light. Small problems can cause big issues if ignored.
Visual Check For Scratches And Grooves
Look for deep scratches or grooves on the rotor surface. These marks can reduce braking power and cause noise. Light surface marks are normal but deep ones need attention.
Feel For Warping Or Unevenness
Run your fingers gently over the rotor. You should feel a smooth, even surface. Warped or uneven areas cause brake vibration and reduce performance.
Check For Rust And Corrosion
Rust spots can weaken the rotor and affect braking. Surface rust is common but thick corrosion is a problem. Clean light rust with a brush or sandpaper.
Measure Rotor Thickness
Use a micrometer to check rotor thickness. Each rotor has a minimum thickness limit. Replace the rotor if it is too thin for safe use.
Mounting The Rotor For Truing
Mounting the rotor correctly is the first step to true a disc brake rotor. It sets the foundation for accurate and smooth rotor truing. The rotor must sit firmly and evenly on the hub to avoid wobbling during rotation.
Improper mounting can cause uneven wear and brake noise. This section guides you through the proper mounting process for truing a rotor.
Clean The Hub And Rotor Surface
Start by cleaning the hub where the rotor attaches. Dirt or grease can cause the rotor to sit unevenly. Use a clean rag and some rubbing alcohol. Wipe the rotor mounting surface too. A clean surface ensures a tight fit and less vibration.
Align The Rotor With The Hub
Place the rotor carefully on the hub. Make sure the bolt holes line up perfectly. The rotor should sit flat without rocking. Check the rotor’s position before tightening bolts. Proper alignment reduces the chance of rotor warping.
Tighten Bolts In A Star Pattern
Tighten the rotor bolts using a star pattern. This means tightening bolts opposite each other in sequence. It helps distribute pressure evenly across the rotor. Use a torque wrench to tighten bolts to the manufacturer’s spec. Even tightening prevents rotor distortion.
Spin The Wheel To Check For Wobble
After mounting, spin the wheel slowly. Watch the rotor edge for side-to-side movement. Minor wobble is normal but large wobble means remounting. Correct mounting reduces the time and effort needed to true the rotor.
Credit: www.parktool.com
Using A Dial Indicator
Using a dial indicator helps check the rotor for any wobble or unevenness. This tool measures small movements with high accuracy. It shows how much the rotor surface moves side to side during rotation. This method ensures precise rotor truing, improving brake performance and reducing noise.
Setting up the dial indicator correctly is essential. The tool must touch the rotor lightly without pressing too hard. Then, slowly rotate the wheel and observe the dial readings. The goal is to find the highest and lowest points on the rotor surface.
Mounting The Dial Indicator
Attach the dial indicator to a stable part of the bike or workbench. Position the probe so it touches the rotor near the hub. Make sure the probe is perpendicular to the rotor surface. This setup prevents false readings and increases accuracy.
Measuring Rotor Runout
Spin the wheel slowly by hand. Watch the dial needle as the rotor turns. Note the maximum and minimum values on the dial. The difference between these values is the rotor runout. A runout above 0.3 mm usually needs correction.
Adjusting The Rotor
If the runout is too high, gently bend the rotor at the affected spot. Use your fingers or a rotor truing tool for small adjustments. After each bend, recheck the runout with the dial indicator. Repeat until the rotor spins evenly with minimal runout.
Correcting Rotor Warps
Correcting rotor warps is key to smooth braking and safety. Warped rotors cause vibration and noise during braking. Fixing them extends rotor life and improves ride comfort.
This process needs patience and care. Use the right tools and gentle touch. Small adjustments make a big difference.
Applying Gentle Pressure
Start by holding the rotor firmly. Apply gentle pressure to the bent area. Use your fingers or a soft tool.
Press slowly and check the rotor’s flatness often. Avoid strong force that may worsen the warp.
Targeting High Spots
Identify the high spots on the rotor surface. These cause the most wobble during braking.
Focus your pressure on these areas. Push just enough to bring them down to level.
Avoiding Overbending
Make small corrections. Overbending can create new problems.
Check the rotor after each adjustment. Stop when the rotor spins smoothly without wobble.
Reassembling And Testing
Reassembling and testing the disc brake rotor is a key step to ensure safety and performance. After trueing the rotor, put the parts back carefully. Check each component for damage or wear. Proper reassembly prevents future problems and keeps brakes working well.
Testing the rotor after reassembly shows if the job is done right. It helps catch any issues before riding. The process is simple but important for smooth braking.
Reassembling The Brake Components
Start by placing the rotor back on the wheel hub. Tighten the bolts in a star pattern to keep the rotor even. Use a torque wrench to apply the correct tightness. Next, reinstall the brake caliper over the rotor. Make sure the brake pads sit properly inside the caliper. Check the brake lever for smooth movement.
Performing A Brake Function Test
Spin the wheel by hand and watch the rotor. The rotor should turn freely without rubbing. Squeeze the brake lever gently to see if the pads contact the rotor evenly. Listen for any unusual noises like scraping or grinding. These signs mean another adjustment may be needed.
Road Testing The Brakes
Take the bike for a short ride. Test the brakes at low speed first. Apply the brakes firmly and feel for smooth stopping power. If the brakes pull to one side, stop and check alignment. Repeat the test until the brakes feel balanced and strong.
Tips For Maintaining Rotor Health
Keeping your disc brake rotors in good shape is key for safe and smooth rides. Healthy rotors stop your bike or car effectively and last longer. Regular care helps avoid costly repairs and keeps your braking strong.
Simple habits protect rotors from damage and wear. Follow these tips to keep rotors true and reliable every time you hit the road.
Regular Cleaning To Remove Dirt And Debris
Clean rotors often to stop dirt buildup. Use a soft cloth and brake cleaner spray. Avoid oil or grease near rotors. Dirt can cause uneven wear and reduce braking power.
Check Rotor Thickness Frequently
Measure rotor thickness with a micrometer. Replace rotors if they are too thin. Thin rotors overheat easily and can warp. Keeping the right thickness ensures safe braking.
Inspect For Warping And Damage
Look closely for bends, cracks, or grooves. Warped rotors cause vibration and noise. If you spot damage, fix or replace rotors quickly. Riding on bad rotors can be dangerous.
Use Proper Brake Pads
Match brake pads to your rotor type. Harder pads wear rotors faster. Soft pads reduce rotor wear but may wear quicker themselves. Choose pads that balance performance and rotor life.
Avoid Overheating The Rotors
Brake gently and avoid sudden stops. Overheating causes rotor warping and cracking. Let rotors cool on long rides or steep descents. Cool rotors last longer and work better.
Frequently Asked Questions
What Tools Are Needed To True A Disc Brake Rotor?
You need a dial indicator, rotor truing stand, and a wrench. A rotor truing tool helps measure rotor runout accurately. These tools ensure precise adjustments and improve brake performance.
How Do You Identify A Warped Disc Brake Rotor?
Look for uneven brake pad wear, pulsating brake pedal, or noise when braking. Use a dial indicator to measure rotor runout. Warped rotors cause vibrations and reduced braking efficiency.
How Often Should Disc Brake Rotors Be Trued?
True rotors when you feel brake vibrations or see uneven wear. Regular checks every 6 months help maintain smooth braking. Timely truing extends rotor life and improves safety.
Can I True A Disc Brake Rotor At Home?
Yes, with proper tools and patience, you can true rotors at home. Follow safety steps and measure runout carefully. DIY truing saves costs but requires precision.
Conclusion
Trueing a disc brake rotor helps your bike stop smoothly and safely. It keeps the rotor even and reduces brake noise. Regular checks prevent damage and save money on repairs. Use simple tools and take your time. A straight rotor means better control and less wear on brake pads.
Small fixes can make a big difference in riding comfort. Keep practicing to improve your skills. Safe rides start with well-maintained brakes.