If you’ve ever noticed vibrations or pulsations when braking, your brake rotors might be the cause. But how can you be sure?
Using a dial indicator on your brake rotors is a simple and effective way to measure rotor runout and spot any issues before they turn into costly repairs. In this guide, you’ll learn exactly how to use a dial indicator step-by-step, so you can keep your brakes performing smoothly and safely.
Keep reading—you’re just minutes away from mastering a skill that can save you time, money, and stress on the road.
Choosing The Right Dial Indicator
Choosing the right dial indicator is important for checking brake rotors accurately. The right tool helps you measure rotor runout and surface variations. It ensures safe and smooth braking performance. Not all dial indicators work the same. Pick one that fits your needs and skill level.
Types Of Dial Indicators
Dial indicators come in different types. The most common type is the mechanical dial indicator. It uses a needle and dial face to show measurements. Digital dial indicators show numbers on a screen. They are easier to read and often more precise. Some dial indicators have magnetic bases. These bases help hold the tool steady on the rotor.
Key Features To Look For
Accuracy is the most important feature. Look for a dial indicator with a small graduation, like 0.001 inches. The measuring range should cover typical rotor runout values. A clear dial or digital display makes reading easier. The tool should be durable and easy to mount on brake parts. A magnetic base or clamp helps keep the indicator steady during measurement.
Preparing The Vehicle And Brake Rotor
Preparing the vehicle and brake rotor is the first step before using a dial indicator. This step ensures accurate and reliable measurements. Proper preparation helps avoid mistakes and protects both you and the vehicle.
Securing The Vehicle
Start by parking the vehicle on a flat, level surface. Apply the parking brake firmly. Place wheel chocks behind the wheels to prevent rolling. Loosen the lug nuts on the wheel before lifting the car. Use a jack to raise the vehicle safely. Support it with jack stands. Never rely on the jack alone. Remove the wheel to access the brake rotor easily.
Cleaning The Rotor Surface
Clean the brake rotor surface before measuring. Use a clean cloth to remove dirt and dust. Apply brake cleaner spray to remove grease and oil. Wipe the rotor with a dry cloth afterward. Dirt or oil on the rotor can cause inaccurate readings. Make sure the rotor is completely dry before proceeding.
Mounting The Dial Indicator
Mounting the dial indicator correctly on brake rotors is crucial for accurate measurements. This step ensures the tool stays steady and reads the rotor surface precisely. A well-mounted dial indicator helps detect any uneven wear or warping on the brake rotor.
Selecting A Stable Base
Choose a solid, stable base to mount the dial indicator. A magnetic base is ideal because it sticks firmly to metal parts. Attach the base to the brake caliper bracket or another sturdy part near the rotor. Avoid mounting on loose or moving parts to prevent false readings.
Positioning The Indicator Tip
Place the dial indicator tip perpendicular to the rotor surface. This position gives the most accurate measurement of rotor runout. The tip should touch the rotor’s outer edge gently but firmly. Adjust the arm so the tip stays in constant contact while the rotor spins slowly.
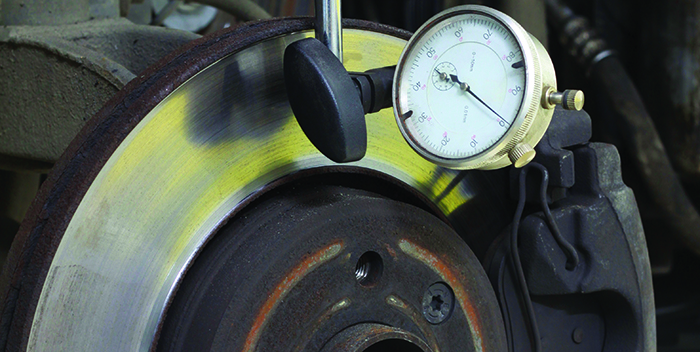
Measuring Rotor Runout
Measuring rotor runout is important to check brake rotor health. Runout means how much the rotor surface moves side to side as it spins. Too much runout causes brake vibration and uneven pad wear. Using a dial indicator helps find this movement accurately. This tool shows the small changes in rotor surface height.
Setting The Dial Indicator To Zero
Start by placing the dial indicator on a solid base near the rotor. Attach the tip of the indicator to the rotor surface, close to the outer edge. Make sure the tip touches the rotor firmly but not too tight.
Turn the dial face to set the needle at zero. This zero point is your baseline for measuring rotor movement. Check that the dial stays at zero before rotating the rotor. This step avoids errors in your readings.
Rotating The Rotor And Reading Measurements
Slowly rotate the rotor by hand. Watch the dial indicator needle as the rotor spins. Note the highest and lowest points the needle reaches. The difference between these points is the rotor runout.
Record the runout measurement. Compare it to the manufacturer’s limit. If the runout is too high, the rotor may need to be resurfaced or replaced.
Interpreting The Results
Interpreting the results from a dial indicator on brake rotors is key to maintaining safe driving. The readings show if the rotor surface is even or if there is any wobble. Understanding these numbers helps decide if the rotor needs repair or replacement.
Proper interpretation keeps your brakes working smoothly. It also prevents vibration and noise during braking. Let’s explore what the readings mean and how to spot problems.
Acceptable Runout Limits
Runout is the amount the rotor surface moves up and down as it spins. A small amount is normal. Most manufacturers say runout should not exceed 0.002 to 0.005 inches.
If the runout is within this range, the rotor is usually fine. Slight runout might not cause brake issues. But higher numbers can make brakes pulse or vibrate.
Always check your vehicle’s manual for exact limits. Some cars have tighter tolerances. Use the dial indicator readings to compare with these limits.
Identifying Rotor Warping Or Damage
High runout readings often mean rotor warping. Warping happens when rotors heat unevenly or wear out. Warped rotors cause shaking or noise when braking.
Look for runout above the acceptable limit. If the dial indicator needle jumps or swings a lot, the rotor surface is uneven. This points to damage or warping.
Minor warping may be fixed by resurfacing the rotor. Severe warping usually means the rotor must be replaced. Always address rotor issues to keep brakes safe and effective.
Credit: www.tirereview.com
Corrective Actions
After measuring brake rotors with a dial indicator, you might find issues like warping or uneven surfaces. These problems can cause vibrations or poor braking. Taking the right corrective actions is crucial to keep your vehicle safe and running smoothly. This section covers common fixes for brake rotor problems.
Rotor Resurfacing Options
Resurfacing removes a thin layer of metal to smooth out the rotor. It fixes minor warping or rough spots. You can use a brake lathe machine to do this job precisely. Resurfacing extends rotor life and improves brake performance. Always check rotor thickness before resurfacing. Too thin rotors are unsafe to resurface.
When To Replace The Rotor
Replace rotors if deep grooves or cracks appear. Also, discard if the rotor is thinner than the minimum thickness. Severe warping or damage cannot be fixed by resurfacing. New rotors ensure better braking and safety. Always replace rotors in pairs to keep balance and performance.
Tips For Accurate Measurements
Taking accurate measurements with a dial indicator on brake rotors is essential. It ensures the rotors are within the correct specifications. This helps avoid brake problems and keeps driving safe.
Small errors can lead to wrong readings. Careful attention and proper technique improve accuracy. Follow these tips to get the best results every time.
Avoiding Common Mistakes
Start with a clean rotor surface. Dirt and rust cause false readings. Secure the dial indicator firmly to avoid movement. Loose tools give unstable results.
Check the dial zero before measuring. Always reset it to zero on the rotor’s lowest spot. Measure slowly and avoid sudden motions. Fast movement causes needle jumps and errors.
Do not apply too much pressure with the indicator tip. Gentle contact is enough to get a reading. Avoid touching other parts that may shift the tool.
Maintaining Your Dial Indicator
Keep your dial indicator clean and dry. Wipe it after each use with a soft cloth. Store it in a protective case to prevent damage.
Regularly check for smooth needle movement. If it sticks or jumps, the tool needs servicing. Lubricate the moving parts with proper oil when needed.
Calibrate your dial indicator often. Use a known standard to ensure it measures correctly. Accurate tools give reliable brake rotor readings.

Credit: www.remmenbrakes.com

Credit: www.youtube.com
Frequently Asked Questions
How Do I Set Up A Dial Indicator On Brake Rotors?
Attach the dial indicator securely to a stable surface near the rotor. Position the tip on the rotor’s surface, ensuring contact. Zero the dial before rotating the rotor for accurate runout measurement.
What Does Dial Indicator Measure On Brake Rotors?
A dial indicator measures rotor runout, which is the lateral movement or wobble. This helps detect uneven wear or warping that causes brake vibration or noise.
When Should I Use A Dial Indicator On Rotors?
Use a dial indicator when you suspect brake pulsation, vibration, or uneven rotor wear. It helps diagnose rotor issues before replacing or machining them.
How To Read Dial Indicator Results On Brake Rotors?
Observe the dial needle movement as you rotate the rotor. Note the maximum and minimum readings. The difference shows rotor runout, which should be within manufacturer limits.
Conclusion
Using a dial indicator on brake rotors helps spot uneven wear or warping. This tool gives precise measurements, so you know if rotors need attention. Regular checks keep your brakes working safely and smoothly. Always follow the steps carefully to get accurate results.
Small efforts now can prevent bigger problems later. Keep your vehicle safe by checking brake rotors often with a dial indicator. Simple and effective.