You want your car to stand out, and your spoiler is the perfect place to start. Vinyl wrapping a spoiler is an easy, cost-effective way to give your vehicle a fresh, custom look without spending a fortune.
But if you’ve never done it before, the process might seem tricky. Don’t worry—this guide will walk you through every step, helping you avoid common mistakes and achieve a smooth, professional finish. By the end, you’ll know exactly how to transform your spoiler and make your car truly yours.
Ready to get started? Let’s dive in!

Credit: www.youtube.com
Preparing The Spoiler
Preparing the spoiler is the first key step before applying vinyl wrap. It ensures the wrap sticks well and looks smooth. A clean and smooth surface helps avoid bubbles and wrinkles.
Cleaning And Removing Dirt
Start by washing the spoiler with soap and water. Use a soft cloth to remove dirt and dust. Dry the surface completely with a clean towel. Avoid using oily or greasy cleaners. They can stop the vinyl from sticking properly.
Sanding And Smoothing Surface
Lightly sand the spoiler using fine-grit sandpaper. This step removes old paint chips and rough spots. Sand in small, gentle circles to keep the surface even. Wipe the spoiler with a damp cloth to clear sanding dust. Let it dry fully before moving to the next step.
Removing The Spoiler (optional)
Removing the spoiler can make wrapping easier. It allows you to work without bends or edges in the way. Use the right tools to avoid damage. Keep screws and bolts safe for reassembly. If you prefer, you can wrap the spoiler while it’s still on the car, but removal gives better results.
Choosing The Right Vinyl Wrap
Choosing the right vinyl wrap is key to a great spoiler makeover. The right wrap changes your car’s look and lasts a long time. It also makes the wrapping process easier. Consider the type, color, finish, and size. These factors help you pick the best wrap for your spoiler.
Types Of Vinyl Wraps
There are many vinyl wrap types. Cast vinyl is thin and flexible. It fits curves well and lasts longer. Calendared vinyl is thicker and less flexible. It works better for flat surfaces. Some wraps have air-release technology. It stops bubbles during installation. Choose a type that fits your spoiler shape.
Selecting Color And Finish
Color changes your car’s style. Choose a color that matches or stands out. Glossy finishes shine bright and look new. Matte finishes have no shine and look smooth. Satin finishes are between glossy and matte. Textured finishes like carbon fiber add style. Pick a finish that suits your taste and car’s look.
Measuring For Material
Measure your spoiler carefully. Use a tape measure to get length and width. Add extra material for curves and edges. About 10 to 15 percent more is safe. This extra helps during wrapping and trimming. Accurate measurement avoids running out of wrap. It saves money and time.
Tools And Materials Needed
Before starting to vinyl wrap a spoiler, gather all tools and materials. Having everything ready makes the process smooth. It saves time and avoids frustration. The right tools help get a clean, professional look. Below are the key items needed.
Essential Tools
- Vinyl wrap film designed for automotive use
- Heat gun to soften vinyl for shaping
- Squeegee to smooth out air bubbles
- Utility knife with sharp blades for trimming
- Measuring tape to size the vinyl accurately
- Surface cleaner to remove dust and grease
- Gloves to protect hands and avoid fingerprints
Additional Supplies
- Masking tape to hold vinyl temporarily in place
- Isopropyl alcohol for final surface cleaning
- Lint-free cloths to wipe surfaces clean
- Spray bottle with water and soap mix for repositioning
- Soft microfiber towel for drying
- Plastic card for delicate smoothing in hard spots
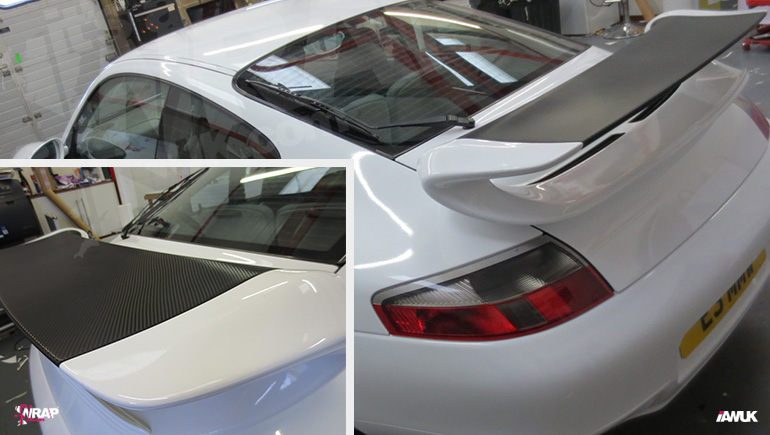
Credit: www.itsawrapuk.com
Cutting And Aligning The Vinyl
Cutting and aligning the vinyl is a key step for a smooth finish on your spoiler. Proper measuring and cutting save time and material. Aligning the vinyl carefully avoids wrinkles and bubbles. Follow these simple steps to prepare the vinyl perfectly before wrapping.
Measuring The Spoiler
Start by measuring the length and width of the spoiler. Use a flexible tape measure to follow curves. Write down the measurements to cut the vinyl accurately. Add a little extra to cover edges and curves well.
Cutting Vinyl To Size
Place the vinyl on a flat, clean surface. Use sharp scissors or a craft knife for straight cuts. Cut the vinyl slightly larger than your measurements. This extra material helps with stretching and wrapping around edges.
Positioning The Wrap
Lay the vinyl over the spoiler carefully. Align the center of the vinyl with the spoiler’s middle. Smooth the vinyl gently from the center outwards. Use a squeegee to push out any air bubbles or wrinkles.
Applying The Vinyl Wrap
Applying the vinyl wrap on a spoiler takes patience and care. This step determines how smooth and professional the finish looks. The wrap must fit perfectly and stick well to the surface. Follow each step carefully for the best results.
Peeling And Placing The Vinyl
Start by peeling the backing paper from the vinyl slowly. Hold the vinyl by the edges to avoid touching the sticky side. Place the vinyl on the spoiler gently. Align it correctly before pressing it down fully. Use light pressure first to keep it movable.
Smoothing Out Air Bubbles
Use a soft squeegee or cloth to smooth the vinyl. Push from the center outwards to remove air bubbles. Work slowly and carefully to avoid wrinkles. Small bubbles can be pushed out easily. For big bubbles, lift the vinyl slightly and reapply.
Using Heat For Flexibility
Heat makes the vinyl soft and easy to stretch. Use a heat gun or hairdryer on low heat. Keep the heat moving to avoid damage. Warm the vinyl gently and stretch it over curves. Heat also helps the vinyl stick better to the spoiler.
Trimming And Finishing Edges
Trimming and finishing edges is the final step in vinyl wrapping a spoiler. This step gives the wrap a clean, professional look. Proper trimming prevents the vinyl from peeling or lifting over time. Finishing the edges well ensures the wrap stays smooth and secure.
Pay close attention to details during this phase. Take your time to cut carefully and seal the edges tightly. This keeps the vinyl protected from water and dirt. A neat finish helps the spoiler look like it was painted, not wrapped.
Cutting Excess Vinyl
Use a sharp craft knife or blade to cut off extra vinyl. Cut close to the edge but avoid cutting into the spoiler surface. Hold the blade steady and make smooth, even cuts. Trim little by little to avoid mistakes. Remove all loose vinyl pieces to prevent lifting.
Sealing The Edges
Apply heat with a heat gun or hair dryer to seal the edges. Heat softens the vinyl for a better bond. Press the edges down using a squeegee or your fingers. This step helps the vinyl stick firmly. It also stops water from getting underneath the wrap.
Checking For Imperfections
Inspect the spoiler carefully after trimming and sealing. Look for air bubbles, wrinkles, or loose edges. Use a pin to pop small bubbles and press them flat. Smooth out any wrinkles with heat and pressure. Fixing these issues now prevents damage later.
Curing And Maintenance Tips
After wrapping a spoiler with vinyl, proper curing and maintenance are vital. These steps help keep the vinyl smooth, shiny, and long-lasting. Good care prevents peeling, fading, and dirt buildup.
Allowing Vinyl To Set
Let the vinyl sit for at least 24 hours after wrapping. This time allows the adhesive to bond fully. Avoid touching or moving the spoiler during this period. Warm conditions help the vinyl stick better. Do not wash the car for 3 days to protect the wrap.
Cleaning Wrapped Spoiler
Use a soft cloth and mild soap to clean the vinyl. Avoid harsh chemicals or abrasive tools. Rinse with clean water and dry gently. Clean the spoiler regularly to stop dirt from building up. A clean wrap looks new and lasts longer.
Avoiding Damage
Keep the spoiler away from sharp objects or rough surfaces. Do not use high-pressure washers directly on the vinyl. Park in shaded areas to reduce sun damage. Avoid parking under trees to prevent sap and bird droppings. Handle the wrap gently to avoid scratches or tears.

Credit: www.cruxmoto.com
Frequently Asked Questions
How Do I Prepare A Spoiler For Vinyl Wrapping?
Clean the spoiler thoroughly to remove dirt and grease. Use isopropyl alcohol for best results. Dry it completely before starting the wrap.
What Tools Are Needed To Vinyl Wrap A Spoiler?
You need a heat gun, squeegee, utility knife, and microfiber cloth. These tools help smooth the vinyl and ensure a clean finish.
Can I Vinyl Wrap A Spoiler At Home?
Yes, with patience and proper tools, you can wrap a spoiler at home. Follow step-by-step instructions and work in a dust-free environment.
How Long Does Vinyl Wrap On A Spoiler Last?
A quality vinyl wrap lasts 5 to 7 years with proper care. Avoid harsh chemicals and frequent washing to maintain its durability.
Conclusion
Vinyl wrapping a spoiler takes patience and care. Clean the surface well before starting. Work slowly to avoid bubbles or wrinkles. Use heat gently to shape the vinyl around curves. Trim edges neatly for a sharp look. Practice helps improve your skills over time.
A well-wrapped spoiler can change your car’s style. Enjoy the process and the new appearance. Keep your vinyl clean to make it last longer. This simple upgrade can boost your car’s look easily.