
Are you ready to give your kitchen doors a fresh new look without the hassle of a full remodel? Vinyl wrapping is an affordable and stylish way to transform your kitchen, but those grooves on your doors can make the process tricky.
Don’t worry—you can achieve a smooth, professional finish even with textured surfaces. In this guide, you’ll discover simple, step-by-step tips to wrap your grooved kitchen doors like a pro. Stick with me, and you’ll be amazed at how easy and rewarding this project can be.
Let’s get started!
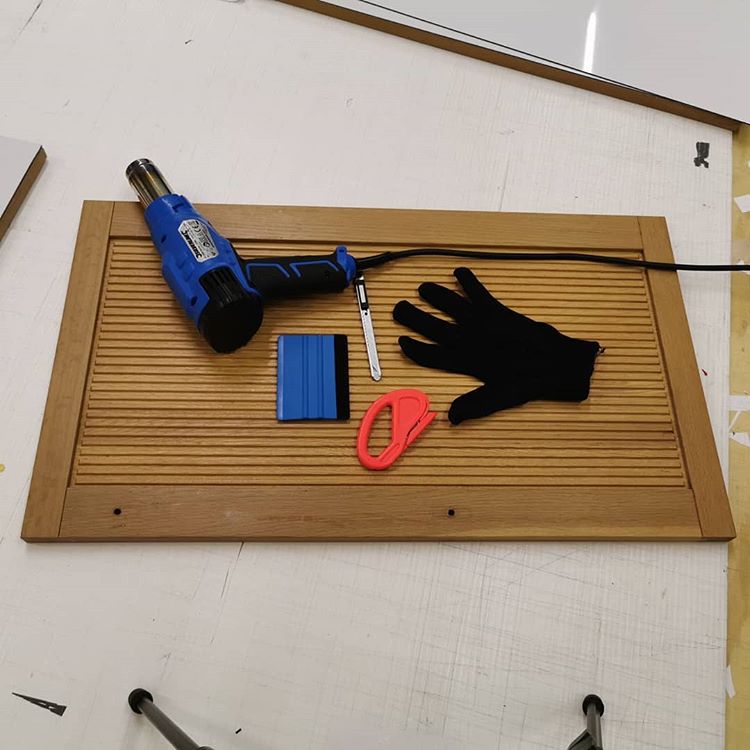
Credit: modernds.co.uk
Materials And Tools Needed
Preparing to vinyl wrap kitchen doors with grooves requires specific materials and tools. Choosing the right supplies makes the process smoother and the finish better. This list covers everything needed for a neat, professional look.
Vinyl Wrap Film
Select a high-quality vinyl wrap film designed for cabinets. Look for a film with a strong adhesive backing. Choose a color or pattern that fits your kitchen style. Matte or glossy finishes work well depending on your preference. Make sure the film is wide enough to cover each door fully.
Cleaning Supplies
Clean surfaces thoroughly before wrapping. Use mild soap and water to remove dirt and grease. A lint-free cloth helps avoid dust and fibers on the door. Rubbing alcohol can remove stubborn grease and residue. Clean doors ensure better adhesion and a smooth finish.
Application Tools
A squeegee with a soft edge is essential for smooth application. It helps remove air bubbles and wrinkles. A sharp utility knife or razor blade trims excess vinyl precisely. Heat guns or hair dryers soften the vinyl for better molding around grooves. Use a measuring tape to cut vinyl accurately.
Additional Supplies
Masking tape holds vinyl in place during application. Gloves protect your hands and prevent fingerprints on the adhesive side. A plastic scraper helps press vinyl into deep grooves without damage. Patience and steady hands improve the final result significantly.
Preparing Kitchen Doors
Preparing your kitchen doors before vinyl wrapping is very important. It helps the vinyl stick better and last longer. Kitchen doors with grooves need careful preparation to get smooth, clean results. Follow these steps for the best finish.
Cleaning And Removing Hardware
Start by taking off all handles, knobs, and hinges. This makes the surface easier to wrap. Clean the doors with warm soapy water. Remove any grease, dirt, or dust. Use a soft cloth to avoid scratching. Let the doors dry completely before moving to the next step.
Sanding And Repairing Surface
Lightly sand the door surface with fine-grit sandpaper. This helps the vinyl stick well, especially on glossy finishes. Fill any cracks or holes in the grooves with wood filler. Smooth the filler once it dries using sandpaper. Wipe away dust with a damp cloth. Your doors are now ready for wrapping.
Measuring And Cutting Vinyl Wrap
Measuring and cutting vinyl wrap for kitchen doors with grooves requires care and precision. This step ensures the vinyl fits perfectly and looks smooth. Taking accurate measurements and cutting around grooves and edges helps avoid wrinkles or bubbles. Proper preparation saves time and effort during application.
Taking Accurate Measurements
Start by measuring the height and width of the door surface. Use a tape measure and write down exact numbers. Measure each groove separately to capture depth and width. Double-check all measurements to avoid mistakes. Add a small extra margin for trimming later. Accurate numbers help cut the vinyl without waste.
Cutting For Grooves And Edges
Lay the vinyl flat on a clean surface before cutting. Mark the vinyl with a pencil or chalk using your measurements. Cut slowly with a sharp craft knife or scissors. For grooves, score lightly first to guide deeper cuts. Cut into the vinyl at the edges carefully to wrap around corners. Make small, precise cuts to fit the vinyl into grooves snugly.
Applying Vinyl Wrap To Flat Sections
Applying vinyl wrap to flat sections of kitchen doors is the first step in achieving a smooth, professional look. Flat areas are easier to handle than grooves, making them perfect to start with. This process sets a solid base before moving on to more detailed parts.
Start by cleaning the flat surface well. Remove dirt, grease, and dust to help the vinyl stick better. Use a mild cleaner and a soft cloth. Let the surface dry completely before applying the wrap.
Next, measure and cut the vinyl slightly larger than the door panel. This extra material helps with positioning and trimming later. Peel the backing a little at the top to expose the adhesive.
Positioning The Vinyl On Flat Sections
Place the top edge of the vinyl on the flat section. Align it carefully to avoid crooked wrapping. Stick the top part first, then slowly peel the backing downward.
Smoothing Out Air Bubbles And Wrinkles
Use a plastic squeegee to press the vinyl flat. Start from the center and move outward. This action pushes air bubbles toward the edges. Work slowly to avoid wrinkles.
After smoothing, trim the extra vinyl around the edges. Use a sharp utility knife for clean cuts. Cut close to the door edges but be careful not to damage the surface.
Handling Vinyl Wrap Around Grooves
Vinyl wrapping kitchen doors with grooves can be tricky. Grooves create uneven surfaces that need careful attention. Proper handling helps the vinyl fit well and look smooth.
Focus on making the vinyl flexible and pressing it firmly into the grooves. This avoids bubbles and wrinkles. Patience and the right tools make the process easier.
Using Heat For Flexibility
Heat softens the vinyl, making it easier to bend around grooves. Use a heat gun or hairdryer on low heat. Keep the heat moving to avoid damage.
Warm vinyl stretches without tearing. It fits the grooves’ shape better. Heat also helps the adhesive stick well to the door surface.
Smoothing Vinyl Into Grooves
Use a soft tool like a plastic squeegee or cloth to press vinyl into grooves. Start from the center and move outward. This pushes out air bubbles.
Work slowly and gently. Pull the vinyl slightly to avoid wrinkles. Check the vinyl edges in grooves and press firmly for a tight fit.
Credit: www.youtube.com
Trimming Excess Vinyl
Trimming excess vinyl is a key step in wrapping kitchen doors with grooves. It helps create a neat, smooth finish. Removing extra vinyl prevents wrinkles and bubbles. Careful trimming ensures the vinyl fits perfectly around edges and grooves.
Cutting Clean Edges
Use a sharp utility knife for clean, precise cuts. Cut slowly along the door edges for better control. Keep the blade angle low to avoid tearing the vinyl. Replace dull blades often to maintain sharpness. Clean edges give your kitchen doors a polished look.
Avoiding Damage To Doors
Protect the door surface during trimming by applying light pressure. Use a cutting mat or thick cardboard under the vinyl. Avoid pressing too hard to prevent scratching the door. Take your time to reduce mistakes. Proper care keeps your kitchen doors safe and damage-free.
Finishing Touches
Finishing touches give your vinyl wrap a neat, professional look. They make sure the wrap stays smooth and lasts longer. Take your time to check every detail before calling the job done.
Reattaching Hardware
Remove all tape or paper under the hardware. Clean screws and hinges before putting them back. Use the original screws to avoid damage. Tighten them gently to keep doors aligned. Check if handles and knobs move smoothly.
Final Inspection And Adjustments
Look closely at all edges and grooves. Press down any loose vinyl with a soft cloth. Use a heat gun carefully to smooth bubbles out. Trim extra vinyl around edges for a clean finish. Test doors by opening and closing slowly. Fix any wrinkles or gaps you see.
Tips For Long-lasting Vinyl Wrap
Applying vinyl wrap on kitchen doors with grooves needs care to last long. Proper handling and maintenance keep the wrap fresh and strong. Follow these tips to protect your investment and enjoy a neat look.
Small steps during installation and daily use make a big difference. Keep the surface clean and avoid harsh actions that may damage the vinyl.
Clean The Surface Before Application
Remove dirt, grease, and dust from the door surface. Use mild soap and water with a soft cloth. Let the door dry completely before applying the vinyl. A clean surface helps the vinyl stick firmly.
Use A Heat Gun For Grooves
Apply gentle heat with a heat gun to soften the vinyl. Heat helps the vinyl wrap bend into grooves better. Move the heat gun slowly to avoid melting the material. This step improves adhesion and prevents bubbles.
Press Vinyl Firmly In Grooves
Use a squeegee or a soft cloth to press the vinyl into grooves. Work carefully to push out air bubbles. Firm pressure ensures the vinyl stays attached and looks smooth.
Avoid Sharp Objects Near Wrapped Doors
Keep knives, keys, and other sharp objects away from the vinyl. Scratches and cuts can ruin the wrap’s appearance. Handle doors gently to protect the vinyl surface.
Clean Wrapped Doors Gently
Use a soft cloth and mild cleaner for regular cleaning. Avoid abrasive pads or strong chemicals that harm the vinyl. Regular gentle cleaning keeps the wrap bright and intact.

Credit: www.reddit.com
Frequently Asked Questions
How Do You Prepare Grooved Kitchen Doors For Vinyl Wrapping?
Clean the doors thoroughly and remove all hardware. Lightly sand the surface for better adhesion. Fill grooves with a flexible filler to ensure a smooth wrapping surface.
What Type Of Vinyl Is Best For Kitchen Doors With Grooves?
Choose a high-quality, stretchable vinyl designed for textured surfaces. This type conforms well to grooves and provides long-lasting durability in kitchen environments.
Can Vinyl Wrap Cover Deep Grooves On Kitchen Doors?
Yes, but deep grooves require careful filling before wrapping. Use a flexible filler to level the surface, allowing the vinyl to adhere smoothly without bubbles.
How Do You Apply Vinyl Around Kitchen Door Grooves Without Wrinkles?
Use a heat gun to soften the vinyl. Stretch it gently over grooves, smoothing with a squeegee. Work slowly to avoid wrinkles and air bubbles.
Conclusion
Vinyl wrapping kitchen doors with grooves can change your space easily. Take your time to clean and measure each door well. Use a heat gun carefully for smooth bends around grooves. Patience helps avoid bubbles and wrinkles in the vinyl.
Small cuts near grooves make wrapping easier and cleaner. Your kitchen will look fresh and stylish without much cost. Try this method to update your kitchen doors yourself. Enjoy the new look and the satisfaction of doing it by hand.