Are you struggling to get a smooth, clean finish when vinyl wrapping square corners? You’re not alone.
Those sharp edges can be tricky, causing wrinkles, bubbles, or peeling if you don’t handle them right. But don’t worry—once you learn the right steps, you’ll be able to wrap any square corner like a pro. Keep reading, and you’ll discover simple tips and tricks that will save you time, frustration, and give your project a flawless look every time.
Ready to master vinyl wrapping square corners? Let’s dive in!

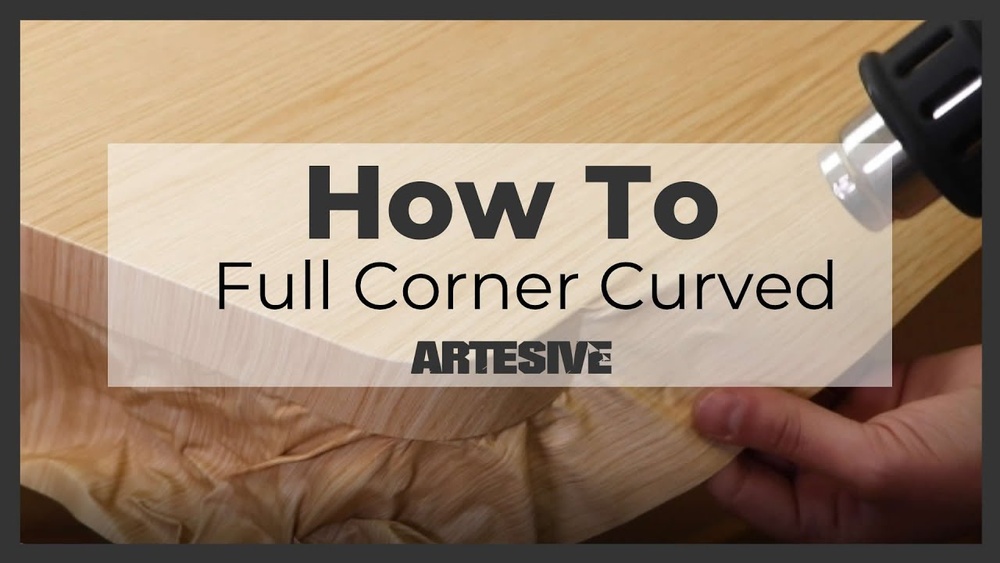
Credit: www.youtube.com
Preparing The Surface
Preparing the surface is the first step to a successful vinyl wrap on square corners. A clean and smooth surface helps the vinyl stick better and last longer. It also prevents bubbles and wrinkles during application. Taking time here saves effort later.
Cleaning The Corner Area
Start by removing dirt, dust, and grease from the corners. Use a mild soap and water solution with a soft cloth. Avoid harsh chemicals that can damage the surface. Dry the area completely with a clean towel. Clean corners help the vinyl wrap stick evenly without peeling.
Smoothing Imperfections
Check the corners for bumps, scratches, or dents. Use fine sandpaper to gently smooth these flaws. Wipe away sanding dust with a damp cloth. Fill any deep scratches with a suitable filler and let it dry. Smooth corners allow the vinyl to lay flat and look neat.
Choosing The Right Vinyl
Choosing the right vinyl is key for wrapping square corners. The material must bend without folding or tearing. It should stick well and last long. Picking good vinyl makes the wrapping process easier and the final look better.
Not all vinyl is the same. Some work better on flat surfaces. Others are made for curves and corners. Understanding the types helps you pick the best option for your project.
Selecting Flexible Materials
Flexible vinyl bends easily around edges. It prevents creases and bubbles. Look for vinyl labeled as cast or calendared. Cast vinyl is thinner and more flexible, perfect for sharp corners. Calendared vinyl is thicker and less flexible, best for flat areas. Choose a type that matches your corner’s shape.
Considering Thickness And Adhesive
Thin vinyl wraps better on tight corners. Thick vinyl can crack or peel. Pick vinyl with moderate thickness to avoid damage. Adhesive matters too. Strong adhesives hold better but can be hard to remove. Softer adhesives allow repositioning without damage. Balance thickness and adhesive strength for best results.
Measuring And Cutting
Measuring and cutting vinyl wrap for square corners is a key step. It ensures the wrap fits perfectly without wrinkles or gaps. Taking exact measurements and using the right cutting methods can make the process smooth and effective. This section explains how to measure and cut vinyl wrap for sharp, clean corners.
Accurate Measurements For Corners
Start by measuring the length of each side of the corner. Use a flexible measuring tape for better accuracy on edges. Measure twice to avoid mistakes. Mark the vinyl wrap with a pencil or light marker. Leave extra material around the corner for folding. This extra space helps cover the edges neatly. Precise measuring prevents waste and ensures a clean finish.
Cutting Techniques For Precision
Use a sharp utility knife or vinyl cutter for clean cuts. Cut slowly along the marked lines to avoid jagged edges. Create small relief cuts near the corner to help the vinyl bend smoothly. Avoid cutting too deep to protect the surface underneath. Trim any excess vinyl after wrapping to keep edges neat. Careful cutting helps the wrap fit snugly around square corners.
Applying Heat
Applying heat is a key step in vinyl wrapping square corners. Heat makes the vinyl soft and easier to shape. Without heat, the vinyl can wrinkle or tear. Proper heat application helps achieve smooth, tight corners that look professional.
Using Heat Guns Safely
Heat guns are popular tools for vinyl wrapping. They blow hot air to warm the vinyl quickly. Keep the heat gun moving to avoid burning the vinyl. Hold it about 6 to 8 inches from the surface. Use medium heat settings to protect the vinyl. Never point the heat gun directly in one spot for too long. Always wear gloves to protect your hands from heat. Work in a well-ventilated area to avoid fumes.
Softening Vinyl For Flexibility
Heat softens vinyl, making it flexible for tight corners. Warm vinyl stretches more without tearing. Start by heating the vinyl until it feels warm to touch. Gently stretch the vinyl over the corner. Use a squeegee or your fingers to smooth wrinkles. Heat again if the vinyl feels stiff. Avoid overheating, which can damage the vinyl’s color and texture. Soft vinyl bends easily, creating clean, sharp corners.
Wrapping The Corners
Wrapping the corners of a vinyl wrap on square edges is tricky but important. Corners need careful handling to avoid damage and maintain a smooth look. The key is to stretch and fold the vinyl correctly. This helps the wrap fit tightly without wrinkles or bubbles. Understanding the right techniques makes the process easier and the final result clean and professional.
Stretching And Folding Methods
Start by heating the vinyl gently. This softens it and makes stretching easier. Pull the vinyl slowly around the corner. Avoid pulling too hard to prevent tears. Use your fingers to fold the vinyl neatly at the edge. A sharp crease helps the vinyl sit flat. Make small folds on the corner for a smooth finish. This method keeps the vinyl tight and well-fitted.
Avoiding Wrinkles And Bubbles
Press the vinyl firmly as you wrap the corner. Use a soft squeegee to smooth out air pockets. Work from the center out to the edges. This pushes bubbles away and prevents wrinkles. Reheat spots that feel tight or bumpy. Stretch the vinyl lightly if you see wrinkles forming. Patience is key to keeping the surface even. A smooth corner shows quality and care in your work.
Trimming Excess Vinyl
Trimming excess vinyl is a key step in wrapping square corners. It helps achieve a neat, professional look. Removing extra vinyl prevents wrinkles and bubbling around edges. Careful trimming also protects the vinyl from peeling over time. This process needs steady hands and the right tools. Follow these tips to trim vinyl cleanly and safely.
Using Sharp Blades
Use a new, sharp blade for clean cuts. Dull blades can tear or stretch the vinyl. A sharp blade slices smoothly through excess material. Change blades often to avoid rough edges. Hold the blade at a low angle for control. Cut slowly and steadily to prevent mistakes. Safety first: always cut away from your body.
Creating Clean Edges
Trim close to the corner without cutting the wrap. Keep the blade steady along the edge line. Use light pressure to avoid damaging the surface. After trimming, press edges down firmly with a squeegee. This seals the vinyl and stops peeling. Check corners for any leftover excess. Clean edges make your vinyl wrap look polished and strong.
Finishing Touches
Finishing touches make your vinyl wrap look neat and last longer. This step ensures the wrap sticks well and stays smooth around square corners. Proper finishing keeps edges from peeling and protects your work from damage.
Applying Pressure For Adhesion
Use a squeegee or soft cloth to press the vinyl firmly. Apply pressure evenly across the edges and corners. This helps the vinyl stick tightly to the surface. Avoid pressing too hard to prevent stretching or tearing. Take your time to smooth out air bubbles and wrinkles.
Sealing Edges For Durability
Seal the edges with a heat gun or hair dryer on low heat. Warm the vinyl gently to activate the adhesive fully. Press edges down again while warm for a strong seal. This step stops dirt and water from getting under the wrap. Proper sealing increases the wrap’s lifespan and keeps it looking fresh.

Credit: www.amazon.com
Common Mistakes To Avoid
Vinyl wrapping square corners needs care and skill. Mistakes can spoil the finish and waste material. Avoiding common errors helps you get smooth, sharp edges every time.
Overstretching The Vinyl
Stretching vinyl too much weakens it. It can tear or lose its shape around corners. Stretch gently and use heat to soften the vinyl. This keeps the wrap tight without damage. Take time to adjust the vinyl rather than pull hard.
Neglecting Surface Preparation
Dirty or rough surfaces cause bubbles and poor adhesion. Clean the corner area well before applying vinyl. Remove dust, grease, and old residues. A smooth, dry surface helps the vinyl stick better. Skipping this step leads to peeling and wrinkles later.
Credit: www.essmovinyl.com
Frequently Asked Questions
How Do I Prepare Square Corners For Vinyl Wrapping?
Clean the surface thoroughly and remove any dirt or grease. Use a heat gun to warm the corner gently. This softens the vinyl, making it easier to wrap tightly around edges without bubbles or wrinkles.
What Tools Are Needed For Wrapping Square Corners?
You need a squeegee, heat gun, sharp utility knife, and vinyl wrap film. These tools help smooth the vinyl, apply heat for flexibility, and trim excess material accurately.
Can I Wrap Sharp Square Corners Without Stretching Vinyl?
Yes, use a heat gun to warm the vinyl before applying. This makes the film more pliable, allowing it to conform to sharp edges without overstretching or tearing.
How Do I Avoid Bubbles On Vinyl-wrapped Square Corners?
Apply vinyl slowly and use a squeegee to push out air bubbles. Heat the vinyl to increase flexibility, ensuring it adheres smoothly to the surface.
Conclusion
Vinyl wrapping square corners takes patience and careful work. Stretch the vinyl slowly to avoid wrinkles or bubbles. Use a heat gun to soften the vinyl and help it bend smoothly. Trim the edges neatly for a clean finish. Practice on small areas first to build confidence.
With time, the process becomes easier and results look professional. Keep these simple steps in mind for successful wrapping. Your project will stand out with sharp, smooth corners. Try it yourself and see the difference it makes.


