

If you drive a Chevy Silverado, keeping your brakes in top shape is crucial for your safety and your truck’s performance. Worn-out brake rotors can cause squealing, vibrations, or longer stopping distances—problems you don’t want on the road.
The good news? Changing brake rotors yourself is easier than you might think. In this guide, you’ll discover simple, step-by-step instructions to replace your Chevy Silverado’s brake rotors quickly and confidently. Ready to save time and money while making sure your truck stops just like it should?
Let’s get started.
Tools And Materials Needed
Changing brake rotors on a Chevy Silverado requires specific tools and materials. Having the right items makes the job easier and safer. Prepare everything before starting work on your truck.
Essential Tools
You need a jack and jack stands to lift the truck safely. A lug wrench helps remove the wheel nuts. A socket set with ratchet is necessary for bolts on the brake caliper and rotor. A C-clamp or brake caliper tool compresses the brake piston. A hammer or rubber mallet helps remove old rotors if stuck. A screwdriver or pry bar assists with brake caliper removal. Clean rags are useful for wiping dust and dirt.
Replacement Parts
Buy new brake rotors that fit your Silverado’s model and year. New brake pads are recommended to install with rotors. Brake grease prevents noise and keeps parts moving smoothly. Brake cleaner spray removes brake dust and grime from rotors and other parts. Check if new bolts or clips are needed for your truck.
Safety Gear
Wear safety glasses to protect your eyes from dust and debris. Use mechanic gloves to avoid cuts and keep hands clean. A dust mask helps if brake dust is heavy. Work on a flat surface and use wheel chocks to stop the truck from moving. Keep a fire extinguisher nearby for emergencies.
Credit: www.youtube.com
Preparing Your Silverado
Preparing your Chevy Silverado for a brake rotor change is a crucial step. It ensures safety and makes the job easier. Taking time to set up properly can prevent accidents and damage.
Start by making sure the truck is stable and ready for work. This preparation helps the process go smoothly and safely.
Park And Secure The Vehicle
Park the Silverado on a flat, hard surface. Avoid slopes or soft ground. Engage the parking brake firmly. Place wheel chocks behind the tires. This stops the truck from moving during work.
Loosen Lug Nuts
Before lifting the truck, loosen the lug nuts on the wheel. Use a lug wrench to turn them counterclockwise. Do not remove them completely yet. Loosening first makes removal easier once the truck is lifted.
Lift And Support The Truck
Use a jack to lift the truck at the manufacturer’s recommended jacking points. Raise the truck high enough to remove the wheel easily. Place jack stands under solid parts of the frame. Never rely on the jack alone for support.
Removing The Old Brake Rotors
Removing the old brake rotors is a key step in changing them on your Chevy Silverado. It prepares the vehicle for new parts and ensures safety. Follow these steps carefully to avoid damage and complete the job efficiently.
Remove The Wheel
Start by loosening the lug nuts with a wrench. Then, lift the truck using a jack and secure it with jack stands. Remove all lug nuts and take the wheel off. Set the wheel aside in a safe place.
Detach The Caliper And Bracket
Locate the brake caliper and use a socket wrench to remove the bolts holding it. Carefully slide the caliper off the rotor. Do not let it hang by the brake hose. Use a piece of wire or a hook to hang it securely. Next, remove the caliper bracket bolts and take off the bracket.
Extract The Old Rotor
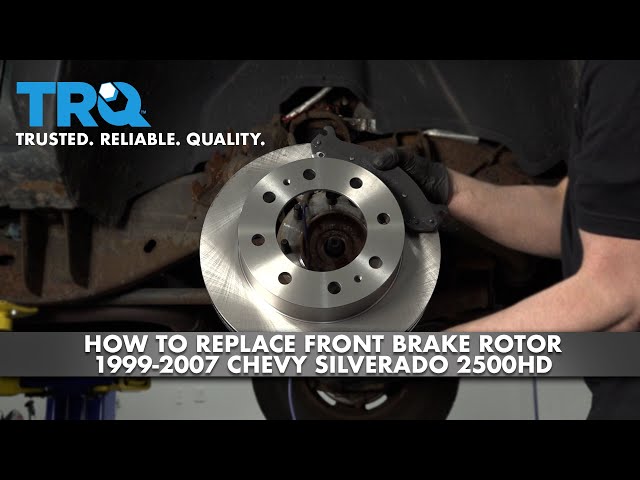
The rotor may be stuck due to rust or dirt. Tap it gently with a rubber mallet to loosen it. Pull the rotor straight off the hub. Clean the hub surface to remove rust before installing a new rotor. This step helps the new rotor sit flat and secure.
Credit: www.pirouette-editions.fr
Inspecting Brake Components
Inspecting brake components is a key step before changing brake rotors on your Chevy Silverado. It helps ensure safety and good performance. Skipping this step can lead to poor braking and costly repairs. Take time to check each part carefully.
Check Brake Pads
Start by checking the brake pads. Look at their thickness. Pads thinner than 3 millimeters need replacement. Also, watch for cracks or uneven wear. Worn brake pads can damage new rotors quickly.
Examine Caliper Condition
Next, examine the calipers. Check for leaks around the piston seals. Make sure the caliper moves smoothly on its slides. Stuck or leaking calipers cause brake problems and uneven rotor wear.
Look For Additional Wear
Finally, inspect other parts like brake lines and hardware. Look for cracks, rust, or loose bolts. Check the rotor surface for deep grooves or warping. Addressing these issues helps your brakes work well after rotor change.
Installing New Brake Rotors
Installing new brake rotors on your Chevy Silverado requires careful steps. Proper installation ensures safe and smooth braking. Follow each step closely to avoid issues later.
Clean The New Rotor
New rotors often have a protective oil coating. Clean this off with brake cleaner spray. Use a clean cloth to wipe the surface. This prevents brake pad contamination and ensures good contact.
Position The Rotor
Place the new rotor onto the wheel hub. Make sure it sits flush and aligns with the bolt holes. This step is key for proper rotor fit and wheel attachment.
Reattach Caliper And Bracket
Carefully put the caliper bracket back over the rotor. Tighten the bolts securely to hold it in place. Then, slide the brake caliper over the rotor and pads. Fasten the caliper bolts firmly to complete the setup.

Credit: www.amazon.com
Reassembling And Testing
After replacing the brake rotors on your Chevy Silverado, reassembling and testing are crucial steps. Proper reassembly ensures safety and smooth driving. Testing confirms the brakes work correctly and safely.
Mount The Wheel
Place the wheel back onto the hub carefully. Align the holes with the lug bolts. Push the wheel until it sits flush against the rotor.
Lower The Vehicle
Use the jack to lower the truck slowly. Bring it down until the tire touches the ground fully. Remove the jack and keep the truck stable on the ground.
Tighten Lug Nuts
Tighten the lug nuts by hand first. Use a wrench to secure them in a star pattern. This ensures even pressure and proper fit. Double-check each nut is tight.
Test Brake Function
Press the brake pedal several times. Feel for firmness and no sponginess. Start the truck and drive slowly. Test stopping gently to confirm the brakes work well.
Tips For Maintenance And Longevity
Keeping your Chevy Silverado’s brake rotors in good shape helps you drive safely. Proper care extends their life and saves money. Follow these simple tips to maintain your brake rotors and avoid frequent replacements.
Regular Inspections
Check your brake rotors often for signs of wear or damage. Look for grooves, cracks, or rust on the surface. Listen for unusual noises when braking. Catching problems early prevents bigger issues.
Proper Driving Habits
Drive smoothly and avoid hard braking. Sudden stops wear down rotors faster. Give your brakes time to cool after heavy use. Avoid riding the brakes on long downhill drives. These habits reduce rotor stress and improve lifespan.
When To Replace Again
Replace rotors if you feel vibration or pulsing when braking. Thin or warped rotors also need replacement. Follow your owner’s manual for recommended rotor thickness. Timely replacement keeps braking strong and safe.
Frequently Asked Questions
How Do I Know When To Change Chevy Silverado Brake Rotors?
You should change brake rotors if you hear squealing, feel vibration, or notice uneven wear. Regular inspections help identify rotor damage early. Thin, warped, or cracked rotors reduce braking efficiency and safety.
What Tools Are Needed To Change Brake Rotors On Silverado?
Basic tools include a jack, lug wrench, socket set, C-clamp, and brake cleaner. A torque wrench and screwdriver may also be necessary. Proper tools ensure safe and efficient rotor replacement.
Can I Replace Brake Rotors Myself On A Chevy Silverado?
Yes, with mechanical knowledge and proper tools, you can replace rotors yourself. Follow safety guidelines, lift the vehicle securely, and carefully remove brake components. If unsure, consult a professional mechanic.
How Long Does It Take To Change Brake Rotors On A Silverado?
Typically, rotor replacement takes 1 to 2 hours per axle for a DIYer. Time varies based on experience and tools. Proper time ensures thorough inspection and correct installation.
Conclusion
Changing brake rotors on your Chevy Silverado is a useful skill. It saves money and keeps your truck safe. Follow the steps carefully and take your time. Use the right tools and parts for the best results. Check your brakes often to avoid problems.
With practice, this task will feel easier. Stay safe on the road by maintaining your brakes well. Your Silverado will thank you with better performance. Keep learning and improving your truck care skills.


