If you’ve noticed strange noises or vibrations when braking your Toyota Avalon, it might be time to change your brake rotors. But don’t worry—this task isn’t as complicated as it sounds.
In this guide, you’ll learn step-by-step how to safely and effectively replace your brake rotors, saving you time and money. By the end, you’ll have the confidence to handle this important maintenance yourself and keep your Avalon running smoothly. Ready to get started?
Let’s dive in.
Tools And Materials Needed
Changing brake rotors on a Toyota Avalon needs the right tools and materials. Using proper tools makes the job easier and safer. Gather everything before starting to avoid interruptions.
Basic Hand Tools
You need a socket set with various sizes. A ratchet wrench helps remove bolts fast. A breaker bar gives extra power for tight bolts. Use a flathead screwdriver to pry parts carefully.
Specialty Tools
A C-clamp or brake caliper tool pushes the caliper piston back. A torque wrench ensures bolts tighten to the right strength. A wire brush cleans rust and dirt from parts.
Safety Equipment
Wear safety glasses to protect your eyes from dust and debris. Use gloves to keep hands clean and safe. Have a jack stand to support the car securely while working.
Replacement Parts And Materials
New brake rotors matched to your Avalon model. Brake pads if they show signs of wear. Brake cleaner spray to remove grease and brake dust. Anti-seize lubricant to prevent bolts from sticking.

Credit: www.tomorrowstechnician.com
Preparing Your Toyota Avalon
Changing brake rotors on your Toyota Avalon starts with good preparation. This step makes the entire process safer and easier. You need the right tools, a clean workspace, and clear steps to follow. Proper preparation also helps avoid damage to your vehicle.
Focus on safety first. The car must be stable and secure before you work on the brakes. This section covers the key safety tips and how to lift your Avalon properly.
Safety Precautions
Wear gloves and safety glasses to protect your hands and eyes. Use a dust mask to avoid breathing brake dust. Work on a flat, solid surface to prevent the car from slipping. Keep children and pets away from the work area. Never work under a car supported only by a jack. Always use jack stands for extra security.
Lifting And Securing The Vehicle
Park your Avalon on level ground and set the parking brake. Place wheel chocks behind the wheels that stay on the ground. Use a hydraulic jack to lift the car at the recommended jacking points. These points are usually marked in the owner’s manual. After lifting, place jack stands under the frame for support. Lower the car slowly onto the stands. Give the car a gentle shake to check stability before starting work.
Removing The Wheel
Start by loosening the lug nuts on the wheel before lifting the car with a jack. Remove the wheel carefully to access the brake rotors. Keep the wheel in a safe place to avoid damage.
Start by parking your Toyota Avalon on a flat surface. Engage the parking brake to keep the car from moving. Place wheel chocks behind the wheels for extra safety. Gather all tools needed before you begin.
Loosening The Lug Nuts
Use a lug wrench to slightly loosen the lug nuts on the wheel. Turn them counterclockwise but do not remove them yet. Loosening the nuts while the wheel is on the ground stops it from spinning.
Raising The Vehicle
Position a jack under the car’s recommended lifting point. Slowly lift the car until the wheel is off the ground. Make sure the car is stable before moving forward. Never work under a car supported only by a jack.
Fully unscrew the lug nuts and keep them safe. Pull the wheel straight off the hub. Place the wheel aside carefully to avoid damage. Now, you have clear access to the brake rotor.
Accessing The Brake Rotor
Accessing the brake rotor on a Toyota Avalon is the first step to replace or inspect it. This part is behind the wheel and the brake assembly. Removing some parts carefully gives you clear access to the rotor. Follow simple steps to avoid damage and ensure safety.
Removing The Brake Caliper
Start by loosening the lug nuts and lifting the car. Remove the wheel to see the brake assembly. The brake caliper holds the brake pads and sits over the rotor. Use a wrench to remove the bolts holding the caliper. Gently pull the caliper away from the rotor. Support the caliper with a hanger or rope to avoid strain on the brake line.
Detaching The Brake Pads
With the caliper removed, the brake pads become visible. They sit inside the caliper bracket and press against the rotor. Slide the brake pads out carefully. Check them for wear or damage. Removing the pads clears the rotor for easy removal or replacement.
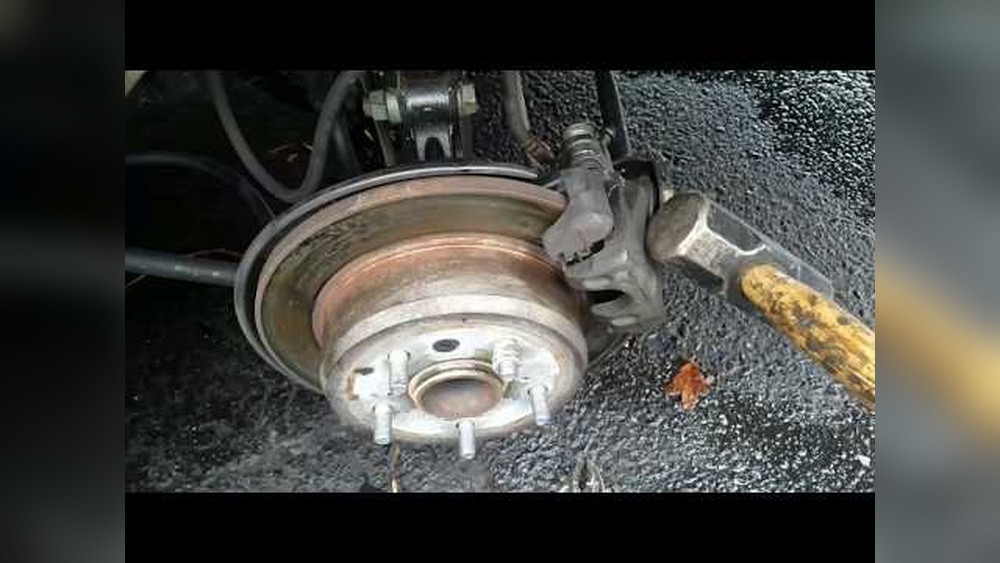
Removing The Old Rotor
Removing the old brake rotor on a Toyota Avalon is an important step. It prepares the wheel for the new rotor installation. This task requires some care and the right tools. Taking your time helps avoid damage to other brake parts.
Start by ensuring the car is safely lifted and supported. Remove the wheel to access the brake rotor. Keep the tools ready for loosening and handling the rotor.
Loosening The Rotor Screws
Locate the small screws that hold the rotor to the hub. These screws are usually on the rotor surface. Use a screwdriver or a socket wrench to turn them counterclockwise.
Sometimes, these screws are tight due to rust or dirt. Apply some penetrating oil and wait a few minutes. This makes loosening easier and prevents stripping the screws.
Turn the screws slowly and steadily. Avoid using too much force to stop damage. Once loose, remove the screws completely and set them aside.
Handling Stubborn Rotors
Old rotors can stick tightly to the hub. Rust and corrosion often cause this problem. Tap the rotor gently with a rubber mallet to loosen it.
Do not hit too hard. The rotor can break or damage nearby parts. If the rotor still won’t come off, try spinning it back and forth while pulling.
Some rotors have small holes for bolts. Tighten these bolts to push the rotor off. Keep patience and avoid rushing the process.
Credit: parts.olathetoyota.com
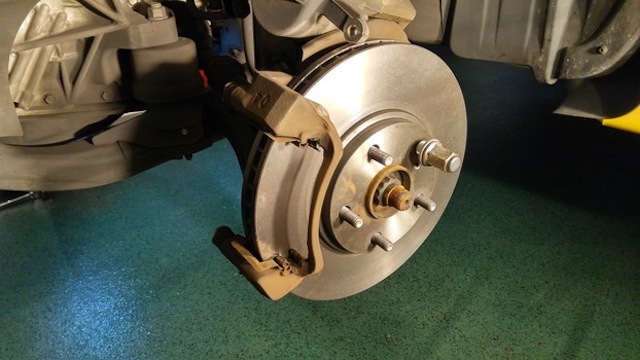
Installing The New Rotor
Installing the new brake rotor on your Toyota Avalon requires careful steps. Proper installation ensures safety and smooth braking. This section explains how to handle the new rotor properly and secure it in place.
Cleaning The New Rotor
New rotors often have a protective coating. This coating must be removed before installation. Use brake cleaner spray to clean the rotor surface. Spray both sides evenly. Wipe off the cleaner with a clean cloth. This step prevents brake pad slipping and ensures good contact.
Aligning And Securing The Rotor
Place the rotor onto the wheel hub carefully. Make sure the holes line up with the studs. Hold the rotor firmly against the hub. Use a lug nut to keep the rotor in place temporarily. This makes it easier to attach the caliper later. Tighten the lug nut just enough to hold the rotor steady. Avoid fully tightening at this stage.
Reassembling The Brake Components
Reassembling the brake components is a key step after changing brake rotors on a Toyota Avalon. It ensures the brakes work safely and smoothly. Take care to fit every part correctly. This avoids problems during driving and keeps braking effective.
Reinstalling Brake Pads And Caliper
Start by placing the brake pads back into their slots on the rotor. Make sure they sit tightly and do not move. Then, position the caliper over the brake pads and rotor. Align it carefully to avoid damage. Push the caliper gently until it fits fully over the pads. This helps the brake system function properly.
Checking Brake Caliper Bolts
Next, tighten the brake caliper bolts. Use a torque wrench to get the right tightness. Too loose or too tight bolts can cause issues. Check both bolts, ensuring they hold the caliper firmly in place. Proper bolt tightening keeps the brake system stable and safe.
Reattaching The Wheel
Reattaching the wheel is a key step after changing brake rotors on a Toyota Avalon. This step secures the wheel and ensures safe driving. Proper wheel attachment prevents vibrations and wobbling.
Take your time to align the wheel correctly. This avoids damage and ensures a smooth ride. Use the right tools and follow safety steps carefully.
Position The Wheel On The Hub
Lift the wheel and place it onto the hub. Line up the wheel holes with the wheel studs. Make sure the wheel sits flush against the brake rotor. A well-positioned wheel prevents uneven wear and noise.
Hand-tighten The Lug Nuts
Start threading the lug nuts by hand. This keeps the wheel in place. Avoid using tools at this stage to prevent cross-threading. Tighten the nuts evenly in a star pattern. This helps the wheel sit evenly on the hub.
Tighten Lug Nuts With A Wrench
Use a lug wrench to tighten the nuts further. Follow the star pattern again for even pressure. Do not fully tighten one nut before others. Proper tightening secures the wheel and reduces vibration risks.
Lower The Vehicle And Final Torque
Carefully lower the car until the wheel touches the ground. Use a torque wrench to tighten lug nuts to factory specs. Check the Toyota Avalon manual for correct torque values. Final torque ensures safety and prevents loosening on the road.
Testing The Brakes
Testing the brakes after changing the rotors is very important. It ensures your Toyota Avalon stops safely and works well. This step checks the brake system and confirms the new rotors are installed correctly. Follow these simple steps to test your brakes carefully.
Lowering The Vehicle
Begin by removing the jack stands supporting your Avalon. Use the jack to slowly lower the car to the ground. Make sure the vehicle is stable before removing the jack. Never rush this step, as safety is key.
Performing A Brake Test
Start the engine and press the brake pedal gently. Feel for any unusual softness or sponginess. Next, drive the car slowly in a safe area. Apply the brakes several times to check their response. The brakes should feel firm and stop the car smoothly.
Listen for strange noises or vibrations. If everything feels normal, your brake rotors are working well. If not, recheck the installation or consult a mechanic. Testing the brakes this way protects you and others on the road.
Maintenance Tips For Brake Rotors
Brake rotors need regular care to work well and last long. Proper maintenance keeps your Toyota Avalon’s brakes safe and smooth. Small habits can prevent big problems and costly repairs.
Check your rotors often. Look for signs like grooves, rust, or cracks. These show wear and need attention. Clean rotors help brakes grip better and stop faster.
Inspect Brake Rotors Regularly
Look at the rotors every few months. Use a flashlight to see any damage. Thin or uneven rotors reduce brake power. Replace if you find deep grooves or cracks.
Keep Rotors Clean
Remove dirt and brake dust from rotors. Use a soft brush and brake cleaner. Clean rotors avoid noise and improve stopping. Avoid water or soap; they can cause rust.
Check Brake Pads
Brake pads protect rotors from damage. Worn pads can harm rotors quickly. Change pads before they are too thin. Healthy pads extend rotor life and save money.
Avoid Hard Braking
Sudden stops wear rotors fast. Brake gently and early to save rotors. Smooth braking keeps the rotor surface even. It also reduces heat and warping risk.
Watch For Brake Noise
Squealing or grinding sounds mean rotor or pad issues. Don’t ignore brake noise. Have a mechanic check your brakes soon. Early fixes prevent bigger damage.

Credit: www.youtube.com
Frequently Asked Questions
How Do I Know When To Change Toyota Avalon Rotors?
You should replace rotors if you hear grinding or feel vibrations when braking. Also, check for visible cracks or warping on the rotor surface.
What Tools Are Needed To Change Brake Rotors?
You will need a jack, lug wrench, socket set, C-clamp, and a screwdriver to remove and install brake rotors on a Toyota Avalon.
Can I Change Brake Rotors Myself Safely?
Yes, if you have basic mechanical skills and follow safety steps, you can change rotors on your Avalon at home.
How Long Does It Take To Replace Brake Rotors?
Replacing brake rotors usually takes 1 to 2 hours for both front wheels, depending on your experience and tools.
Conclusion
Changing brake rotors on your Toyota Avalon is simple with the right steps. Take your time and follow each part carefully. This task saves money and keeps your car safe. Use proper tools and check your work twice. Regular maintenance helps your brakes last longer.
Keep learning about your car to handle small repairs. Drive safely and enjoy your smooth ride.


