Struggling to get your brake rotor off can be frustrating, especially when it feels stuck no matter what you try. If you want to save time, avoid damage, and get the job done right, you need the right steps and tips.
This guide will walk you through simple, effective ways to remove your brake rotor safely and quickly. By the end, you’ll feel confident handling this task on your own—no more guessing or wasting effort. Ready to learn how? Keep reading and take control of your brake repair today.
Tools Needed
Removing a brake rotor requires the right tools. Having the correct tools makes the process safer and faster. This section lists the tools you need to get the job done.
Essential Hand Tools
A lug wrench is needed to remove the wheel nuts. A socket set with ratchet helps remove the caliper bolts. A flathead screwdriver or pry bar can separate the caliper from the rotor. A hammer or rubber mallet helps loosen stuck rotors. A torque wrench is useful to tighten bolts correctly later. These hand tools are basic and must-have for brake rotor removal.
Optional Power Tools
An impact wrench speeds up removing lug nuts and bolts. A cordless drill with a screwdriver bit makes removing screws easier. A wire brush attachment on a drill cleans rust from the rotor hub. These power tools save time and effort but are not required. Hand tools alone can do the job well.
Credit: www.youtube.com
Prepare Your Vehicle
Before removing the brake rotor, prepare your vehicle properly. This step ensures safety and smooth work. Take time to get everything ready. This way, you avoid accidents and damage.
Preparation also helps you work faster. Follow simple steps to lift and secure your car. Use the right tools and methods. This section guides you through these important tasks.
Safety Precautions
Wear gloves and safety glasses to protect yourself. Brake dust is harmful. Avoid breathing it in. Work in a well-ventilated area.
Keep your workspace clean and free of clutter. This prevents trips and falls. Use wheel chocks on the tires that stay on the ground. This stops the car from rolling.
Lifting And Securing The Car
Park your car on a flat surface. Engage the parking brake. Place wheel chocks behind the wheels for safety.
Use a jack to lift the car. Find the correct jacking point in your owner’s manual. Lift the car slowly and steadily.
Once lifted, place jack stands under the car. Never work with only the jack holding the vehicle. Lower the car gently onto the stands for a secure hold.
Remove The Wheel
Removing the wheel is the first step to take off the brake rotor. It gives you clear access to the brake system. This step needs care and the right tools. Follow these simple instructions to remove the wheel safely and easily.
Loosen Lug Nuts
Start by loosening the lug nuts on the wheel. Use a lug wrench or a breaker bar. Turn the nuts counterclockwise to loosen them. Do this while the car is still on the ground. This stops the wheel from spinning. Do not remove the nuts completely yet.
Take Off The Wheel
Next, lift the car using a jack. Place the jack under the car’s lifting point. Raise the car until the wheel is off the ground. Now, fully remove the lug nuts. Keep them in a safe place. Pull the wheel straight off the hub. Set the wheel aside carefully.
Detach The Brake Caliper
Detaching the brake caliper is a crucial step to remove the brake rotor safely. The caliper holds the brake pads and must be taken off carefully. This part connects the rotor to the brake system. Removing it allows the rotor to come free without damage.
Handle the caliper with care. It contains important parts like brake pads and pistons. Follow the steps below to detach it properly and avoid any problems.
Locate Caliper Bolts
Find the bolts that secure the caliper to the wheel assembly. Usually, two bolts hold the caliper in place. Look behind the caliper for these bolts. Use a flashlight if needed to see clearly. Identifying these bolts is the first step to remove the caliper.
Remove And Secure Caliper
Use the correct size wrench or socket to loosen the caliper bolts. Turn the bolts counterclockwise to remove them. Do not let the caliper hang by the brake hose. Use a hook or wire to hang the caliper safely on the suspension or frame. This prevents damage to the brake hose and keeps the caliper secure during the process.
Remove The Brake Pads
Removing the brake pads is the next step before taking off the brake rotor. Brake pads press against the rotor to stop your vehicle. They need to come off to free the rotor.
Brake pads can be tight or stuck. Use the right tools and work carefully. This prevents damage and keeps your brake system safe.
Locate The Brake Caliper
First, find the brake caliper holding the pads. It sits over the rotor. The caliper clamps the pads on the rotor.
Remove The Caliper Bolts
Use a socket wrench to remove the bolts on the caliper. Keep the bolts safe for reassembly. The caliper will loosen after this.
Lift The Caliper Away
Gently lift the caliper off the rotor. Do not pull on the brake line. Support the caliper to avoid strain on the line.
Take Out The Brake Pads
Slide the brake pads out of the caliper bracket. Note their position for reinstallation. Some pads have clips or pins to remove first.
Inspect The Brake Pads
Check the pads for wear or damage. Thin or cracked pads need replacement. Good pads can be reused after rotor work.
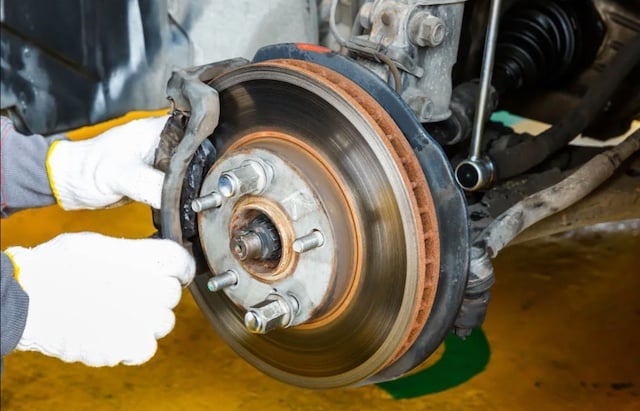
Credit: www.buybrakes.com
Free The Rotor
Freeing the brake rotor is the next step after removing the wheel and caliper. This part can stick due to rust or dirt. Taking the right approach helps avoid damage and makes the job easier. Follow these steps carefully to release the rotor safely.
Check For Retaining Screws
Look closely at the rotor hub for small screws. These screws hold the rotor in place. Use a screwdriver to remove them before trying to pull the rotor off. Skipping this step can make removal very hard.
Loosen Rust And Debris
Rust often binds the rotor to the hub. Tap the rotor gently with a rubber mallet. This breaks the rust and loosens debris. Avoid hitting too hard to prevent damaging parts. Work around the edges for better results.
Use Penetrating Oil
Spray penetrating oil around the rotor hub area. Let it sit for 10 to 15 minutes. The oil seeps into tight spaces and dissolves rust. This step reduces the force needed to remove the rotor. Repeat if the rotor still feels stuck.
Remove The Rotor
Removing the brake rotor is an important step in brake maintenance. It helps you check for wear or replace the rotor if needed. The rotor can stick due to rust or dirt, so careful removal is key. Use gentle methods first to avoid damage. If the rotor does not come off easily, tools can help.
Tap The Rotor Gently
Use a rubber mallet or hammer with a cloth to tap the rotor. Tap around the edge evenly. This loosens rust and dirt holding the rotor in place. Avoid hitting too hard to prevent damage. Tap gently until the rotor starts to move. It may take a few taps to loosen it.
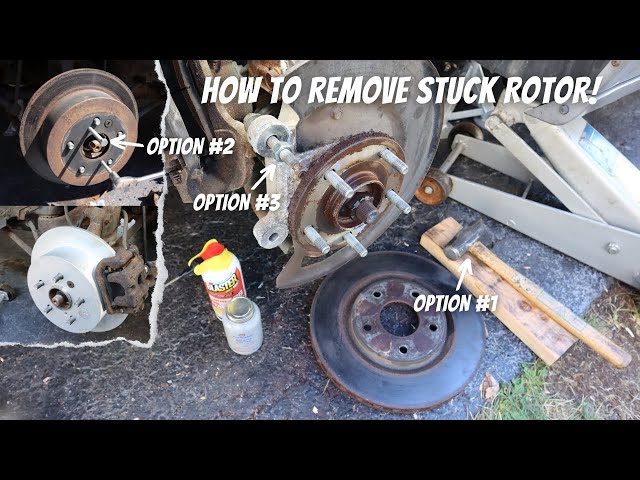
Use Puller Tools If Necessary
If tapping does not work, try a puller tool. A puller applies even pressure to pull the rotor off. Attach the tool to the rotor according to instructions. Turn the tool slowly to release the rotor. This method avoids bending or breaking the rotor. Puller tools make removal easier and safer.

Credit: www.reddit.com
Tips For Stubborn Rotors
Stubborn brake rotors can be tough to remove. Rust and debris often cause them to stick tightly. Patience and the right tools make this job easier. Use these tips to loosen stuck rotors safely and effectively.
Apply Heat
Heat helps expand metal parts and break rust bonds. Use a heat gun or propane torch carefully. Apply heat around the rotor center. Avoid overheating brake pads or sensors. Heat for a few minutes, then try to remove the rotor. This method softens rust and eases removal.
Use Impact Tools
Impact tools deliver strong, sudden force to stuck rotors. Use an impact wrench or hammer with a punch. Tap around the rotor hub gently but firmly. This shakes loose rust and corrosion. Avoid hitting too hard to prevent damage. Impact tools help free rotors that won’t budge by hand.
Reinstalling Components
Reinstalling the brake components is an important step after removing the rotor. This process ensures your brake system works safely and smoothly. Take your time and follow each step carefully. Proper reinstallation helps avoid noise, vibrations, or brake failure.
Clean The Hub Surface
Start by cleaning the hub surface. Use a wire brush or sandpaper to remove rust and dirt. A clean surface helps the rotor sit flat and secure. Wipe off any dust with a clean cloth before moving on.
Install New Or Cleaned Rotor
Place the new or cleaned rotor onto the hub. Align the holes with the wheel studs. Push the rotor gently until it sits flush against the hub. Avoid touching the rotor’s braking surface to keep it clean.
Reattach Caliper And Pads
Next, position the brake pads inside the caliper. Slide the caliper back over the rotor carefully. Secure the caliper bolts tightly using a wrench. Check that the caliper moves freely without binding.
Mount The Wheel
Put the wheel back on the hub. Align it with the wheel studs and push it firmly. Screw the lug nuts by hand at first. Then, tighten them in a star pattern with a wrench. Lower the vehicle and finish tightening the lug nuts to the correct torque.
Frequently Asked Questions
How Do You Safely Remove A Brake Rotor?
First, lift the vehicle and remove the wheel. Then, take off the caliper and bracket. Finally, slide the rotor off the hub carefully.
What Tools Are Needed To Remove A Brake Rotor?
You typically need a jack, lug wrench, socket set, screwdriver, and possibly a hammer or impact driver for stuck rotors.
Why Is The Brake Rotor Hard To Remove?
Rust and corrosion often cause rotors to stick tightly to the hub, making removal difficult without proper tools or techniques.
Can Heat Help Remove A Stuck Brake Rotor?
Yes, applying heat with a heat gun or torch can expand the metal, loosening rust and making rotor removal easier.
Conclusion
Removing a brake rotor takes patience and the right tools. Start by loosening bolts carefully and avoid forcing parts. Rust or dirt might make removal tough. Use a hammer gently if needed, but stay cautious. Clean the area after removing the rotor to prevent future problems.
Taking your time helps keep safety first. Following these steps makes the job easier and safer. Keep learning and practicing to improve your skills. Brake maintenance is key to safe driving.