
Are your car’s wheels looking a bit dull or scratched? Installing plastic wheel covers is a simple and affordable way to give your vehicle a fresh, stylish look.
You don’t need special tools or experience to do it yourself. In this guide, you’ll discover easy steps to fit wheel covers quickly and securely. By the end, your car will stand out on the road, and you’ll save money on expensive upgrades.
Ready to transform your wheels? Let’s get started!
Tools Needed
Installing plastic wheel covers is simple with the right tools. These tools help make the process safe and fast. You do not need many tools, but the correct ones ensure a good fit and protect your wheels.
Gathering all tools before starting saves time. It also helps avoid mistakes during installation. Below are the key tools needed for this task.
Flathead Screwdriver
A flathead screwdriver helps remove old wheel covers or hubcaps. It also assists in prying off tight covers gently. Be careful not to scratch the wheel or cover.
Rubber Mallet
A rubber mallet helps tap the plastic wheel cover into place. It provides soft but firm force. This tool prevents damage to the cover compared to a metal hammer.
Wheel Wrench
A wheel wrench loosens and tightens wheel nuts if you remove the wheel. This tool is useful if the wheel cover fits behind the nuts. It ensures safe removal and reinstallation.
Cleaning Cloth
A clean cloth removes dirt and dust from the wheel surface. Clean wheels help covers fit better and stay secure longer. Use a damp cloth for stubborn grime.
Choosing The Right Wheel Covers
Choosing the right plastic wheel covers is important for your car’s look and fit. The right covers protect your wheels and improve your car’s style. Picking the correct size and design helps the covers stay on securely and look great.
Measuring Wheel Size
Measure your wheel’s diameter before buying covers. Use a tape measure to find the wheel size in inches. Check the number on the tire’s sidewall. This number shows the wheel diameter. Choose covers that match this size exactly. Covers too small or too large will not fit well.
Material And Design Options
Plastic wheel covers come in different materials and styles. Look for durable plastic that resists cracks and fading. Some covers have a shiny finish, while others are matte. Pick a design that matches your car’s color and style. Simple designs suit most cars. Sporty or fancy styles fit certain looks better.
Preparing The Wheels
Preparing the wheels is an important step before installing plastic wheel covers. It makes sure the covers fit well and last longer. Taking time to prepare the wheels helps avoid problems later. Simple steps like cleaning and checking for damage make a big difference.
Cleaning The Surface
Start by washing the wheels with soap and water. Dirt and grease can stop the covers from sticking properly. Use a soft brush to scrub the surface gently. Rinse the wheels and dry them completely with a clean cloth. Clean wheels help the covers snap on securely and look better.
Inspecting For Damage
Look closely at the wheels for cracks, dents, or rust. Damaged areas can cause the covers to fit poorly or fall off. Small cracks may grow bigger over time. Rust can weaken the wheel surface. Fix any damage before adding the covers to keep them safe and tight.

Credit: www.g-locbrakes.com
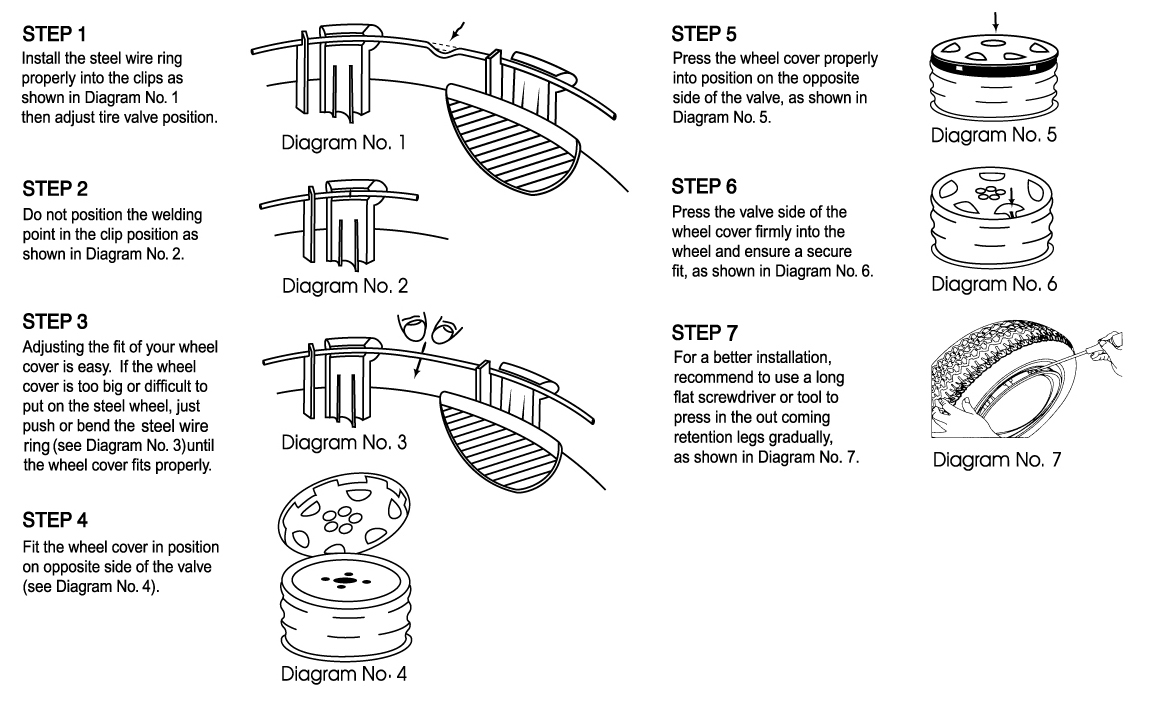
Installing The Wheel Covers
Installing plastic wheel covers is a simple task you can do at home. It improves the look of your wheels quickly. Follow these steps carefully for a perfect fit and secure attachment. Take your time for better results.
Aligning The Cover
Start by holding the wheel cover near the wheel. Match the cover’s valve stem cutout with the tire’s valve stem. This step ensures the cover fits properly without blocking the valve. Check the edges to see if they line up evenly with the wheel rim.
Securing The Clips
Press the cover firmly against the wheel. Push the clips or tabs inward so they snap onto the wheel rim. Each clip should hold the cover tightly in place. Do not force it too hard to avoid breaking the clips. Make sure all clips are attached before moving on.
Checking The Fit
After securing the cover, check if it sits flush against the wheel. Try to wiggle the cover gently to see if it moves. A good fit means the cover stays steady without shifting. Inspect all around the wheel to confirm even contact and secure attachment.
Troubleshooting Common Issues
Installing plastic wheel covers can sometimes cause small issues. Most problems are easy to fix with quick checks and simple steps. This section helps solve common troubles during installation. Follow the tips below to make your wheel covers fit and work well.
Loose Covers
Loose wheel covers can fall off while driving. Check if clips or tabs are damaged or bent. Replace any broken parts before installing the cover again. Clean the wheel surface to remove dirt or grease. Dirt stops the cover from gripping tightly. Press the cover evenly all around the wheel. Make sure it snaps into place firmly. If the cover still feels loose, try a different size or style that fits better.
Difficult Removal
Removing wheel covers can be hard if they stick too much. Use a plastic pry tool or flat screwdriver to lift the edges carefully. Avoid metal tools that can scratch the cover or wheel. Work slowly around the cover’s edge to release clips. Spray some water or mild soap around the cover’s edge to loosen dirt or rust. Do not force the cover off, as it may break. After removing, clean the clips and wheel to make future removal easier.

Credit: www.youtube.com
Maintenance Tips
Plastic wheel covers need regular care to stay in good shape. Proper maintenance helps them look new and last longer. Small steps can prevent damage and keep them clean.
Cleaning Your Plastic Wheel Covers
Use a soft cloth or sponge with mild soap and water. Avoid harsh chemicals that can damage the plastic. Rinse well to remove all soap. Dry with a clean cloth to stop water spots.
Checking For Damage
Inspect wheel covers often for cracks or scratches. Fix small cracks early to stop them from growing. Replace covers that are broken or loose to avoid loss while driving.
Protecting From Harsh Weather
Keep your wheel covers away from direct sunlight for long times. Sunlight can make plastic fade or become brittle. Store the car in a garage or use a car cover if possible.
Reattaching Loose Covers
Secure loose wheel covers right away. Use the right clips or fasteners for your model. Loose covers can fall off and get lost or damaged on the road.
Credit: www.capads.com.tw
Frequently Asked Questions
How Do I Remove Old Plastic Wheel Covers?
Use a flathead screwdriver to pry off the old wheel covers gently. Work around the edges carefully to avoid damage. Clean the wheel surface before installing new covers for better fit and appearance.
What Tools Are Needed To Install Wheel Covers?
You typically need a flathead screwdriver and a rubber mallet. The screwdriver helps remove old covers, and the mallet secures new covers. Some wheel covers snap on without tools.
Can I Install Plastic Wheel Covers Myself?
Yes, installation is simple and can be done at home. Align the cover with the wheel, then press or tap it into place. No special skills are required.
How Do I Ensure Wheel Covers Fit Properly?
Check the wheel cover size matches your tire diameter. Measure your wheels before purchase. Proper fit prevents covers from falling off during driving.
Conclusion
Installing plastic wheel covers is simple with the right steps. Take your time and follow each instruction carefully. Make sure the covers fit snugly on your wheels. Check that they stay in place while driving. Clean your wheel covers regularly to keep them looking good.
Enjoy the fresh, neat look they give your car. Now, you can easily change or replace wheel covers anytime. Small effort, big difference. Safe driving!


