
Are you looking to give your car, furniture, or gadgets a fresh new look without spending a fortune? Installing a vinyl wrap might be the perfect solution for you.
It’s a cost-effective way to change colors, add patterns, or protect surfaces, and you don’t need to be a pro to do it yourself. In this guide, you’ll discover simple, step-by-step instructions to help you master vinyl wrapping with ease.
Keep reading, and by the end, you’ll have the confidence to transform your items like a true expert.
Credit: www.apexcustoms.com
Preparing The Surface
Preparing the surface is the first step to a smooth vinyl wrap installation. A clean, smooth surface helps the vinyl stick better. It prevents bubbles and wrinkles. Taking time here saves problems later.
Cleaning And Drying
Start by washing the surface with soap and water. Remove all dirt, dust, and grease. Use a clean cloth to wipe the area. Dry it fully before moving on. Any moisture can stop the vinyl from sticking.
Removing Old Wraps Or Decals
Peel off any old vinyl wraps or stickers carefully. Use a heat gun or hairdryer to soften the adhesive. This makes removal easier and protects the paint. Clean leftover glue with adhesive remover. Make sure the surface is clear and smooth.
Sanding And Smoothing Imperfections
Check for scratches, bumps, or rust spots. Lightly sand these areas with fine-grit sandpaper. Smooth out rough patches for better adhesion. After sanding, wipe the surface again to remove dust. A flat, clean surface ensures a flawless wrap.
Gathering Essential Tools
Starting a vinyl wrap project needs more than just the vinyl itself. Gathering the right tools is key. This step sets the stage for a smooth installation process. Having everything ready helps avoid stops and mistakes.
Vinyl Wrap Materials
Choose high-quality vinyl wrap sheets. Pick the right size for your surface. Clean the area before applying the wrap. Use a good primer to help the vinyl stick. Keep extra vinyl for small repairs or mistakes.
Application Tools
Use a squeegee to smooth out air bubbles. A heat gun helps stretch and shape the vinyl. Have a sharp utility knife for trimming edges. Use a microfiber cloth to clean surfaces. A measuring tape ensures accurate cuts.
Safety Gear
Wear gloves to protect your hands. Use safety glasses to guard your eyes. Keep a mask if working with strong smells. Work in a well-ventilated space. Avoid loose clothing to prevent accidents.
Measuring And Cutting The Vinyl
Measuring and cutting vinyl wrap is a key step in the installation process. Accurate work here ensures the wrap fits perfectly and looks smooth. Taking your time helps avoid mistakes that waste material or cause wrinkles.
Use the right tools and follow careful steps to get clean cuts and exact shapes. This section explains how to take measurements, mark cut lines, and use cutting tools effectively.
Taking Accurate Measurements
Start by measuring the surface you want to cover. Use a tape measure for precise length and width. Write down each measurement to avoid forgetting.
Measure twice to confirm numbers. Add a small extra margin, about one inch, for adjustments. This helps when you place the vinyl and trim it later.
Marking Cut Lines
Lay the vinyl flat on a clean surface. Use a ruler or straight edge to mark cut lines with a pencil or light marker. Keep lines straight for clean edges.
Double-check measurements before marking. Mark clearly but lightly to erase if needed. Avoid deep marks that damage the vinyl.
Cutting Techniques
Use a sharp utility knife or vinyl cutter for clean cuts. Cut slowly along the marked lines. Apply gentle pressure to avoid tearing.
Keep the vinyl flat and steady while cutting. Use a cutting mat or board underneath to protect surfaces. Change blades often for smooth cutting.
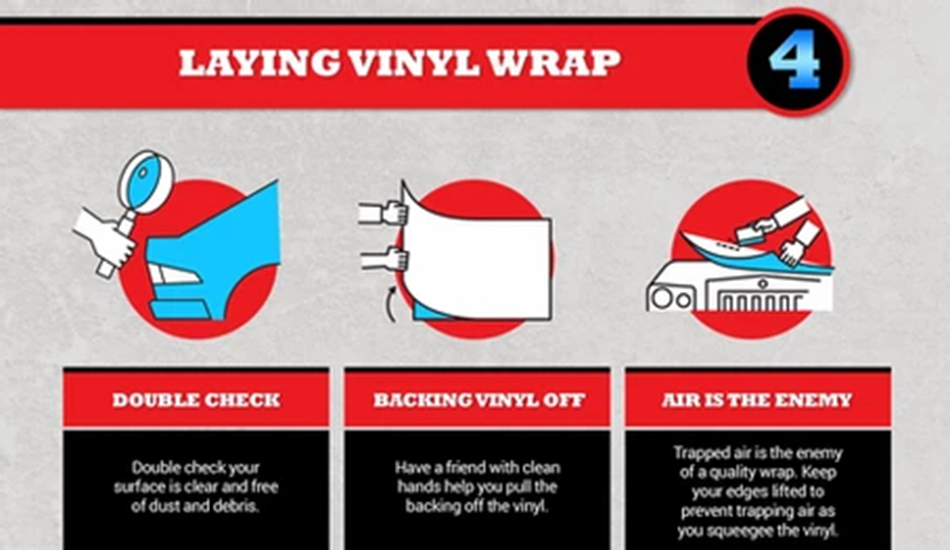
Applying The Vinyl Wrap
Applying the vinyl wrap is the most important step. It takes care and focus to avoid wrinkles and bubbles. This part decides how your wrap will look in the end. Follow these simple steps to apply the vinyl wrap smoothly.
Positioning The Vinyl
Start by placing the vinyl wrap on the surface. Align it carefully to cover the area fully. Make sure the edges match the shape of the object. Take your time to check the fit from all sides. Good positioning prevents mistakes later on.
Peeling The Backing
Slowly peel off a small part of the backing paper. Avoid removing it all at once to control the application. Work little by little, pulling the backing as you smooth the vinyl. This helps keep the wrap flat and clean.
Smoothing With A Squeegee
Use a squeegee to push out air bubbles and wrinkles. Start from the center and move outward in straight lines. Apply firm, even pressure for the best results. Keep the vinyl tight and smooth to avoid creases.
Handling Curves And Edges
Handling curves and edges is one of the toughest parts of installing vinyl wrap. These areas need extra care to avoid wrinkles and bubbles. Proper technique helps the vinyl stick smoothly and look professional. This section covers key steps to work with these tricky shapes.
Heating The Vinyl
Heat softens the vinyl, making it easier to stretch and shape. Use a heat gun or a hairdryer on low heat. Move the heat source slowly and evenly across the surface. Avoid overheating, which can damage the vinyl. Warm vinyl molds better to curves and edges.
Stretching Techniques
Stretch the vinyl gently to fit around curves. Pull the material slowly in different directions. Use your fingers or a squeegee to smooth it out. Stretching too hard can cause tears or distortions. Patience is key to getting a perfect fit.
Trimming Excess Material
After fitting the vinyl, trim the extra material near edges. Use a sharp blade or utility knife for clean cuts. Cut carefully to avoid cutting the surface underneath. Trim small sections at a time for better control. Neat trimming helps the wrap look sharp and tidy.

Credit: www.wikihow.com
Final Touches And Inspection
After applying your vinyl wrap, the final steps are key to a smooth, lasting finish. These touches ensure the wrap looks great and stays in place. A careful inspection helps find and fix small issues before they become big problems.
Removing Air Bubbles
Air bubbles can ruin the smooth look of your vinyl wrap. Use a small pin or a needle to prick the bubbles gently. Press the air out with a squeegee or your fingers. Work from the center of the bubble toward the edges. This method avoids damage and keeps the wrap tight against the surface.
Sealing The Edges
Edges are the most vulnerable parts of the wrap. Use a heat gun to warm the edges slightly. This makes the vinyl more flexible and easier to press down. Press edges firmly with a squeegee or cloth to seal them. Proper sealing stops dirt and water from getting under the wrap.
Curing Time
After installation, the vinyl needs time to settle. Avoid washing or exposing the wrap to harsh weather for at least 24 hours. This curing time lets the adhesive bond fully with the surface. A well-cured wrap lasts longer and looks better over time.
Common Mistakes To Avoid
Installing vinyl wrap can be tricky. Many beginners make common mistakes that hurt the final look. Avoiding these errors saves time and money. Focus on the details for a smooth finish. Here are some usual pitfalls to watch out for.
Skipping Surface Prep
Clean the surface well before applying vinyl. Dirt and grease stop the vinyl from sticking properly. Dust or wax will cause bubbles and peeling later. Use soap and water, then a cleaner like isopropyl alcohol. Dry the surface fully for the best grip. Skipping this step leads to a poor, short-lived wrap.
Overstretching Vinyl
Pulling vinyl too hard can damage it. Overstretching causes tears, wrinkles, or thin spots. Vinyl has some stretch but use it sparingly. Heat the vinyl gently to make it flexible instead. Stretch only enough to fit corners and curves. Being too forceful ruins the vinyl and wastes material.
Ignoring Temperature Guidelines
Vinyl wraps need the right temperature to stick well. Too cold, and the adhesive won’t bond properly. Too hot, and the vinyl can become too soft or sticky. Aim for moderate temperatures, around 60-80°F (15-27°C). Work indoors or in shade if needed. Ignoring temperature causes bubbles, peeling, and poor durability.
Maintaining Your Vinyl Wrap
Maintaining your vinyl wrap keeps it looking fresh and new for longer. Proper care prevents damage and fading. Simple steps help protect your investment and keep the wrap vibrant. Follow these tips to enjoy your vinyl wrap for years.
Cleaning Tips
Use a soft cloth or sponge for cleaning. Wash the wrap with mild soap and water only. Avoid harsh chemicals or abrasive cleaners. Rinse thoroughly to remove all soap residue. Dry with a soft towel to prevent water spots. Clean your wrap regularly to avoid dirt buildup.
Avoiding Damage
Do not use high-pressure washers directly on the wrap. Avoid scrubbing too hard or using rough brushes. Park in shaded areas to reduce sun damage. Stay away from sharp objects that can scratch the surface. Be cautious with fuel spills or harsh liquids. Handle your wrapped surface gently to avoid peeling.
Longevity Advice
Keep your vinyl wrap out of extreme heat as much as possible. Apply a vinyl protectant every few months for added shine. Inspect the wrap often for small tears or lifting edges. Fix minor issues quickly to stop further damage. Regular care helps your wrap last several years. Protect your wrap for a long-lasting finish.

Credit: wrapguys.com
Frequently Asked Questions
What Tools Are Needed To Install Vinyl Wrap?
You need a squeegee, heat gun, utility knife, cleaning solution, and microfiber cloth. These tools help apply vinyl smoothly and securely.
How Long Does Vinyl Wrap Installation Take?
Installation usually takes 2 to 6 hours depending on the vehicle size and wrap complexity. Proper time ensures a flawless finish.
Can I Install Vinyl Wrap Myself?
Yes, with patience and proper tools, DIY vinyl wrap is possible. However, professional help ensures better results and durability.
How Do I Prepare The Surface Before Wrapping?
Clean the surface thoroughly with soap and alcohol to remove dirt and oils. This ensures vinyl adheres properly and lasts longer.
Conclusion
Installing vinyl wrap can change your vehicle’s look without much cost. Take your time and follow each step carefully. Clean surfaces help the wrap stick better and last longer. Use a heat gun to smooth out bubbles and creases. Patience pays off for a neat, professional result.
Practice on smaller areas before tackling bigger sections. Enjoy your new style and protect your vehicle’s paint. Vinyl wrapping is a fun, creative way to refresh your ride. Keep your tools ready and start your project today.


