
If you’ve ever struggled with those stubborn alloy wheel nut covers, you know how frustrating it can be to get them off without damaging your wheels. Removing them might seem tricky, but with the right tips and tools, you can do it quickly and safely.
In this guide, you’ll discover simple, step-by-step methods that anyone can follow. Keep reading, and you’ll learn how to protect your wheels while making this task easier than you ever thought possible.

Credit: www.youtube.com
Tools Needed
Removing alloy wheel nut covers requires specific tools. Having the right tools makes the job easier and safer. This section covers the essential tools needed for removal.
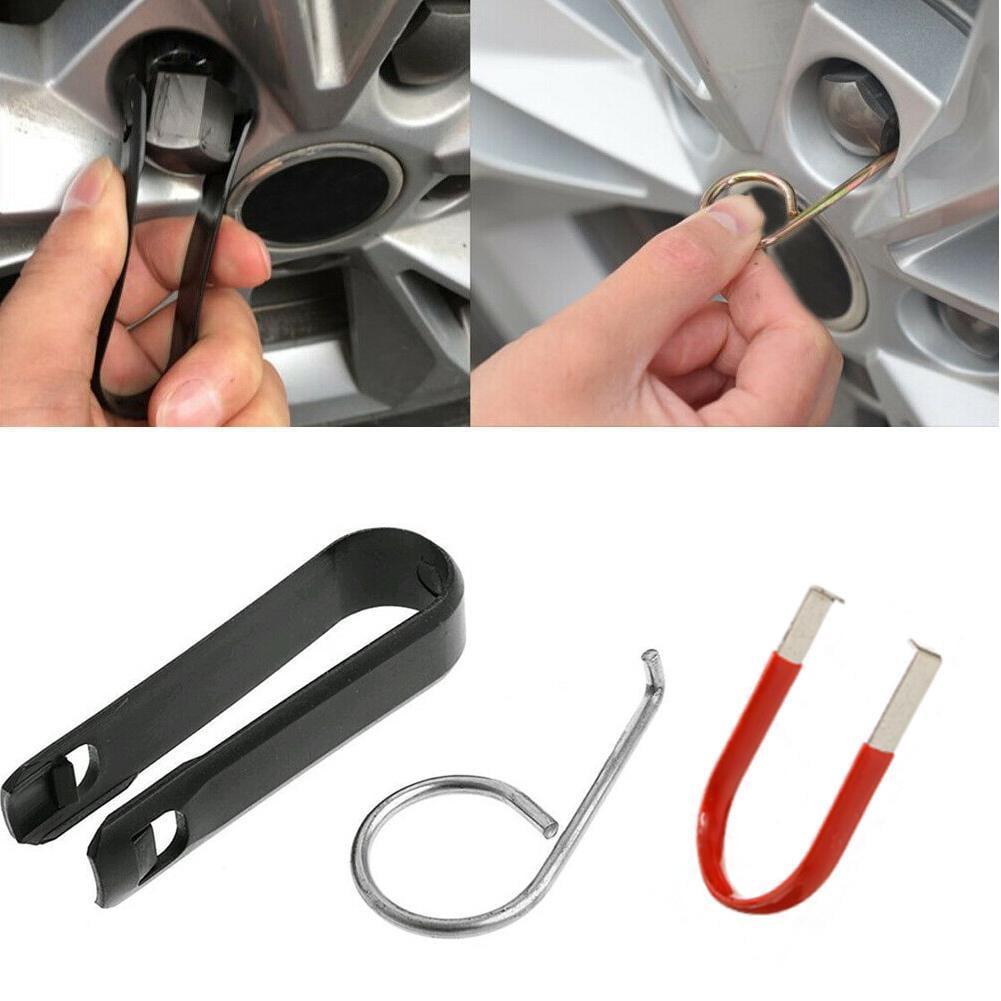
Common Tools For Removal
The most common tool is a flathead screwdriver. It helps pry off the nut covers gently. A plastic pry tool is also useful to avoid scratching the wheel. Sometimes, a pair of pliers can help grip tight covers. Use tools that fit well to prevent damage. Avoid sharp or metal tools that may harm the wheel finish.
Safety Equipment
Wear gloves to protect your hands from sharp edges. Safety glasses keep your eyes safe from dust or debris. Use knee pads if you work on the ground for long. Proper safety gear prevents injuries during the removal process. Keep the workspace clean and clear for safe movement.
Identifying Nut Cover Types
Removing alloy wheel nut covers starts with knowing the type of cover you have. Nut covers come in different materials and attachment styles. Identifying these types helps you remove them safely without damage. This guide explains the common nut cover types you may find on your wheels.
Plastic Vs Metal Covers
Nut covers are usually made of plastic or metal. Plastic covers are lightweight and flexible. They often snap on easily and can crack if forced. Metal covers are heavier and stronger. They resist wear better but may need special tools to remove. Knowing the material helps choose the right removal method.
Clip-on Vs Screw-on Designs
Nut covers attach to the wheel nuts in two main ways: clip-on or screw-on. Clip-on covers snap over the nuts and hold tight with small clips. They can be pried off with a flat tool. Screw-on covers twist onto the nuts like a lid. Removing them requires turning counterclockwise, sometimes with a wrench. Identifying the design avoids damage during removal.
Preparing The Vehicle
Preparing the vehicle is the first step in removing alloy wheel nut covers. This stage ensures safety and makes the job easier. A well-prepared vehicle stays stable and avoids damage. Clean surroundings help you see nut covers clearly. Follow simple steps to prepare your car properly.
Securing The Car
Park the car on a flat, firm surface. Avoid slopes or soft ground. Apply the parking brake to stop the car from moving. Place wheel chocks behind the wheels that stay on the ground. This keeps the car steady while you work. Double-check the car does not roll or shift.
Cleaning The Wheel Area
Remove dirt and dust from the wheel surface. Use a brush or cloth to clean around the nut covers. Clean wheels help you grip the covers better. Dirt can block tools or cause slipping. Wipe away grease and grime for a clear view.
Removing Nut Covers Step-by-step
Removing alloy wheel nut covers is simple with the right steps. This guide breaks down the process into easy actions. Follow these steps carefully to avoid damage to your wheels or covers.
Start by preparing the tools you need. Be gentle and patient for the best results.
Using A Flathead Screwdriver
Find a flathead screwdriver that fits under the edge of the nut cover. Place the tip carefully between the cover and the wheel. Gently twist or pry the screwdriver to lift the cover. Move slowly to avoid scratching the wheel. Work your way around the cover if needed.
Leveraging A Pry Tool
A pry tool can help remove nut covers without damage. Insert the tool’s tip under the cover edge. Apply light pressure to lift the cover off. Use a soft cloth between the tool and wheel to protect the surface. Pry evenly around the cover for easy removal.
Applying Penetrating Oil If Stuck
Some nut covers stick due to dirt or rust. Spray penetrating oil around the cover base. Let it sit for 5 to 10 minutes to loosen the grip. Try removing the cover again with a screwdriver or pry tool. Repeat the process if the cover stays stuck.
Handling Stubborn Nut Covers
Removing stubborn alloy wheel nut covers can be tricky. These covers often get stuck from dirt, rust, or tight fitting. Patience and care are important to avoid damage. Using the right tools and methods makes the job easier and safer. Below are tips to handle tough nut covers without harm.
Techniques To Avoid Damage
Start with a plastic or rubber tool to pry the cover gently. Avoid metal tools that can scratch the wheel surface. Use a lubricant like WD-40 around the edges to loosen dirt and rust. Let it sit for a few minutes before trying again. Tap lightly with a rubber mallet if needed. Pull straight out to prevent bending or breaking the cover. Clean the area after removal to stop future sticking.
When To Seek Professional Help
Seek help if covers resist all attempts or you lack proper tools. Professionals have special tools to remove covers safely. They also prevent damage to alloy wheels and nuts. Avoid forcing covers, which can cause costly repairs. A trusted mechanic can save time and protect your wheels.
Credit: www.g-locbrakes.com
Cleaning And Maintenance Tips
Keeping alloy wheel nut covers clean and well-maintained helps your wheels look great. Dirt and grime build up fast on nut covers. Cleaning them often stops damage and keeps them shiny. Proper care also makes removal easier next time.
Cleaning Nut Covers
Start by removing the nut covers carefully. Use a soft brush to remove loose dirt. Mix warm water with mild soap for washing. Dip a cloth or sponge in the soapy water. Gently wipe each nut cover to clean all sides. Avoid harsh cleaners that can damage the finish. Rinse covers with clean water and dry with a soft towel. Check for stubborn stains and repeat if needed. Clean covers regularly to avoid tough grime.
Protecting Covers After Removal
Store the nut covers in a clean, dry place. Avoid leaving them in direct sunlight or wet areas. Use a soft cloth or small box to keep them safe. Applying a light coat of wax helps protect the surface. Wax adds shine and prevents dirt buildup. Always dry covers completely before storing. Handle covers gently to avoid scratches. Keeping covers protected extends their life and appearance.
Reinstalling Nut Covers
Reinstalling nut covers on alloy wheels is a simple task that protects the wheel nuts from dirt and damage. Proper reinstallation helps keep your wheels looking neat and working well. Take your time to place each cover carefully for best results.
Aligning Properly
Start by matching the shape of the nut cover with the wheel nut. Each cover fits in one way only. Hold the cover steady and press it gently over the nut. Make sure it sits flat and straight. Avoid forcing the cover, as this can damage it.
Ensuring Secure Fit
Press the nut cover firmly until it snaps into place. It should feel tight and not wiggle. Check all covers by lightly tapping them. A loose cover can fall off while driving. If a cover does not fit well, try cleaning the nut or using a different cover.

Credit: www.youtube.com
Frequently Asked Questions
How Do I Safely Remove Alloy Wheel Nut Covers?
Use a flathead screwdriver or plastic pry tool gently. Insert it under the nut cover edge and carefully pry it off. Avoid using excessive force to prevent damage to the wheel or cover.
What Tools Are Needed To Remove Nut Covers?
Typically, a flathead screwdriver or a plastic pry tool works best. These tools help you lift the covers without scratching the alloy wheels. Avoid metal tools that might cause damage.
Can I Remove Nut Covers Without Damaging Alloy Wheels?
Yes, by using the right tools and gentle pressure. Always pry from the edges slowly and avoid twisting or forcing the cover off. Proper technique ensures no scratches or dents.
Why Remove Alloy Wheel Nut Covers?
Removing covers is necessary for wheel maintenance, tire changes, or cleaning. It also allows access to the wheel nuts during repairs or replacements. Regular removal helps maintain wheel condition.
Conclusion
Removing alloy wheel nut covers is easier than it seems. Use the right tools and take your time. Avoid forcing the covers to prevent damage. Clean the area before and after removal for best results. Practice makes the process smoother and quicker.
Keep the covers safe if you plan to reuse them. Now, you can handle this task with confidence. Simple steps lead to good results. Your wheels will look neat and well-maintained.


