Are you struggling to remove the wheel nut covers on your Ford? It can be tricky if you don’t know the right steps.
But don’t worry—this guide will show you exactly how to do it quickly and safely. By the end, you’ll have the confidence to handle your wheel nut covers like a pro. Keep reading to learn simple tips that save you time and protect your wheels from damage.
Your next wheel job just got a whole lot easier!
Tools Needed
Removing wheel nut covers on a Ford requires the right tools. Using proper tools makes the job easier and prevents damage. Some tools fit many vehicles, while others work best with Ford models. Gather your tools before starting to save time and effort.
Common Tools For Removal
A flathead screwdriver is helpful for prying off covers gently. A plastic trim removal tool avoids scratching the wheel surface. Pliers can grip stubborn covers firmly for easier removal. Gloves protect your hands from sharp edges and dirt. A soft cloth helps clean the area after removal.
Special Tools For Ford Models
Some Ford models use unique wheel nut covers needing specific tools. A Ford wheel cover removal tool fits precisely to avoid damage. A lug wrench with the right size socket helps remove the nuts underneath. Check your vehicle manual for tool recommendations. Using correct tools keeps your wheel and cover safe.
Credit: globaltransportation.org
Preparation Steps
Before removing wheel nut covers on your Ford, some basic preparation is essential. These steps ensure safety and make the job easier. Taking time to prepare prevents damage to your vehicle and tools.
Park On A Flat Surface
Choose a flat and stable surface to park your Ford. This stops the vehicle from rolling or moving. Avoid slopes or uneven ground. A level area offers better control and safety during the removal process.
Secure The Vehicle
Engage the parking brake firmly to keep the car still. Place wheel chocks or blocks behind the tires for extra safety. This prevents the vehicle from shifting while you work. Securing the car protects you and the vehicle from accidents.
Removing Wheel Nut Covers
Removing wheel nut covers on a Ford car is simple. It helps when changing tires or cleaning the wheels. These covers protect the nuts and give your wheels a neat look. Removing them carefully keeps your car safe and avoids damage.
Locate The Cover
First, find the wheel nut cover on your Ford. It sits over the wheel nuts in the center of the wheel. Some covers are small caps; others may cover the whole nut. Check each wheel to see all covers before starting.
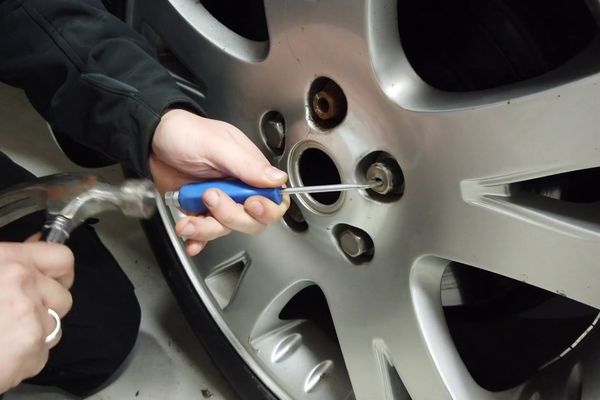
Use A Pry Tool Or Screwdriver
Use a plastic pry tool or flat screwdriver to remove the cover. A plastic tool avoids scratching the wheel. If using a screwdriver, wrap its tip with cloth to protect the paint. Insert the tool gently between the cover and the wheel.
Apply Gentle Pressure
Press the tool slowly to lift the cover. Do not force it hard; the cover can break. Work around the edges bit by bit. Once loose, pull the cover off by hand. Store the covers safely for future use.
Credit: www.martinispa.com
Handling Stubborn Covers
Sometimes, wheel nut covers on Ford vehicles get stuck tightly. Removing them can be tricky without the right approach. Patience and careful handling help avoid damage and make the job easier.
Use tools and tricks to loosen covers gently. Avoid forcing them off quickly. This section explains simple methods to handle stubborn covers safely.
Use Lubricants
Spray a small amount of lubricant around the edges of the wheel nut cover. Let it sit for a few minutes. The lubricant seeps into tight spaces and reduces friction. This makes the cover easier to pull off.
Tap Around The Edges
Use a soft mallet or the handle of a screwdriver. Tap gently around the edges of the cover. This helps loosen any dirt or rust holding the cover in place. Tap lightly to avoid bending or cracking the cover.
Avoid Damage
Do not use excessive force or sharp tools. This can scratch or break the cover. Use a plastic pry tool or a cloth-wrapped screwdriver to protect the surface. Work slowly and carefully to keep the cover intact.
Post Removal Tips
After removing the wheel nut covers from your Ford, some important steps follow. These post removal tips help keep your wheels in good shape. They also prepare you for reinstallation or replacement of the covers.
Clean The Wheel Area
Clean the area around the wheel nuts carefully. Use a soft brush or cloth to remove dirt and dust. Dirt can cause problems when you put the covers back. Cleaning helps prevent rust and keeps the wheel looking neat. Use mild soap and water for the best results. Dry the area fully before moving on.
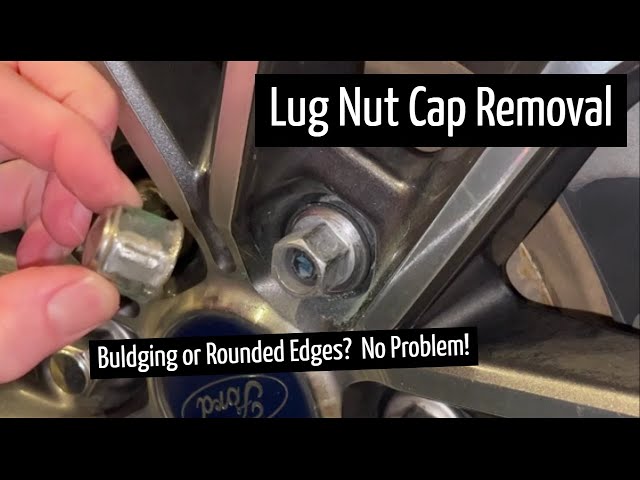
Inspect Covers For Damage
Look closely at the removed wheel nut covers. Check for cracks, dents, or missing clips. Damaged covers may not fit correctly later. Small cracks can grow and cause the cover to fall off. Replace covers that look worn out or broken. Keeping covers in good condition protects your wheels well.

Credit: www.reddit.com
Reinstalling Nut Covers
Reinstalling wheel nut covers on your Ford is a simple task. It helps protect the nuts and keeps your wheels looking neat. Follow these easy steps to place the covers back correctly.
Doing this carefully ensures the covers stay in place while driving. Avoid damage to the covers or the wheel nuts by reinstalling them right.
Align Correctly
Start by matching the nut cover to the wheel nut shape. Look for any grooves or markings that help with alignment. Place the cover gently over the nut, making sure it fits snugly in place.
Press Firmly
Use your palm or fingers to press the cover firmly. Apply steady pressure until you feel it snap or click into place. Avoid pushing too hard to prevent damage to the cover or wheel.
Check Secure Fit
Once installed, check if the cover stays put by gently pulling on it. It should not move or fall off easily. Secure covers protect the nuts and improve the wheel’s appearance.
Common Mistakes To Avoid
Removing wheel nut covers on a Ford might seem simple. Yet, many make mistakes that cause damage or injury. Avoiding these errors saves time and keeps your vehicle safe. Below are common mistakes to watch out for.
Using Excessive Force
Applying too much force can break the nut covers. These covers are made from plastic or light metal. Pushing hard might crack or bend them. Use gentle pressure with the right tool. Slow and steady works best. Avoid hammering or prying aggressively.
Ignoring Safety Precautions
Not wearing gloves can lead to cuts and scrapes. The wheel area might have dirt and rust. Eye protection helps prevent debris from causing harm. Make sure the car is on a flat surface. Use wheel chocks to stop the car from moving. Safety keeps the task easy and injury-free.
Frequently Asked Questions
How Do I Safely Remove Ford Wheel Nut Covers?
Use a flathead screwdriver or plastic pry tool. Gently insert it under the cover edge. Pry carefully to avoid damage to the wheel or cover.
What Tools Are Needed To Remove Ford Wheel Nut Covers?
A flathead screwdriver or plastic trim removal tool works best. Avoid metal tools that can scratch or damage the covers or wheel surface.
Can I Remove Ford Wheel Nut Covers Without Damaging Them?
Yes, by applying gentle, even pressure with a plastic pry tool. Avoid forceful pulling or sharp tools that could crack or scratch the covers.
Why Remove Wheel Nut Covers On Ford Vehicles?
Removing covers allows access to wheel nuts for tire changes or maintenance. It also helps inspect for damage or corrosion on the wheel nuts.
Conclusion
Removing wheel nut covers on a Ford is simple with the right steps. Use proper tools to avoid damage. Gently pry the cover off, working around the edges. Take your time and be careful not to scratch the wheel. Regular removal helps with maintenance and tire checks.
Now, you can easily remove wheel nut covers whenever needed. Keep these tips in mind for a smooth process every time.