Are your brakes making strange noises or not stopping as smoothly as before? It might be time to replace your brake pads and rotors.
Knowing how to do this yourself can save you money and give you confidence in your car’s safety. In this guide, you’ll find simple, step-by-step instructions that anyone can follow—even if you’re not a mechanic. By the end, you’ll understand exactly what to do to keep your brakes working like new.
Ready to take control of your car’s safety? Let’s dive in.
Tools And Materials Needed
Replacing brake pads and rotors requires specific tools and materials. Having the right items makes the job easier and safer. Prepare everything before starting to avoid interruptions.
Use quality tools to ensure a smooth process. These tools help remove old parts and install new ones correctly. Proper materials protect your vehicle and improve brake performance.
Basic Hand Tools
You need a set of wrenches and sockets. These help remove bolts holding the brake parts. A ratchet wrench speeds up the process. A flathead screwdriver can pry off clips and covers. Pliers are useful for springs and pins.
Brake Pad Spreader Or C-clamp
Use a brake pad spreader or a large C-clamp. This tool pushes the caliper piston back into place. It creates space for new, thicker brake pads. This step is crucial for proper brake function.
Jack And Jack Stands
A sturdy jack lifts the car safely. Jack stands hold the vehicle in place. Never rely on the jack alone for support. Safety is key when working under the car.
Brake Cleaner And Rags
Brake cleaner removes dust and grease from parts. Clean parts help the brakes work well. Use clean rags to wipe surfaces after spraying cleaner. Avoid touching rotors with greasy hands.
New Brake Pads And Rotors
Purchase the right brake pads and rotors for your vehicle. Check your car’s manual or part numbers. Using the correct parts ensures proper fit and function. Avoid cheap parts that wear out fast.
Lug Wrench
A lug wrench removes wheel nuts easily. It must fit your car’s lug nuts perfectly. Use it to take off wheels before brake work begins. Tighten nuts securely after installation.
Torque Wrench
A torque wrench tightens bolts to exact specifications. Over-tightening or under-tightening can cause damage. Follow the manufacturer’s torque settings carefully. This tool guarantees safe and reliable brake assembly.
Preparing Your Vehicle
Preparing your vehicle is the first step in replacing brake pads and rotors. This stage ensures your work area is safe and the car is ready for maintenance. Proper preparation helps avoid accidents and makes the job easier. Follow these steps carefully before starting the brake replacement.
Safety Precautions
Wear gloves to protect your hands from dirt and sharp parts. Use safety glasses to shield your eyes from dust and debris. Work in a well-ventilated area to avoid inhaling harmful dust. Keep a fire extinguisher nearby in case of emergencies. Never rush through the process. Stay alert and focused.
Lifting And Securing The Car
Park your car on a flat, solid surface. Engage the parking brake to stop the vehicle from moving. Place wheel chocks behind the wheels that stay on the ground. Use a jack to lift the car at the recommended lift points. Secure the car with jack stands for extra support. Never rely on the jack alone to hold the car.
Removing The Wheel
Loosen the lug nuts before lifting the car. Turn them counterclockwise using a lug wrench. After the car is lifted and secure, remove the lug nuts completely. Pull the wheel straight off the hub. Place the wheel aside in a safe spot. This gives you clear access to the brake system.
Removing Old Brake Pads
Removing old brake pads is the first step in replacing your brakes. This process clears the way for new parts to work well. Proper removal ensures safety and better brake performance. Follow these steps carefully to avoid damage.
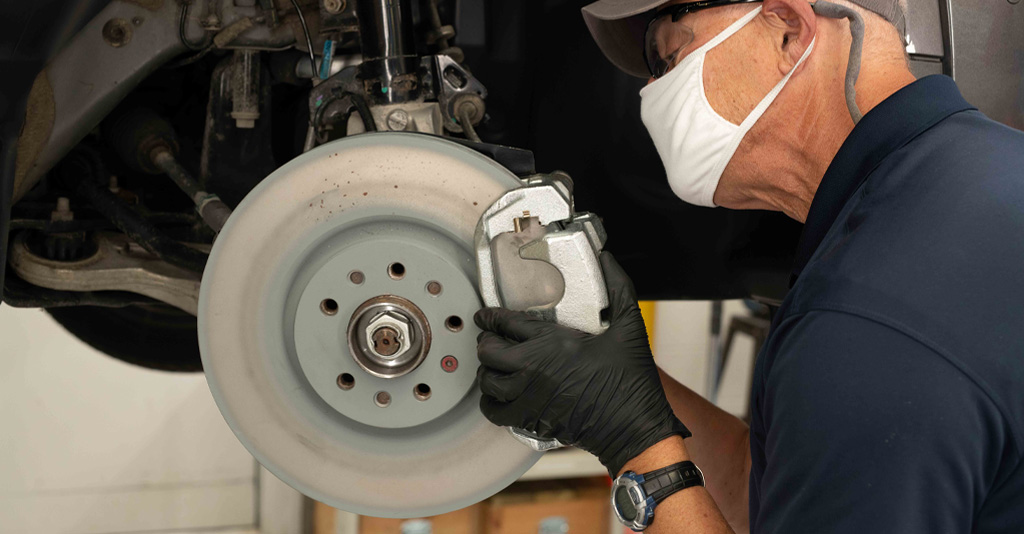
Locating The Brake Caliper
The brake caliper holds the brake pads. Find it near the wheel, attached to the rotor. It looks like a small clamp over the rotor. You may need to remove the wheel to see it clearly.
Detaching The Caliper
Use a wrench to loosen the bolts on the caliper. Be careful not to drop or damage it. Once loose, gently lift the caliper away from the rotor. Support it with a hanger or rope to avoid stress on the brake line.
Taking Out The Old Pads
The brake pads sit inside the caliper bracket. Slide them out carefully. They may be tight or stuck from wear. Check for clips or pins holding them. Remove these parts and pull the pads free without force.

Credit: vatire.com
Replacing Brake Rotors
Replacing brake rotors is a key part of maintaining safe brakes. Over time, rotors wear out and can cause vibrations or poor braking. Swapping out old rotors for new ones helps your vehicle stop smoothly and safely.
This process involves a few careful steps. Removing the caliper bracket comes first. Then, take off the old rotor. Finally, clean and install the new rotor properly. Each step ensures your brakes work well.
Removing Caliper Bracket
Start by lifting the vehicle and removing the wheel. Locate the caliper bracket holding the brake caliper in place. Use a wrench to remove the bolts securing the bracket. Carefully slide the bracket away from the rotor. Support the caliper to avoid stress on the brake line.
Taking Off The Old Rotor
Check if the rotor is held by screws or clips and remove them. If the rotor sticks, tap it gently with a rubber mallet. Avoid using excessive force to prevent damage. Once loose, pull the rotor off the hub. Clean the hub surface before installing the new rotor.
Cleaning And Installing New Rotor
Clean the new rotor with brake cleaner to remove factory oils. Wipe it dry with a clean cloth. Place the rotor onto the hub, aligning any screw holes. Reattach screws or clips to secure it. Reinstall the caliper bracket and tighten bolts firmly. Double-check all parts before lowering the vehicle.
Installing New Brake Pads
Installing new brake pads is a key step in brake maintenance. It helps keep your car safe and stops it smoothly. This part requires care and the right tools. Follow each step closely to avoid mistakes and ensure proper brake function.
Compressing The Caliper Piston
Start by pushing the caliper piston back into its housing. Use a C-clamp or a brake piston tool for this. This creates space for the new, thicker brake pads. Do it slowly and evenly to avoid damage. Check that the piston moves smoothly without force.
Positioning The New Pads
Place the new brake pads into the caliper bracket. Make sure they fit snugly in the slots. Align the pads so the friction material faces the rotor. Avoid touching the pad surface with your fingers. Dirt or oil can reduce braking power.
Reattaching The Caliper
Once the pads are in place, carefully position the caliper over them. Align the bolt holes and slide the caliper back onto the bracket. Tighten the bolts securely but do not overtighten. Check that the caliper moves slightly on its pins. This ensures even pad wear and proper braking.
Reassembling The Wheel
Reassembling the wheel is the final step in replacing brake pads and rotors. It ensures your vehicle is safe and ready to drive. Pay close attention to each action. Properly mounting the wheel and tightening the lug nuts are key to a secure fit.
Mounting The Wheel
Place the wheel carefully onto the hub. Align the holes in the wheel with the lug bolts. Push the wheel firmly until it sits flush against the rotor. Avoid dropping the wheel or letting it hang by the lug nuts. Hold it steady to prepare for tightening.
Tightening Lug Nuts
Start by hand-tightening each lug nut. Turn them clockwise until snug but not fully tight. Use a lug wrench in a star pattern to tighten nuts evenly. This pattern prevents the wheel from being off-center. Finally, use a torque wrench to secure nuts to the correct tightness. This step ensures safety and prevents damage to the wheel or studs.
Testing Brakes After Replacement
Testing brakes after replacement is crucial for safety and performance. It ensures the new pads and rotors work well together. Proper testing helps avoid accidents caused by brake failure. Follow each step carefully to confirm your brakes respond correctly.
Lowering The Vehicle
After installing new brake pads and rotors, lower the vehicle slowly. Use a jack to bring the car down gently. Make sure the wheels touch the ground evenly. This step helps the brake system adjust to the new parts. Avoid driving fast right after lowering the vehicle.
Brake Function Test
Start the engine and press the brake pedal several times. Check for firmness in the pedal feel. The brake should not feel soft or spongy. Test braking at low speed in a safe area. Ensure the car stops smoothly without pulling to one side.
Breaking-in New Pads And Rotors
New pads and rotors need a break-in period. Drive slowly and avoid hard stops for the first 200 miles. This allows the parts to wear evenly and bond well. Proper break-in improves brake performance and lifespan. Be patient during this process for best results.
Common Issues And Troubleshooting
Brake pads and rotors are vital for safe driving. Sometimes, problems occur even after replacement. Recognizing common issues early helps keep your brakes working well. Troubleshooting these problems saves time and money. Below are typical problems and how to fix them.
Squeaking Or Grinding Noises
Squeaking sounds often mean worn brake pads. Dirt or dust can cause noise too. Grinding noises usually show metal-on-metal contact. This happens when pads wear down completely. Replace pads immediately to avoid rotor damage. Clean the brake parts to remove dirt. Use quality pads to reduce noise.
Brake Pedal Feel Problems
A soft or spongy brake pedal signals air in the brake lines. Check brake fluid level and refill if low. Bleed the brakes to remove trapped air. A hard pedal may mean a stuck caliper or bad master cylinder. Inspect these parts and replace if needed. Proper pedal feel ensures safe stopping.
Uneven Pad Wear
Uneven wear shows if calipers do not move freely. It can cause one pad to wear faster than the other. Check caliper slides for rust or dirt. Clean and lubricate slides for smooth movement. Misaligned brake parts also cause uneven wear. Adjust or replace parts to fix the problem.
Maintenance Tips For Longer Brake Life
Brake pads and rotors wear down over time. Proper care helps them last longer. Regular maintenance keeps brakes working well and safe. Small habits can extend brake life.
Simple checks and smart driving reduce brake damage. Follow these tips to protect your brake system.
Check Brake Fluid Regularly
Brake fluid helps brake parts work smoothly. Low fluid can cause brake problems. Check fluid levels every month. Replace old brake fluid as the car manual says. Clean fluid keeps brakes strong.
Avoid Hard Braking
Hard stops wear brake pads fast. Brake gently whenever possible. Give yourself extra space to slow down. Smooth braking saves brake parts and fuel. Your brakes will last much longer.
Inspect Brake Components Often
Look at brake pads and rotors regularly. Check for cracks, grooves, or thin pads. Early problems are easier and cheaper to fix. Listen for strange sounds while driving. Take action quickly to avoid bigger damage.
Keep Wheels Clean
Dirt and dust build up on brake parts. Clean wheels help brakes cool and work right. Wash wheels and brake areas regularly. Avoid strong chemicals that can harm brake parts. Clean brakes mean better stopping power.
Drive At Safe Speeds
High speeds increase brake heat and wear. Slow down in traffic and on hills. Give brakes time to cool after heavy use. Cool brakes last longer and perform better. Drive safely for longer brake life.
Credit: www.advicsaftermarket.com
.jpg)
Credit: www.cbac.com
Frequently Asked Questions
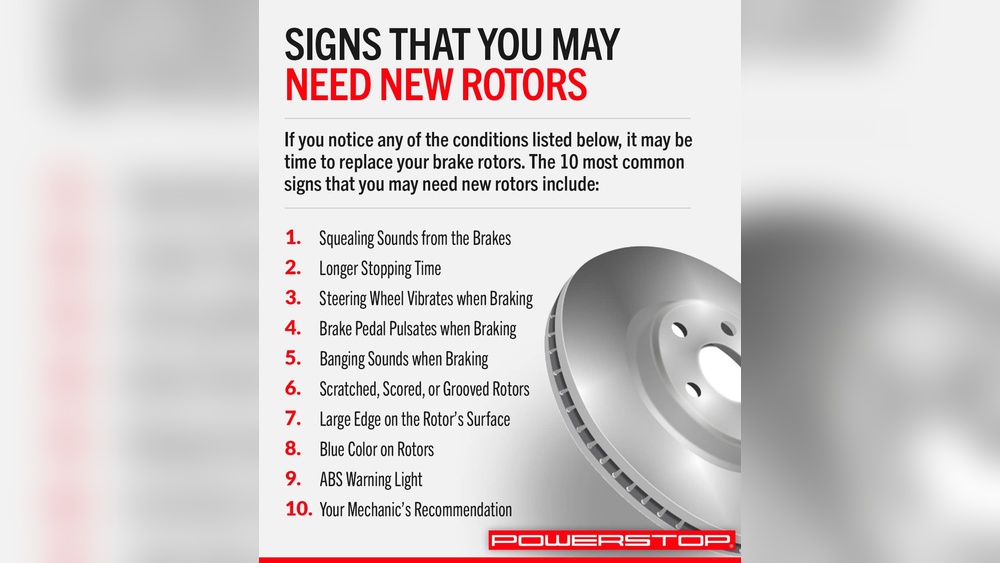
How Do I Know When To Replace Brake Pads?
Brake pads need replacement when they are below 3mm thick or make squealing noises. Also, if braking feels less responsive, check pads immediately. Regular inspection ensures safety and avoids rotor damage. Replacing worn pads prevents costly repairs and maintains optimal brake performance.
Can I Replace Brake Rotors Without Changing Pads?
It’s not recommended to replace rotors without changing pads. New rotors require fresh pads for proper bedding and performance. Using old pads on new rotors can cause uneven wear and noise. Always replace both together for safe, efficient braking and to extend component life.
What Tools Are Needed To Replace Brake Pads And Rotors?
Basic tools include a jack, lug wrench, socket set, C-clamp, and brake cleaner. You may also need a torque wrench and screwdriver. Having the right tools ensures a smooth and safe replacement process. Proper equipment helps avoid damage and speeds up the job.
How Long Does It Take To Replace Brake Pads And Rotors?
Replacing brake pads and rotors typically takes 1 to 2 hours per axle. Time varies based on experience, vehicle type, and tool availability. Taking your time ensures correct installation and safety. Rushing can lead to mistakes or brake issues later.
Conclusion
Replacing brake pads and rotors is a key car maintenance task. It keeps your vehicle safe and running smoothly. Take your time and follow each step carefully. Use the right tools and parts for best results. Check your work before driving again.
Regular brake care helps avoid costly repairs later. Trust your skills and stay safe on the road. Simple steps make a big difference in brake performance. Keep learning and caring for your car.