If you’ve noticed your brakes feeling rough or your car vibrating when you stop, your brake rotors might need some attention. Resurfacing a brake rotor can save you money and improve your car’s performance, but it’s not always clear how to do it right.
This guide will walk you through simple steps to resurface your brake rotors safely and effectively. By the end, you’ll know exactly what to do to keep your brakes smooth and reliable. Keep reading—you’re closer than you think to better braking!
Signs Of Rotor Wear
Brake rotors wear down over time due to regular use. Recognizing signs of rotor wear helps keep your vehicle safe. Early detection can prevent costly repairs and ensure smooth braking.
Rotors that are worn out may cause problems while driving. Knowing what to watch for can save you time and money. Here are some clear signs that your rotors might need resurfacing or replacement.
Common Symptoms
Your brake pedal might feel different, such as vibrating or pulsing. Strange noises like squealing or grinding often mean rotor issues. Longer stopping distances can also indicate rotor wear.
Car pulling to one side during braking is another symptom. If you sense a rough or uneven brake feel, check the rotors. These symptoms show your rotors might be uneven or damaged.
Visual Inspection Tips
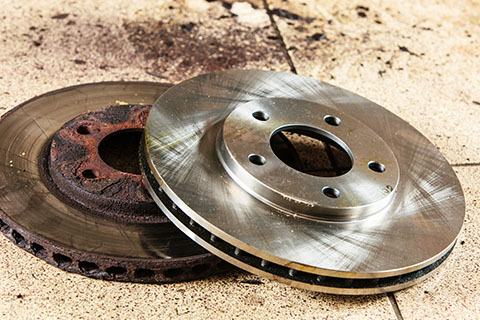
Look at the rotor surface for grooves, cracks, or scoring marks. Deep ridges mean the rotor surface is uneven. Rust can cause rough braking and reduce rotor life.
Check for blue or dark spots, signs of overheating. Warped rotors often show visible warping or discoloration. Measure rotor thickness and compare it to the manufacturer’s limit.
Keep your rotors clean for a better inspection. Regular checks help catch wear early and keep brakes reliable.

Credit: knowhow.napaonline.com
Tools Needed For Resurfacing
Resurfacing a brake rotor requires the right tools to get a smooth finish. Using proper equipment ensures the job is done safely and correctly. This section lists the key tools needed for rotor resurfacing. It helps you prepare well before starting the work.
Essential Equipment
Start with a brake lathe, the main tool for resurfacing rotors. It spins the rotor to shave off a thin layer of metal. A dial indicator measures the rotor’s thickness and runout. This tool checks if the rotor is flat and even. You will also need a set of wrenches and sockets. These help remove and install the rotor from the vehicle. Sandpaper or emery cloth can clean the rotor surface before and after resurfacing. A wire brush is useful to remove rust and dirt.
Safety Gear
Safety is important during rotor resurfacing. Use safety glasses to protect your eyes from metal shavings. Gloves keep your hands safe from sharp edges and chemicals. A dust mask prevents inhaling brake dust and metal particles. Wear ear protection if the brake lathe is noisy. Proper clothing, like long sleeves, protects your skin from debris. Always work in a well-ventilated area for fresh air.
Preparing The Vehicle
Preparing the vehicle is the first step to resurface a brake rotor. It involves making the car safe and ready for work. Taking time here helps avoid accidents and damage. Follow these steps carefully.
Lifting And Securing
Park the vehicle on a flat surface. Use the parking brake to keep it still. Place wheel chocks behind tires for extra safety. Use a reliable jack to lift the car. Raise it until the tire is off the ground. Then, place jack stands under the frame. Never rely only on the jack. Make sure the car is stable before moving on.
Removing The Wheel And Brake Components
Remove the lug nuts with a wrench. Take off the wheel and set it aside. Locate the brake caliper and bolts. Use a suitable tool to remove the caliper bolts. Carefully slide the caliper off the rotor. Hang the caliper using a hook or wire. Avoid letting it hang by the brake hose. Remove the brake pads from the caliper. Now, you can access the rotor for resurfacing.
Credit: www.oceanworksberkeley.com
Removing The Brake Rotor
Removing the brake rotor is a key step in resurfacing your vehicle’s braking system. It requires care and the right tools to avoid damage. This process helps you access the rotor for cleaning or repair. Taking time to remove it properly ensures safety and effectiveness.
Start by preparing your workspace and gathering necessary tools. Safety gloves and eye protection are also important. Follow the steps below to remove the brake rotor smoothly.
Loosening Fasteners
Begin by loosening the wheel lug nuts slightly before lifting the car. Use a jack to raise the vehicle and secure it with stands. Remove the wheel completely to see the brake rotor.
Next, locate the fasteners holding the rotor or brake caliper in place. Use the correct size socket or wrench to loosen these bolts. Turn them counterclockwise until they come free. Keep these fasteners safe for reassembly later.
Handling Stuck Rotors
Sometimes rotors stick due to rust or dirt buildup. Tap the rotor gently with a rubber mallet to loosen it. Avoid using metal tools that can damage the rotor surface.
If it still does not budge, apply a penetrating oil on the rotor hub area. Let it sit for a few minutes. This helps break down rust and makes removal easier.
Use steady force and try to wiggle the rotor free. Do not rush or force it too hard to prevent injury or damage.
Resurfacing Methods
Resurfacing brake rotors is key to maintaining smooth braking. There are two main methods to do this. Each method has its own tools and steps. Choose the one that fits your skills and tools best.
Using A Brake Lathe
A brake lathe is a machine designed to resurface rotors accurately. It spins the rotor while a cutting tool removes a thin layer of metal. This process smooths out grooves and restores a flat surface.
Professional shops use brake lathes for the best results. The machine ensures even cutting and precise thickness. This helps prevent brake vibrations and noise after resurfacing.
Operating a brake lathe requires some skill. The rotor must be mounted securely. The cutting tool must be adjusted to remove just enough metal. Too much removal can weaken the rotor.
Diy Sanding Techniques
Sanding rotors by hand is a simple way to resurface at home. Use medium-grit sandpaper wrapped around a block. Sand the rotor surface evenly in a circular motion.
This method removes minor rust and small grooves. It is not as precise as a brake lathe. But it can improve rotor condition enough for short-term use.
Work carefully to avoid uneven surfaces. Check the rotor often to see progress. Finish with fine-grit sandpaper for a smoother surface.
Reinstalling The Rotor
Reinstalling the brake rotor is a key step after resurfacing. Proper reinstallation ensures safety and smooth braking. Take care to follow each step carefully to avoid issues later.
Cleaning And Inspection
Start by cleaning the rotor surface. Remove dust, grease, and dirt using a clean cloth or brake cleaner. Check the rotor for cracks or warping. Any damage means replacement is better than reuse. Make sure the rotor sits flat on the hub. This prevents wobbling and uneven wear.
Proper Tightening
Place the rotor on the hub carefully. Align the holes for the screws or bolts. Tighten them by hand first to keep the rotor in place. Use a torque wrench to tighten bolts to the manufacturer’s specs. Over-tightening can cause rotor damage. Under-tightening leads to rotor movement. Tighten bolts in a star or crisscross pattern. This ensures even pressure and a secure fit.
Final Checks
After resurfacing your brake rotor, performing final checks is very important. These checks ensure your brakes work well and safely. They help you spot any issues before driving on the road. Take your time with these steps to keep your vehicle safe.
Brake Pad Condition
Check the brake pads for wear or damage. Pads should have enough thickness to grip the rotor. Look for cracks, glazing, or uneven wear. Replace pads if they look worn out. Clean any dust or debris from the pads and rotor surface. Good pads help the rotor work better and last longer.
Test Driving Tips
Drive slowly at first to test the brakes. Listen for unusual noises or vibrations. Press the brake pedal gently and notice its feel. The pedal should feel firm, not soft or spongy. Test braking from low to medium speeds. Stop smoothly to check rotor and pad performance. Repeat the test a few times to be sure.
When To Replace Instead
Knowing when to replace a brake rotor is just as important as knowing how to resurface it. Some rotors cannot be safely resurfaced. In these cases, replacement is the best option to keep your brakes working well and ensure safety on the road.
Rotor Thickness Limits
Every rotor has a minimum thickness. This is set by the manufacturer. If the rotor is thinner than this limit, it must be replaced. Measuring rotor thickness requires a micrometer. The rotor loses thickness when resurfaced or worn out. Too thin rotors can crack or warp easily. Always check the thickness before resurfacing.
Signs Of Severe Damage
Look closely at the rotor surface. Deep grooves or cracks show severe damage. Warped rotors cause vibration when braking. Rust that cannot be cleaned off is a bad sign. If the rotor is cracked, replace it immediately. Resurfacing cannot fix these serious issues. Driving with damaged rotors is unsafe and can cause brake failure.

Credit: www.youtube.com
Frequently Asked Questions
What Tools Do I Need To Resurface A Brake Rotor?
You need a brake lathe, safety gear, measuring tools, and cleaning supplies. These tools ensure precise resurfacing and safety.
How Long Does It Take To Resurface A Brake Rotor?
Resurfacing a brake rotor typically takes 30 to 60 minutes, depending on experience and equipment.
Can Resurfacing Fix All Brake Rotor Issues?
Resurfacing fixes minor warping and uneven surfaces but can’t repair cracks or deep grooves.
How Often Should Brake Rotors Be Resurfaced?
Brake rotors should be resurfaced when thickness allows and surface damage affects braking performance.
Conclusion
Resurfacing a brake rotor can save money and improve brake performance. Keep your tools ready and follow each step carefully. Check the rotor’s condition to ensure it can be resurfaced safely. Take your time and work slowly to avoid mistakes.
Properly resurfaced rotors help your vehicle stop smoothly and safely. Regular brake maintenance keeps you safer on the road. Give your brake system the care it needs to work well. Safety first, always.