Are you tired of your worn-out steering wheel ruining the look and feel of your car? A stitched steering wheel cover can give your driving experience a fresh, comfortable upgrade—and you don’t need to be an expert to create one yourself.
In this tutorial, you’ll learn simple, step-by-step techniques to stitch a cover that fits perfectly and lasts long. Imagine gripping a cover that feels just right, adds style, and protects your steering wheel at the same time. Ready to take control and make your car’s interior truly yours?
Let’s get started!
Materials Needed
Starting a steering wheel cover stitching project needs the right materials. Gathering everything before you begin makes the process smooth. This section explains what items are necessary for stitching a durable and neat cover.
Choosing The Right Fabric
Select fabric that feels good in your hands. Leather and faux leather are popular for their grip and style. Cotton and microfiber offer comfort and breathability. Pick a fabric thick enough to last but flexible enough to wrap.
Essential Tools
You will need a strong needle for thick fabric. Heavy-duty thread matches your fabric color and resists wear. Scissors cut fabric and thread cleanly. A measuring tape ensures the cover fits your wheel perfectly. Clips or pins hold fabric in place while stitching.
Optional Accessories
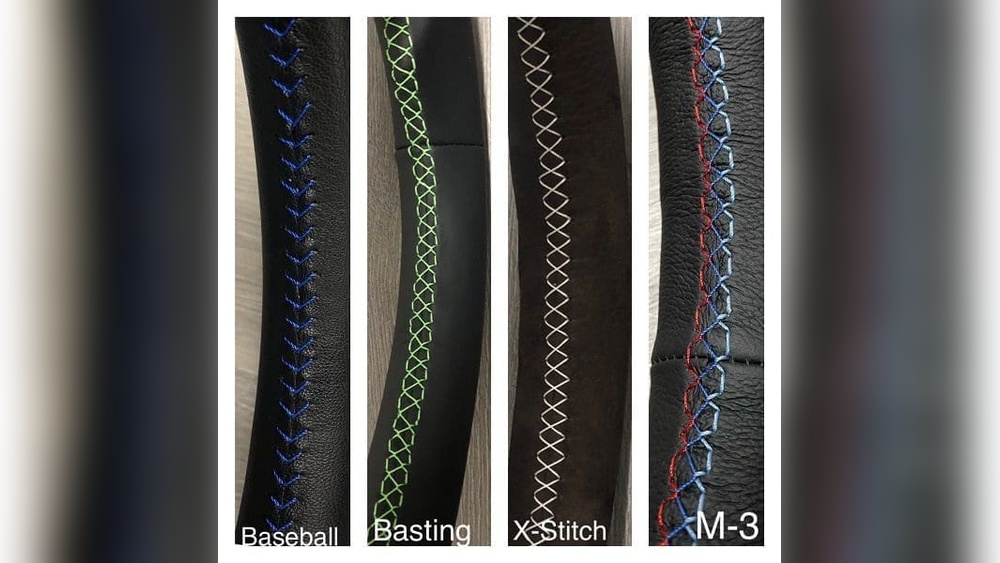
Consider foam padding to add softness under the fabric. Fabric glue can help secure the edges before sewing. Decorative stitches or embroidery add a personal touch. A thimble protects your finger while pushing the needle.

Credit: stitchingcover.com
Preparing The Steering Wheel
Start by cleaning the steering wheel to remove dirt and grease. Ensure it is dry before fitting the cover for a tight, smooth finish. This helps the stitching hold better and keeps the cover in place.
Cleaning The Surface
Start by cleaning the steering wheel surface carefully. Use a soft cloth with mild soap and water. Remove all dirt, dust, and oils. A clean surface helps the cover stick better. Let the wheel dry completely before moving on. This step prevents slipping and ensures a smooth fit.
Measuring The Wheel
Measure the steering wheel’s diameter with a tape measure. Wrap the tape around the wheel’s outer edge. Note the full circumference in inches or centimeters. Accurate measurement helps choose the right cover size. Double-check the number to avoid mistakes later.
Cutting The Fabric
Cutting the fabric is the first key step in making a steering wheel cover. It sets the size and shape needed for a perfect fit. Careful cutting helps avoid mistakes later in the stitching process. Preparing the fabric correctly saves time and effort.
Use a clear pattern to guide your cutting. Mark the fabric with chalk or a fabric pen for precision. Take your time to ensure clean, straight edges. This helps the cover look neat and professional once sewn.
Creating A Pattern
Start by measuring the steering wheel’s diameter and thickness. Add extra space for sewing seams and overlap. Draw a long rectangle with rounded edges on paper. This shape fits around the wheel smoothly.
Cut out the paper pattern and wrap it around the wheel. Check if it matches the wheel’s shape well. Adjust the pattern if it feels too tight or loose. Use the final paper pattern to cut the fabric.
Cutting Tips
Place the fabric flat on a clean surface. Pin the pattern securely on the fabric to avoid slipping. Cut slowly along the pattern lines with sharp fabric scissors. Avoid lifting the fabric while cutting for accuracy.
Cut an extra piece for lining or padding if desired. Trim any loose threads after cutting. Keep the fabric pieces organized for easy stitching later. Proper cutting ensures the cover fits and looks great.

Credit: www.youtube.com
Stitching Techniques
Stitching a steering wheel cover is more than just sewing pieces together. It involves choosing the right stitch to ensure durability and style. Different stitching techniques affect the cover’s fit and strength. Understanding these techniques helps create a neat and lasting finish.
Some stitches are simple and quick, while others offer a decorative touch. Whether sewing by hand or machine, the technique impacts your final result.
Basic Stitch Types
Start with simple stitches like the running stitch or backstitch. The running stitch is easy and good for temporary holds. The backstitch is stronger and ideal for seams that need extra strength. Another option is the whipstitch, which loops around edges to prevent fraying. These basic stitches form the foundation of your cover’s construction.
Using A Needle And Thread
Hand sewing allows better control over tight curves on the wheel. Use a thick, strong thread for durability. Waxed thread works well to reduce slipping and fraying. Keep stitches small and close together for a clean look. Pull the thread gently to avoid puckering the fabric. Take your time, and check your progress often.
Machine Stitching Options
A sewing machine speeds up the process and provides consistent stitches. Use a heavy-duty needle suited for thick leather or fabric. Select a straight stitch or a zigzag stitch for added stretch. Adjust stitch length to match your material’s thickness. Test on scrap fabric before sewing the cover. Machine stitching gives a professional finish when done carefully.
Assembling The Cover
Assembling the steering wheel cover is a key step in this project. This stage brings all parts together to create a snug fit. Careful assembly ensures durability and comfort. Follow these simple steps to assemble your cover properly.
Aligning Fabric Pieces
Start by placing the fabric pieces face to face. Match the edges carefully for a perfect fit. Pin the pieces to hold them steady. Check that all seams line up evenly. This step prevents uneven stitching later.
Sewing The Edges
Use a strong thread suitable for leather or fabric. Sew along the pinned edges with a straight stitch. Keep the stitches tight and close for strength. Leave a small opening to insert padding. Backstitch at the beginning and end to secure.
Inserting Padding
Push the padding through the opening slowly. Fill the cover evenly for a smooth surface. Avoid lumps and uneven spots inside. Once filled, sew the opening closed carefully. This padding adds comfort and protects your hands.
Fitting The Cover
Fitting the steering wheel cover is a key step in this tutorial. It ensures the cover stays in place and looks neat. This part requires patience and careful handling. Follow these simple steps to fit your cover perfectly.
Stretching Over The Wheel
Start by holding the cover with both hands. Pull it gently over the top of the steering wheel. Stretch the cover slowly around the sides. Make sure the material spreads evenly. Avoid pulling too hard to prevent tears. Work your way down until the cover fits fully.
Securing The Cover
Check that the cover sits tight on the wheel. Use any built-in fasteners or stitching to lock it in place. If the cover has laces, thread them carefully through the holes. Pull the laces tight to secure the cover firmly. Tie a strong knot to keep the cover from slipping.
Final Adjustments
Look for any wrinkles or folds in the cover. Smooth out the material with your hands. Adjust the cover so it centers perfectly on the wheel. Test the grip by turning the wheel gently. Make small changes until the cover feels comfortable and stable.
Maintenance Tips
Proper care keeps your steering wheel cover looking fresh and lasting longer. Regular maintenance prevents damage and preserves its fit and feel. Follow these simple tips to keep your cover in good condition every day.
Cleaning The Cover
Dust and dirt can wear down your cover over time. Use a soft cloth or brush to remove loose dirt gently. For deeper cleaning, use mild soap with warm water. Avoid harsh chemicals that can damage the material. Wipe the cover with a damp cloth and let it air dry completely before use.
Repairing Stitches
Loose or broken stitches reduce the cover’s strength and appearance. Use a needle and strong thread to fix small stitch problems quickly. Match the thread color to keep repairs invisible. Tighten any loose stitches carefully without pulling too hard. Regularly check the stitching to catch issues early.
Extending Cover Life
Avoid exposing the cover to direct sunlight for long periods. Sunlight can fade colors and weaken materials. Remove the cover occasionally to air it out and prevent odors. Avoid sharp objects near the cover to prevent cuts or tears. Store your car in a shaded or covered area when possible.

Credit: www.youtube.com
Frequently Asked Questions
How Do I Choose The Right Fabric For A Steering Wheel Cover?
Choose durable, breathable fabric like leather, faux leather, or microfiber. These materials provide good grip, comfort, and long-lasting use. Avoid slippery or thin fabrics to ensure safety while driving.
What Tools Are Needed To Stitch A Steering Wheel Cover?
You need a needle, strong thread, scissors, and fabric or leather material. A thimble and fabric glue can help, but hand stitching is often best for control and precision.
How Long Does It Take To Stitch A Steering Wheel Cover?
It usually takes 1 to 2 hours depending on your skill level. Beginners may take longer, but patience ensures neat and secure stitching for durability.
Can I Stitch A Steering Wheel Cover Without Sewing Machine?
Yes, hand stitching is effective and often preferred for steering wheel covers. Use strong thread and tight stitches for durability and a professional finish.
Conclusion
Stitching your own steering wheel cover saves money and adds style. The steps are simple and easy to follow. Take your time and use the right tools. A well-stitched cover feels comfortable and lasts longer. Practice makes perfect, so don’t rush.
Enjoy the satisfaction of a personal touch in your car. Now, your steering wheel looks neat and unique. Try this project for a fun and useful skill. Keep your car interior fresh with this small upgrade.

