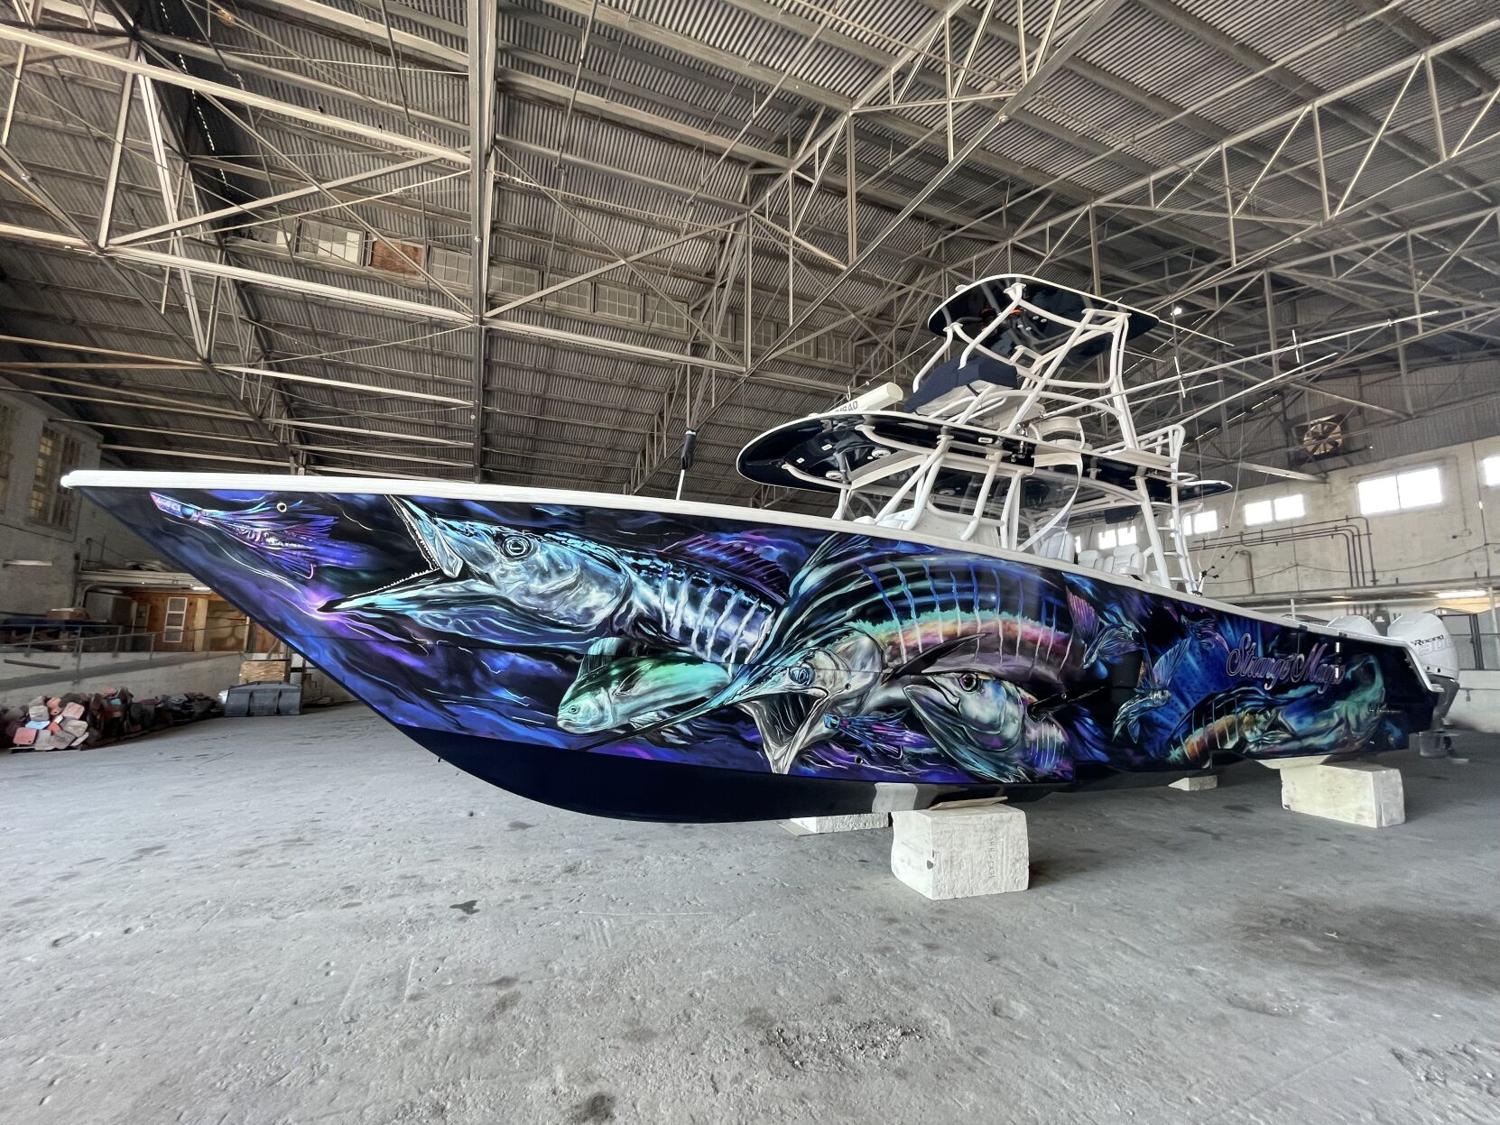
Thinking about giving your boat a fresh, standout look without spending a fortune? Vinyl wrapping your boat hull is a smart, cost-effective way to do just that.
But you might be wondering, is it something you can tackle yourself? The answer is yes—with the right guidance and tools, you can transform your boat’s appearance in no time. You’ll discover simple, step-by-step instructions that make vinyl wrapping your boat hull easier than you ever imagined.
Ready to turn heads on the water? Let’s dive in and get your boat looking amazing!
Choosing The Right Vinyl
Choosing the right vinyl for your boat hull is the first step to a successful wrap. The vinyl must handle water, sun, and rough conditions. Picking the correct type ensures the wrap lasts longer and looks great.
Types Of Vinyl For Boats
Marine vinyl is made for boats and resists water and salt. Cast vinyl stretches easily and fits curves well. Calendered vinyl is cheaper but less flexible. For boat hulls, cast vinyl is usually best.
Color And Finish Options
Vinyl comes in many colors, from bright to dark shades. Matte, gloss, and satin finishes change the boat’s look. Choose a finish that fits your style and hides dirt well.
Durability And Uv Resistance
Strong vinyl protects against sun damage and fading. UV-resistant vinyl keeps colors bright for years. Durable vinyl resists scratches and peeling in rough water.
Preparing The Boat Hull
Preparing the boat hull is a vital step before applying vinyl wrap. A clean, smooth surface ensures the vinyl sticks properly and lasts longer. Proper preparation prevents bubbles, wrinkles, and peeling. This process involves cleaning, sanding, and fixing any damage on the hull.
Cleaning And Degreasing
Start by washing the hull with fresh water. Remove all dirt, salt, and grime. Use a mild soap or boat cleaner for better results. Next, degrease the surface using a specialized cleaner. This step removes oils and wax that block adhesion. Wipe the hull thoroughly with a clean cloth. Allow the surface to dry completely before moving on.
Sanding And Smoothing Surface
Lightly sand the hull using fine-grit sandpaper. Sanding creates a rough texture for the vinyl to grip. Focus on shiny or glossy areas to dull the surface. Avoid sanding too hard to prevent damage. After sanding, clean off dust and debris. A smooth but slightly rough surface gives the best results.
Repairing Imperfections
Inspect the hull for cracks, chips, or dents. Use marine-grade filler to repair any flaws. Apply the filler evenly and let it dry fully. Sand the repaired spots until smooth and flush with the hull. Fixing imperfections ensures the vinyl wraps tightly and looks flawless. Take your time with repairs for a clean finish.
Gathering Tools And Materials
Before starting to vinyl wrap a boat hull, gather all necessary tools and materials. Proper preparation saves time and avoids mistakes. Having everything ready helps the wrapping process go smoothly. It also ensures a clean, professional finish on the boat’s surface.
Essential Tools List
Get a squeegee to smooth out air bubbles and wrinkles. Use a heat gun to soften the vinyl for easy stretching. A utility knife with sharp blades is needed for precise cutting. A measuring tape helps to measure the hull accurately. Use a surface cleaner to remove dirt and oils before wrapping.
Safety Equipment
Wear gloves to protect your hands from cuts and heat. Safety glasses protect your eyes from flying debris and heat gun rays. Work in a well-ventilated area to avoid inhaling fumes from vinyl adhesives. Use knee pads if you work on the floor to avoid discomfort and injury.
Additional Supplies
Get masking tape to hold the vinyl in place during application. A microfiber cloth helps wipe off dust and fingerprints. Have a plastic scraper on hand to remove air bubbles under the vinyl. Keep a spray bottle with water and soap mix to help reposition vinyl easily.

Credit: www.pbo.co.uk
Measuring And Cutting Vinyl
Measuring and cutting vinyl is a key step in wrapping a boat hull. Precise measurements help avoid waste and ensure a smooth finish. Careful cutting keeps the vinyl neat and ready to apply.
Accurate Measurements
Start by measuring the hull’s length and width carefully. Use a flexible tape measure to follow curves and edges. Write down all numbers clearly. Double-check measurements for accuracy. Measure twice, cut once.
Cutting Techniques
Place the vinyl on a flat surface. Use a sharp utility knife or scissors for clean cuts. Cut slowly and steadily to avoid jagged edges. Keep the blade straight and use a ruler as a guide. Small, careful cuts make the job easier.
Allowing For Overlap
Leave extra vinyl around the edges. Add at least 2 to 3 inches for overlap. This extra material helps wrap around curves and corners. It also allows for adjustments during application. Trim the excess after the vinyl sticks well.
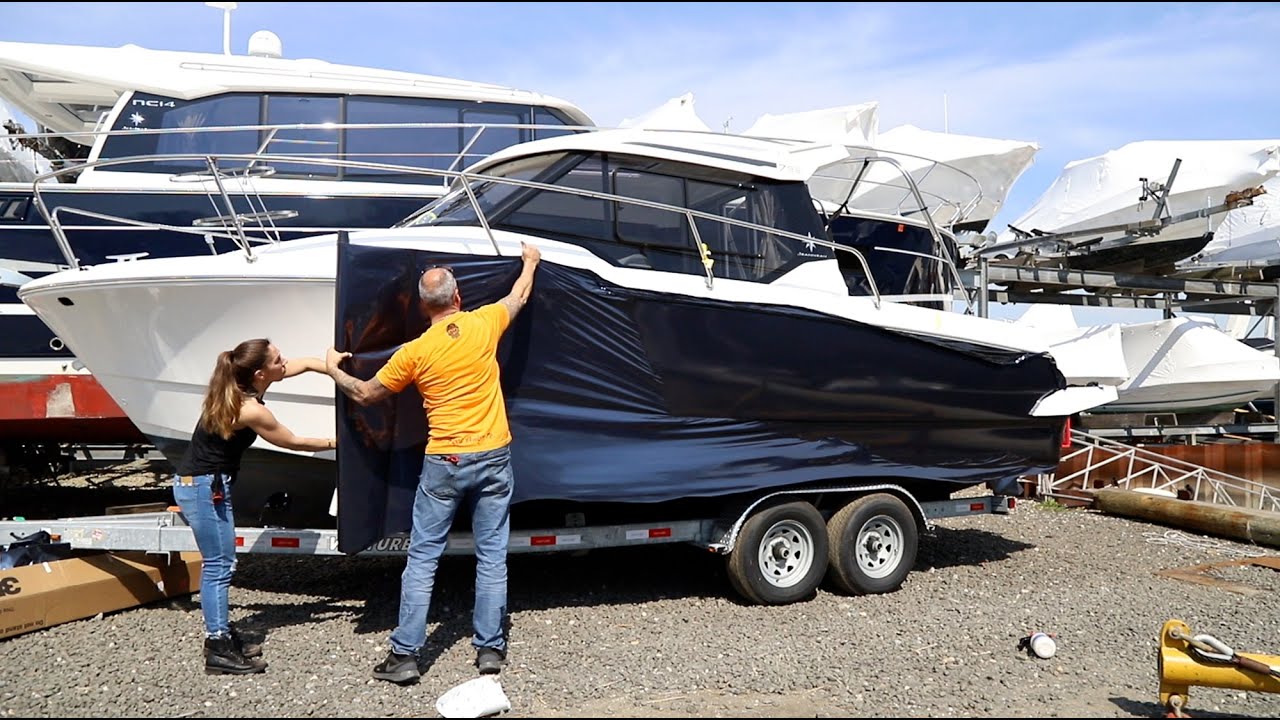
Applying The Vinyl Wrap
Applying the vinyl wrap to a boat hull requires care and attention. This step transforms the surface with color and style. Proper handling ensures the wrap fits smoothly and lasts long. Follow these key actions for a clean, professional finish.
Positioning The Vinyl
Start by laying the vinyl over the hull. Align it carefully to cover the entire area. Use magnets or tape to hold it in place. Check edges to avoid gaps or overlaps. Take your time to get the position right before sticking it down.
Using Heat For Flexibility
Use a heat gun to warm the vinyl gently. Heat makes the material soft and easy to stretch. This helps the wrap follow the hull’s curves. Move the heat gun evenly to avoid damage. Warm vinyl sticks better and reduces wrinkles.
Smoothing Out Bubbles And Wrinkles
Use a squeegee to press the vinyl onto the hull. Work from the center outwards to push air bubbles away. Apply firm but gentle pressure for a smooth surface. Check for wrinkles and stretch the vinyl if needed. Repeat heating and smoothing until the surface is flawless.
Credit: www.floridasportfishing.com
Trimming And Finishing Edges
Trimming and finishing edges is a key step in vinyl wrapping a boat hull. It shapes the final look and protects the wrap from peeling. Clean, smooth edges help the wrap last longer and keep the boat looking sharp. Take your time to trim carefully and seal the edges well.
Sharp Cutting Tools
Use sharp knives or blades for trimming vinyl. Dull tools cause jagged edges and damage the wrap. A fresh blade cuts cleanly and helps avoid mistakes. Cut slowly along the lines to keep the trim straight. Replace blades often to maintain sharpness.
Sealing Edges For Longevity
Seal all trimmed edges with a quality edge sealer. This stops water and dirt from getting under the vinyl. Apply the sealer evenly along the edges with a small brush. Allow it to dry fully before handling the boat. Proper sealing extends the life of the vinyl wrap.
Final Inspection Tips
Check the edges closely after trimming and sealing. Look for any loose spots or uneven cuts. Press down edges firmly with a squeegee to secure them. Fix any bubbles or wrinkles you find. A detailed inspection ensures a neat, durable finish.
Maintenance Tips For Longevity
Proper care keeps your vinyl wrap looking fresh and lasting longer. Simple maintenance steps protect the boat hull from wear and damage. Follow these tips to keep your wrap in top shape for years.
Cleaning Wrapped Surfaces
Use a soft cloth or sponge for cleaning. Mild soap and water work best. Avoid harsh chemicals that can damage the vinyl. Rinse thoroughly with clean water after washing. Dry with a soft towel to prevent water spots.
Avoiding Damage
Keep sharp objects away from the wrap. Do not use abrasive scrubbers or brushes. Park the boat away from direct sunlight when possible. Cover the boat during long storage periods. Avoid pressure washers with high intensity on the wrap.
Touch-up Techniques
Small scratches can be fixed with vinyl repair kits. Clean the area before applying any patch or adhesive. Use a heat gun carefully to smooth out bubbles or wrinkles. For larger damage, consult a professional wrap installer. Regular checks help spot issues early.
Credit: www.youtube.com
Frequently Asked Questions
What Materials Are Needed To Vinyl Wrap A Boat Hull?
You need vinyl wrap film, a heat gun, squeegees, knives, cleaning supplies, and gloves. High-quality marine vinyl is best for durability and water resistance.
How Long Does Vinyl Wrapping A Boat Hull Take?
Wrapping typically takes 1 to 3 days, depending on boat size and complexity. Proper prep and careful application affect the total time.
Can Vinyl Wrap Protect The Boat Hull From Damage?
Yes, vinyl wrap offers a protective layer against scratches, UV rays, and minor abrasions. It helps preserve the boat’s original paint and finish.
Is Vinyl Wrapping A Boat Hull Cost-effective?
Vinyl wrapping is often cheaper than repainting and allows for easy customization. It provides a fresh look without long-term commitment.
Conclusion
Vinyl wrapping a boat hull can change its look fast. Careful cleaning and measuring help the wrap stick well. Take your time to smooth out air bubbles. Use a heat gun to shape the vinyl around curves. Patience and practice make the process easier.
A well-done wrap protects the hull and looks great. Enjoy your boat’s fresh, new style on the water. Keep your tools ready for small fixes later. Try vinyl wrap for a simple, cost-friendly boat update.


