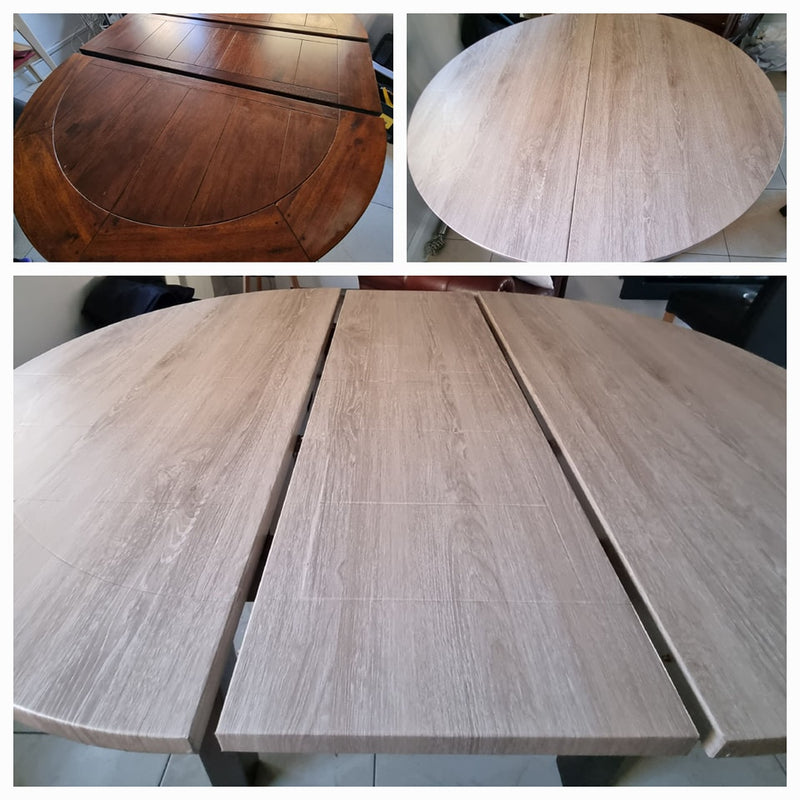
Are you looking to give your round table a fresh, stylish new look without spending a fortune? Vinyl wrapping is an easy and affordable way to transform your furniture and make it stand out.
But wrapping a round table can feel tricky if you don’t know the right steps. Don’t worry—this guide will walk you through the process in simple, clear terms. By the end, you’ll have the confidence to wrap your table perfectly and enjoy a sleek, professional finish.
Ready to turn your old table into something amazing? Let’s get started!
Choosing The Right Vinyl Wrap
Choosing the right vinyl wrap is key for a smooth and lasting finish on your round table. The right vinyl protects the surface and changes its look. Picking the correct type, color, and size of vinyl makes the wrapping process easier. It also helps the wrap last longer and look better. Learn how to select the best vinyl for your table.
Types Of Vinyl Materials
Vinyl wraps come in several types. Cast vinyl is thin, flexible, and very durable. It fits curves well, making it great for round tables. Calendered vinyl is thicker and less flexible. It works better on flat surfaces. Glossy vinyl gives a shiny look, while matte vinyl has no shine. Textured vinyl adds a unique feel, like leather or carbon fiber. Choose the type that fits your table shape and style.
Selecting Colors And Patterns
Choose colors that match your room and style. Solid colors are simple and classic. Patterns add interest and hide small scratches. Wood grain or marble patterns give a natural look. Bright colors make a bold statement. Dark colors show dust and fingerprints less. Think about the room’s lighting and other furniture. Pick colors and patterns that fit your taste and space.
Measuring Your Table Accurately
Measure your round table carefully. Use a soft tape measure for best results. Measure the diameter across the widest part. Also, measure the thickness of the edge. Add extra inches for overlap and trimming. This ensures full coverage without gaps. Accurate measuring helps avoid waste and saves money. Write down your measurements before buying vinyl wrap.
Credit: layed.com
Preparing The Table Surface
Preparing the table surface is the first step in vinyl wrapping a round table. A smooth and clean surface helps the vinyl stick better and last longer. Taking time to prepare the table ensures a neat and professional finish. Each step in this process improves the final look.
Cleaning And Sanding
Start by cleaning the table well. Use a mild soap and water to remove dirt and grease. Dry the table completely with a soft cloth. After cleaning, sand the surface lightly. Use fine-grit sandpaper to create a smooth texture. Sanding removes shiny spots and helps vinyl adhere better.
Removing Old Finishes
Old paint or varnish can stop the vinyl from sticking. Use a paint stripper or sandpaper to remove these finishes. Work carefully to avoid damaging the wood underneath. Wipe off any dust or residue after removing old finishes. A bare surface improves vinyl adhesion.
Fixing Imperfections
Check the table for scratches, dents, or holes. Fill these imperfections with wood filler or putty. Let the filler dry fully before sanding it smooth. A flat surface makes the vinyl wrap look seamless. Take your time to fix every flaw.
Cutting And Positioning The Vinyl
Cutting and positioning the vinyl is a key step in wrapping a round table. It affects how smooth and neat the finish looks. Taking time here prevents wrinkles and bubbles. Precision matters for a professional result.
Creating A Template
Start by making a paper template of the table top. Use a large sheet and place it on the table. Trace the exact shape with a pencil. Mark the edges clearly. This helps measure vinyl size and shape accurately.
Cutting Vinyl To Size
Lay the vinyl flat on a clean surface. Place the paper template on top. Use a sharp blade or scissors to cut along the edges. Leave a small extra margin for wrapping around the table edge. Cut slowly to avoid jagged edges.
Aligning The Vinyl On The Table
Peel the backing from the vinyl carefully. Start by placing the vinyl in the center of the table. Slowly smooth out toward the edges. Use a soft cloth or squeegee to push out air bubbles. Check alignment often to keep it centered and even.
Applying The Vinyl Wrap
Applying vinyl wrap on a round table needs care and patience. This step shapes how the table looks in the end. A smooth, bubble-free finish makes the wrap look professional. Stretching the vinyl gently helps it fit the round edges well. Follow these tips to get the best result.
Using Heat For Flexibility
Heat makes vinyl soft and easy to bend. Use a heat gun or hair dryer on low heat. Move the heat source slowly over the vinyl. Avoid staying in one spot too long. Warm vinyl stretches around curves without tearing. Heat helps the wrap stick better to the table.
Smoothing Out Bubbles
Air bubbles can spoil the look of your wrap. Use a squeegee or flat tool to push bubbles out. Start from the center and move toward the edges. Work slowly and gently to avoid wrinkles. Small bubbles can be popped with a pin. Smooth vinyl means a clean, clear finish.
Handling Edges And Curves
Edges and curves need extra attention. Pull vinyl gently over the edges. Heat helps vinyl wrap around curves without creasing. Trim excess vinyl with a sharp blade. Cut close but not too tight. Proper edge handling prevents peeling later on.
Finishing Touches
The finishing touches are key to a smooth, neat vinyl wrap on your round table. These final steps make the wrap last longer and look professional. Take your time here. Small details create big differences.
Trimming Excess Vinyl
Use a sharp utility knife or scissors to trim extra vinyl. Cut close to the table edge for a clean look. Avoid cutting too deep to protect the table surface. Trim slowly and carefully to keep curves smooth.
Sealing The Edges
Seal edges with a heat gun or hairdryer on low heat. Warm the vinyl edges gently to soften the adhesive. Press edges firmly down with a squeegee or cloth. This prevents peeling and keeps dust away.
Curing And Setting Time
Let the vinyl wrap sit for at least 24 hours. Avoid moving or placing heavy items on the table. This time allows the adhesive to bond fully. After curing, the wrap becomes strong and durable.

Credit: layed.com
Maintenance Tips
Maintaining a vinyl wrap on a round table keeps it looking fresh and new. Proper care prevents damage and extends its life. Follow simple steps to protect your table’s finish.
Cleaning Without Damage
Use a soft cloth for cleaning. Avoid rough sponges or brushes that scratch the wrap. Mild soap and water work best. Wipe gently in circular motions. Dry the surface with a clean towel to avoid water spots.
Avoiding Peeling And Cracks
Keep the table away from direct sunlight for long periods. Heat can cause the wrap to peel or crack. Do not place hot items directly on the surface. Use coasters or mats to protect the vinyl. Avoid sharp objects that can puncture the wrap.
Long-term Care Suggestions
Regularly inspect the wrap for any signs of wear. Fix small lifts or bubbles immediately to stop them growing. Store the table in a cool, dry place if not in use. Clean spills quickly to prevent stains. With good care, your vinyl wrap will last for years.

Credit: www.youtube.com
Frequently Asked Questions
How Do You Prepare A Round Table For Vinyl Wrapping?
Clean the table surface thoroughly to remove dirt and grease. Sand any rough areas smoothly. Ensure the table is dry before applying vinyl wrap for best adhesion and a smooth finish.
What Tools Are Needed To Vinyl Wrap A Round Table?
You need vinyl wrap film, a heat gun, a squeegee, a utility knife, and a measuring tape. These tools help in measuring, cutting, heating, and smoothing the vinyl for a perfect wrap.
Can Vinyl Wrap Conform To Curved Table Edges Easily?
Yes, vinyl wrap is flexible and heat-activated, allowing it to stretch and conform to round edges. Use a heat gun carefully to soften the vinyl for smooth application without bubbles or wrinkles.
How Long Does Vinyl Wrap Last On A Round Table?
Vinyl wrap typically lasts 5 to 7 years with proper care. Avoid sharp objects, excessive moisture, and direct sunlight to extend the lifespan and maintain the table’s appearance.
Conclusion
Vinyl wrapping a round table can refresh its look quickly. Take your time to measure and cut the vinyl carefully. Smooth out bubbles for a clean, neat finish. Use a heat gun or hair dryer to help the vinyl stick well.
A well-wrapped table can last for years with proper care. Try this simple project to change your space without much cost. Enjoy your new table look that suits your style perfectly.