
Are you looking to give your car a fresh, stylish look without spending a fortune? Vinyl wrapping your trim pieces is one of the easiest and most affordable ways to do just that.
But if you’ve never tried it before, the process might seem tricky or confusing. Don’t worry—you’re about to discover simple, step-by-step tips that make vinyl wrapping your trim pieces smooth and stress-free. Keep reading, and you’ll learn how to transform your car’s appearance with a sleek, professional finish that turns heads wherever you go.
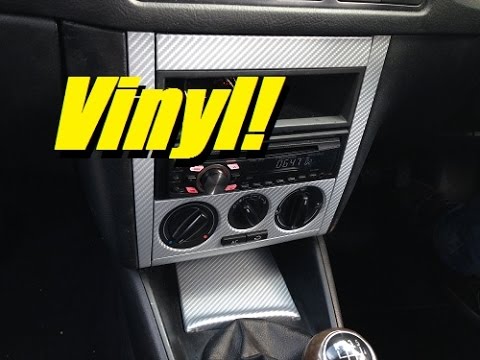
Credit: www.youtube.com
Gathering Tools And Materials
Before starting to vinyl wrap trim pieces, gathering the right tools and materials is key. This step makes the process smoother and helps avoid mistakes. Having everything ready saves time and reduces frustration. It also ensures the wrap looks neat and lasts longer. Let’s explore what you need to prepare.
Choosing The Right Vinyl Wrap
Select vinyl wrap made for trim pieces. Look for thin, flexible vinyl. This type bends easily around curves and corners. Matte or gloss finishes both work well, depending on your style. Choose a color that matches or contrasts your vehicle. Check if the vinyl has air-release technology. It helps prevent bubbles under the wrap. Quality vinyl lasts longer and resists fading.
Essential Tools Checklist
Gather these tools before starting the wrap:
- Squeegee with felt edge to smooth vinyl
- Heat gun for softening the vinyl
- Sharp utility knife for trimming excess vinyl
- Isopropyl alcohol and cloth for cleaning surfaces
- Measuring tape or ruler for accurate cuts
- Gloves to avoid fingerprints and improve grip
- Masking tape to hold vinyl in place
Having these tools ready will help you wrap trim pieces easily and neatly.

Credit: meyer-sansboeuf.com
Preparing Trim Pieces
Preparing trim pieces is a key step before vinyl wrapping. Clean and smooth surfaces help vinyl stick better. This process avoids bubbles and peeling later. Take your time to prepare well for the best results.
Cleaning And Degreasing
Start by washing the trim pieces with soap and water. Remove dirt, dust, and grime fully. Use a soft cloth to avoid scratches. After washing, apply a degreaser to clear oils and grease. This step ensures the vinyl will bond strongly. Let the pieces dry completely before moving on.
Removing Old Adhesives
Check for leftover glue or tape on the trim. Use adhesive remover or rubbing alcohol to wipe these areas. Gently rub until all sticky residue disappears. Avoid harsh scrubbing to protect the surface. Clean surfaces help the vinyl lay flat and last longer.
Cutting And Measuring Vinyl
Cutting and measuring vinyl is a key step in wrapping trim pieces. This step ensures the vinyl fits perfectly and looks smooth. Taking your time here helps avoid mistakes and saves material. Proper measurement and clean cuts make the wrap last longer and look professional.
Accurate Measurements
Measure the trim piece carefully. Use a ruler or tape measure for best results. Write down each length and width. Measure twice, cut once. Check curves and edges as well. Adding a small extra margin helps with wrapping tight corners. Accuracy here prevents wrinkles and bubbles later.
Cutting Techniques
Use sharp scissors or a craft knife for clean cuts. Cut slowly along your measurement lines. Avoid jagged or rough edges. A straight edge guide can help maintain a perfect line. Trim excess vinyl after applying to fine-tune the fit. Clean cuts improve adhesion and the final look.

Credit: twraps.com
Applying The Vinyl Wrap
Applying the vinyl wrap to trim pieces is a careful process. It needs patience and attention to detail. The goal is to get a smooth, clean look without wrinkles or bubbles. Follow each step closely to achieve the best results.
Positioning The Vinyl
Start by placing the vinyl over the trim piece. Align it so it covers the entire surface. Leave some extra vinyl on the edges. This extra helps with wrapping around curves and corners. Make sure the vinyl is not twisted or folded.
Using Heat For Flexibility
Use a heat gun or hair dryer on low heat. Warm the vinyl gently to make it soft and flexible. This helps the vinyl stretch around curves and tight spots. Heat also helps the vinyl stick better to the trim piece. Keep the heat moving to avoid damage.
Smoothing Out Air Bubbles
Use a squeegee or a soft cloth to smooth the vinyl. Start from the center and push air bubbles toward the edges. Work slowly and carefully to avoid tearing the vinyl. If small bubbles remain, heat the area again and smooth it out. Proper smoothing makes the wrap look professional.
Trimming Excess Vinyl
Trimming excess vinyl is a crucial step in wrapping trim pieces. It helps create a clean, professional look. Proper trimming prevents vinyl from peeling or lifting over time. Taking time to trim carefully improves the final appearance. Use sharp tools and steady hands for best results.
Tools For Precise Trimming
Use a sharp utility knife or craft knife for clean cuts. A metal ruler helps guide straight lines. Scissors work well for small, curved areas. Cutting mats protect surfaces and keep blades sharp. Keep your blades new to avoid jagged edges. Good lighting makes it easier to see cut lines.
Avoiding Common Mistakes
Do not cut too close to the trim edge. Leave a small margin to prevent peeling. Cut slowly to avoid tearing the vinyl. Avoid pressing too hard with the knife. Use multiple light passes instead of one deep cut. Keep hands steady to maintain control. Check your work often during trimming.
Finishing Touches
Finishing touches make the vinyl wrap look smooth and last longer. These final steps help the wrap stick well and show a clean result. Pay close attention to details now for a professional finish.
Heat Setting The Wrap
Use a heat gun or hair dryer to warm the vinyl gently. Heat makes the wrap more flexible and helps it stick tightly. Move the heat source slowly over the entire surface. Avoid staying too long in one spot to prevent damage. Heating also helps the wrap conform to curves and edges better.
Inspecting For Imperfections
Check the trim pieces carefully for bubbles or wrinkles. Use a soft squeegee to smooth out any air pockets. Small bubbles can be pushed out toward the edges. If needed, use a pin to release trapped air gently. Ensure the edges are firmly pressed down and sealed. A flawless finish improves both look and durability.
Maintenance Tips
Proper maintenance keeps vinyl wrap trim pieces looking fresh and new. Regular care helps the wrap last longer and stay vibrant. Small efforts prevent damage and preserve the finish.
Cleaning Wrapped Trim
Use a soft cloth and mild soap to clean wrapped trim. Avoid harsh chemicals or abrasive materials that can scratch the vinyl. Rinse with water to remove dirt and soap residue. Dry the trim gently with a microfiber towel. Clean regularly to prevent buildup of grime.
Preventing Peeling And Damage
Keep the trim away from sharp objects and rough surfaces. Avoid high-pressure water sprays directly on the edges. Park your vehicle in shaded areas to reduce sun exposure. Heat can cause the vinyl to peel or warp. Inspect the wrap often for small lifts and press them down carefully.
Frequently Asked Questions
What Tools Do I Need To Vinyl Wrap Trim Pieces?
You need vinyl wrap film, a heat gun, a squeegee, scissors, and a utility knife. Clean the trim pieces before wrapping for best results.
How Do I Prepare Trim Pieces For Vinyl Wrapping?
Clean the trim with soap and water, then use isopropyl alcohol to remove oils. Ensure the surface is dry and smooth before applying vinyl.
Can Vinyl Wrap Trim Pieces Withstand Outdoor Conditions?
Yes, high-quality vinyl wraps are weather-resistant and durable. They protect trim pieces from UV rays, moisture, and minor scratches when properly applied.
How Long Does Vinyl Wrapping Trim Pieces Last?
Typically, vinyl wraps last 5 to 7 years on trim pieces. Longevity depends on vinyl quality, surface prep, and maintenance.
Conclusion
Vinyl wrapping trim pieces can change your vehicle’s look quickly. Take your time to clean and prepare surfaces well. Use steady hands to avoid bubbles and wrinkles. Heat the vinyl gently to help it stretch and fit curves. Patience and care make a big difference in results.
Practice on small pieces before moving to larger trims. Enjoy the new style and protection vinyl wrap offers. This simple process saves money and personalizes your ride. Try it yourself and see how easy it can be.


