
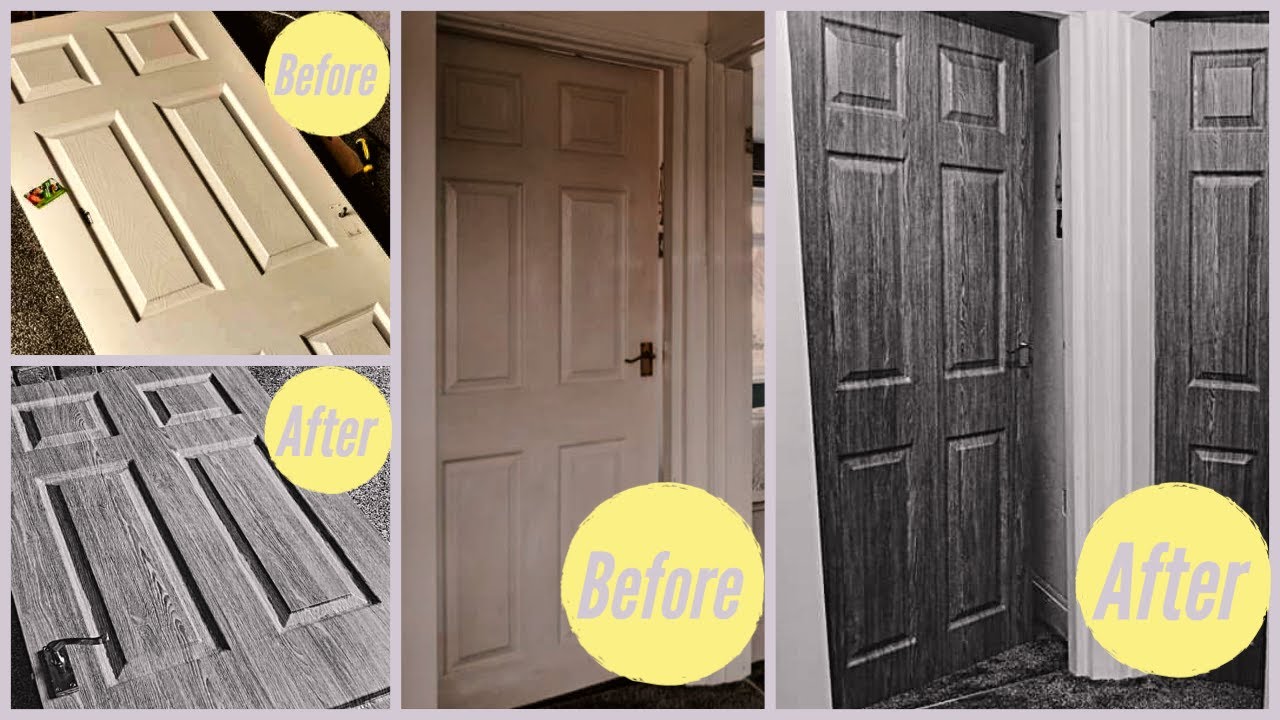
Are you looking to give your door a fresh, stylish look without the hassle of a full replacement? Wrapping your door in vinyl is a simple and cost-effective way to transform your space instantly.
Whether you want to add color, texture, or protect your door from wear and tear, vinyl wrap offers endless possibilities. In this guide, you’ll discover easy-to-follow steps that make the process smooth, even if you’ve never done it before. Ready to upgrade your door and impress everyone who sees it?
Keep reading to learn how to wrap a door in vinyl like a pro.
Materials Needed
Wrapping a door in vinyl requires specific materials for a smooth finish. Having the right supplies helps avoid mistakes and saves time. Gather all items before starting to keep your work steady and clean.
Choosing The Right Vinyl
Select vinyl that fits your door size and style. Pick a vinyl with good adhesive to stick well. Choose a vinyl that is easy to cut and apply. Matte or glossy finishes change the look, so choose based on your taste. Check for vinyl that resists scratches and fading.
Tools For The Job
Use a sharp utility knife for clean cuts. A squeegee helps remove air bubbles under the vinyl. A measuring tape ensures correct vinyl size. Keep a heat gun or hairdryer to soften vinyl edges. Use a ruler or straight edge for precise cutting lines.

Credit: www.etsy.com
Preparing The Door
Preparing the door is the first step in wrapping it with vinyl. This step makes sure the vinyl sticks well and looks smooth. A clean, smooth surface helps avoid bubbles and wrinkles. Removing any hardware helps to wrap the door neatly and prevents damage to the vinyl.
Cleaning The Surface
Start by wiping the door with a soft cloth. Use warm water mixed with mild soap to remove dirt and grease. Avoid harsh chemicals that can damage the door’s finish. Rinse with clean water and dry thoroughly. Any dust or oil left can stop the vinyl from sticking properly. Take your time to clean every corner and edge.
Removing Hardware
Remove all door hardware before wrapping. Take off handles, locks, and any other attachments. Use a screwdriver to carefully unscrew these parts. Keep the screws and hardware in a safe place. Removing hardware makes it easier to wrap the vinyl evenly. It also prevents the vinyl from tearing around the hardware.
Measuring And Cutting Vinyl
Measuring and cutting vinyl are important first steps when wrapping a door. Accurate measurements ensure the vinyl fits well. Precise cutting helps avoid waste and makes the wrap look neat. Taking time in this stage saves effort later. Follow clear steps to get the best results.
Taking Accurate Measurements
Start by measuring the door’s height and width. Use a tape measure for exact numbers. Write down the measurements carefully. Measure twice to avoid mistakes. Include extra space for edges and corners. This extra helps with wrapping and trimming.
Check if the door has panels or handles. Measure around these areas separately. Make notes for any tricky spots. These details affect how you cut the vinyl. Good measurements make the process smoother.
Cutting Vinyl To Size
Lay the vinyl flat on a clean surface. Use a straight edge or ruler as a guide. Cut slowly with a sharp utility knife or scissors. Follow the measurements exactly for a good fit. Remember to leave a small margin for errors.
Cut separate pieces for panels if needed. Keep the vinyl pieces organized by labeling them. Smooth edges reduce the chance of peeling. Take your time to cut carefully. Clean cuts help the wrap look professional.
Credit: www.youtube.com
Applying The Vinyl
Applying vinyl to a door is a careful process. It shapes the final look and finish. You need patience and a steady hand. Follow these steps to get smooth, clean results. The vinyl should fit well and look neat.
Positioning The Vinyl
Start by peeling a small part of the backing paper. Align the vinyl with the top of the door. Hold it carefully to avoid wrinkles. Press lightly to secure the top edge. Check if the vinyl covers the door fully. Adjust the position before sticking it down completely.
Smoothing Out Bubbles
Use a soft squeegee or a credit card. Push from the center outwards gently. This removes air bubbles and creases. Work slowly to avoid tearing the vinyl. If small bubbles remain, prick them with a pin. Smooth again to flatten the surface.
Trimming Excess Material
Use a sharp utility knife or blade. Cut along the edges of the door carefully. Keep the knife close to the edge for a clean cut. Remove extra vinyl to avoid peeling later. Check all corners and edges for neatness.
Finishing Touches
Finishing touches make your vinyl-wrapped door look neat and last longer. This step ensures the vinyl stays smooth and secure. Small details can change the final look and protect your work from damage.
Reattaching Hardware
Remove all vinyl scraps from the hardware before reattaching. Use a screwdriver to carefully put handles, locks, and hinges back. Tighten screws without pressing too hard to avoid tearing the vinyl. Check if the hardware fits well and works smoothly.
Sealing The Edges
Use a heat gun or hairdryer to warm the vinyl edges. Press edges firmly with a plastic squeegee or your fingers. This step sticks the vinyl to the door and prevents peeling. Apply clear edge sealer or vinyl adhesive for extra protection. Smooth edges keep moisture and dirt out.
Maintenance Tips
Maintaining your vinyl-wrapped door keeps it looking fresh and new. Proper care extends the life of the vinyl and protects your investment. Simple steps help avoid damage and keep the surface clean.
Cleaning Vinyl Surfaces
Use a soft cloth or sponge for cleaning. Mild soap mixed with water works well. Gently wipe the surface to remove dirt and dust. Avoid harsh chemicals or abrasive materials. Rinse with clean water and dry with a soft towel. Regular cleaning prevents buildup and keeps vinyl shiny.
Preventing Damage
Avoid sharp objects near the vinyl wrap. Do not use strong solvents or alcohol-based cleaners. Keep the door away from direct heat sources. Protect the wrap from prolonged sun exposure. Handle the door gently to prevent scratches. Regular checks catch small issues before they grow.

Credit: www.youtube.com
Frequently Asked Questions
How Do I Prepare A Door For Vinyl Wrapping?
Clean the door thoroughly to remove dirt and grease. Sand any rough spots and remove hardware. Ensure the surface is smooth and dry before applying vinyl for the best adhesion and finish.
What Tools Are Needed To Wrap A Door In Vinyl?
You need vinyl wrap, a squeegee, a utility knife, heat gun, and measuring tape. These tools help apply vinyl smoothly and cut it accurately around edges and handles.
Can Vinyl Wrap Be Removed Without Damaging The Door?
Yes, vinyl wraps can be removed carefully using heat to soften the adhesive. Peel slowly to avoid damage. Proper removal preserves the door’s surface for future wrapping or painting.
How Long Does Vinyl Wrapping A Door Usually Take?
Wrapping a door typically takes 1 to 3 hours depending on door size and skill level. Preparation and careful application affect the total time needed for a smooth finish.
Conclusion
Wrapping a door in vinyl is a smart way to refresh any room. The process is simple and does not need special skills. Take your time and follow the steps carefully. Clean the door well to help the vinyl stick better.
Use a squeegee to smooth out air bubbles. This project saves money and looks great once done. Try it yourself and see the difference it makes. A small change can bring a fresh look to your space.

