Are your wheels looking dull or damaged? Adding wheel covers can instantly boost your car’s style and protect your rims from dirt and scratches.
But how do you attach wheel covers properly so they stay secure and look great? In this guide, you’ll discover simple, step-by-step tips that anyone can follow—even if you’re not a car expert. Keep reading, and by the end, you’ll feel confident giving your wheels a fresh, polished look that turns heads every time you drive.

Credit: www.youtube.com
Choose The Right Wheel Covers
Choosing the right wheel covers is the first step to a perfect fit. A good fit ensures your wheel covers stay secure and look great. Wrong size covers can fall off or damage your wheels. Take your time to pick the right ones.
Measure Your Wheels
Start by measuring the diameter of your wheels. Use a tape measure from one edge to the opposite edge. Check the size in inches, as wheel covers are sized this way. Measure carefully to avoid errors. Note down the size before shopping.
Select Compatible Covers
Pick covers that match your wheel size exactly. Look for covers that fit your wheel type, such as steel or alloy. Some covers clip on, while others use lug nuts for attachment. Choose the style that works best for your wheels. Confirm the product details before buying.
Gather Necessary Tools
Gathering the necessary tools is the first step to attach wheel covers easily. Having the right tools saves time and prevents damage. You will feel more confident and ready to work.
List Of Tools Needed
Start with a flathead screwdriver. It helps to remove old wheel covers or clean the rim.
Use a rubber mallet to gently tap the wheel cover into place. It avoids scratches.
A pair of gloves protects your hands from dirt and sharp edges.
Keep a clean cloth handy. It helps wipe dust and dirt off the wheel.
Sometimes, a tire iron is useful to loosen the wheel cover clips.
Safety Precautions
Always park the car on a flat, stable surface. This stops the car from moving.
Turn off the engine and set the parking brake for safety.
Wear gloves to protect hands from cuts and dirt.
Handle tools carefully to avoid injury or damage to the wheel.
Work in daylight or a well-lit area for better visibility.
Prepare The Wheels
Preparing the wheels is an important first step before attaching wheel covers. Clean and inspect the wheels carefully. This helps the covers fit better and last longer. Taking time here saves effort later.
Clean The Wheel Surface
Start by washing the wheels with soap and water. Remove dirt, grease, and brake dust. Use a soft brush or cloth to scrub gently. Dry the wheels fully with a clean towel. A clean surface helps the wheel covers stick and stay secure.
Inspect For Damage
Look closely for dents, cracks, or rust on the wheels. Small damage can prevent covers from fitting right. Fix or replace damaged wheels before adding covers. Safe and smooth wheels improve the look and safety of your vehicle.
Credit: www.tirerack.com
Align The Wheel Covers
Aligning the wheel covers is a key step to ensure they fit well and stay secure. This step helps the cover sit properly on the wheel without wobbling or falling off. Taking time to align the covers carefully saves effort later.
Proper alignment also keeps your wheels looking neat and balanced. Follow these simple tips to match and check the cover’s position before attaching it fully.
Match Lug Nut Positions
Start by looking at the holes on the wheel cover. They must line up with the lug nuts on the wheel. This matching keeps the cover centered and stable. If the holes do not match, the cover will not sit correctly.
Hold the cover close to the wheel and twist it gently until all holes align. Take your time to check all lug nut positions before pressing the cover in place.
Check Cover Orientation
Next, look at the cover’s design and shape. Some covers have a top and bottom side. Make sure the cover faces the right way.
Look for brand logos or patterns that show the correct position. Align the cover so the logo or design is upright and centered. This step helps the cover fit perfectly and look good.
Attach The Covers Securely
Attaching wheel covers securely is key to keeping them in place during driving. Loose covers can fall off and cause damage or safety issues. Proper attachment ensures a tight fit and lasting hold on your wheels.
Different wheel covers use different methods to stay attached. Some snap on directly, while others require extra parts like retaining rings. Understanding these methods helps you install covers correctly and avoid problems on the road.
Snap-on Method
The snap-on method is simple and quick. Align the cover with the wheel and press firmly. You will hear or feel a click when it snaps into place.
Make sure to press evenly around the cover. This prevents bending or cracking. Check all edges to confirm the cover is fully attached. Test by gently pulling to ensure it does not come off easily.
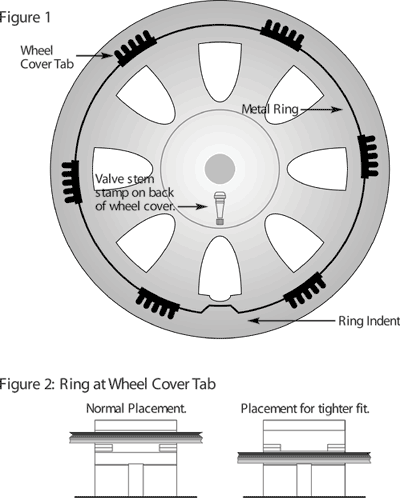
Using Retaining Rings
Some wheel covers need retaining rings for extra security. These rings fit inside the cover and hold it tight on the wheel.
Place the ring inside the cover first. Then align the cover and push it onto the wheel. The ring expands and locks the cover firmly.
Double-check the ring fits snugly. A loose ring can cause the cover to fall off. Use the correct ring size for your wheel cover model.

Credit: www.wikihow.com
Test The Fit
Testing the fit of wheel covers is a key step before final attachment. It ensures the covers align well with your wheels. A proper fit prevents damage and keeps covers secure while driving.
Check each cover by placing it gently over the wheel. Watch for gaps or loose spots. This test helps spot any fitting issues early.
Ensure Stability
Push the cover evenly onto the wheel rim. It should hold firmly without wobbling. A stable cover avoids falling off on the road.
Spin the wheel slightly to see if the cover stays in place. Stability means a safer and longer-lasting fit.
Make Adjustments
Shift the cover if it feels loose or uneven. Small moves can improve the grip. Try repositioning until the cover fits snugly.
Check for clips or fasteners that need tightening. Proper adjustment keeps the cover steady during drives.
Maintain Your Wheel Covers
Maintaining your wheel covers is important to keep them looking good and lasting longer. Clean covers protect your wheels from dirt and damage. Regular care helps avoid costly repairs or replacements. Follow simple steps to keep your wheel covers in top shape.
Regular Cleaning Tips
Clean your wheel covers often to remove dirt and grime. Use mild soap and water for washing. Avoid harsh chemicals that can damage the cover surface. Use a soft cloth or sponge to gently scrub. Rinse thoroughly and dry with a clean towel. Regular cleaning stops buildup that can harm the covers.
Handling Wear And Tear
Check wheel covers for cracks, scratches, or loose parts. Replace damaged covers to prevent falling off while driving. Tighten any loose clips or fasteners carefully. Avoid hitting curbs or rough surfaces that cause damage. Store spare covers in a cool, dry place to avoid warping. Proper care extends the life of your wheel covers.
Frequently Asked Questions
How Do I Attach Wheel Covers Securely?
To attach wheel covers securely, align the cover with the wheel rim. Press firmly until you hear a click. Ensure all clips are engaged to prevent loosening while driving.
Can I Install Wheel Covers Without Tools?
Yes, most wheel covers snap on without tools. Simply align and press the cover onto the wheel. Some designs might require a rubber mallet for a snug fit.
How To Remove Wheel Covers Safely?
Use a flathead screwdriver or a pry tool gently at the cover’s edge. Carefully pry off the cover to avoid damage to the wheel or cover.
Why Are Wheel Covers Important For My Car?
Wheel covers protect rims from dirt, moisture, and damage. They also improve your car’s appearance by providing a clean, stylish look.
Conclusion
Attaching wheel covers is a simple task anyone can do. Start by cleaning your wheels well. Align the cover carefully before pressing it on. Make sure it fits tight and does not wobble. A good fit keeps the cover safe while driving.
Taking these steps saves time and effort later. Now your wheels look neat and protected. Enjoy the fresh look and easy maintenance. Keep practicing, and the process will feel even easier.