

Thinking about wrapping your car hood with vinyl but unsure how much material you’ll need? You’re not alone.
Getting the right amount of vinyl is key to a smooth, professional-looking finish without wasting money. If you order too little, you’ll run into frustrating gaps or visible seams. Order too much, and you’re spending more than necessary. In this guide, you’ll discover exactly how to measure your hood and calculate the perfect amount of vinyl to buy.
Stick with me, and you’ll avoid common mistakes that can ruin your wrap job and end up saving time and cash. Ready to get started? Let’s dive in.
Measuring Your Hood
Start by measuring the length and width of your hood. Multiply these numbers to find the total area. Add extra vinyl for curves and edges to ensure full coverage.
Tools Needed
Gather a tape measure with clear markings in inches or centimeters. A flat ruler or straight edge helps check straight lines. A notepad and pen are useful to write down measurements. A camera or phone can capture photos for later reference. Clean cloth or paper towels help wipe dust from the hood.
Key Measurements To Take
Measure the hood’s length from the windshield base to the front edge. Note the width at the widest point across the hood. Record the height by measuring any curves or raised areas. Check the distance between the hood’s edges and any vents or scoops. Add extra space to cover overlaps and edges.
Tips For Accurate Measuring
Measure twice to avoid mistakes. Keep the tape measure flat against the hood’s surface. Ask someone to help hold the tape for longer measurements. Write down each number clearly and double-check. Avoid measuring on hot days to prevent material stretching. Add 10-15% more vinyl for safety and errors.
Calculating Vinyl Requirements
Calculating the right amount of vinyl for your car hood is key to a smooth wrap. You need enough material to cover the entire surface without running short. Planning helps avoid extra costs and wasted vinyl. This section guides you through the basic steps to calculate vinyl requirements.
Understanding Vinyl Roll Sizes
Vinyl wraps come in different roll widths and lengths. Common widths are 24, 48, and 60 inches. Lengths usually range from 10 to 50 feet. Knowing your roll size helps you plan how much vinyl to buy. Rolls with wider widths cover more area but might be harder to handle.
Estimating Square Footage
Measure your hood’s length and width in inches. Multiply these numbers to get the total square inches. Divide by 144 to convert square inches to square feet. For example, a hood 50 inches long and 40 inches wide equals about 13.9 square feet. This gives a base number for the vinyl size needed.
Allowing For Errors And Overlaps
Always add extra vinyl for mistakes and overlaps. A good rule is adding 10 to 20 percent more than the measured size. This extra material covers edges and hidden areas. It also helps if you need to reposition the vinyl during installation. Better to have a bit more than run out halfway.
Choosing The Right Vinyl
Choosing the right vinyl is key to a successful hood wrap. The vinyl must fit your needs and the look you want. This choice affects how long the wrap lasts and how it looks on your car.
Types Of Vinyl Wraps
There are several types of vinyl wraps. Cast vinyl is flexible and molds well to curves. It lasts longer and resists fading. Calendered vinyl is cheaper but less durable. It works well for flat surfaces and short-term wraps.
Thickness And Durability
Vinyl thickness affects durability and ease of application. Thicker vinyl is stronger and lasts longer. It also hides surface imperfections better. Thin vinyl is easier to apply but can tear. Choose based on your car’s condition and how long you want the wrap.
Color And Finish Options
Vinyl comes in many colors and finishes. Glossy finishes give a shiny look. Matte finishes offer a smooth, non-shiny surface. Satin finishes are between glossy and matte. You can also find textured vinyl, like carbon fiber or brushed metal. Pick a style that fits your car’s personality.
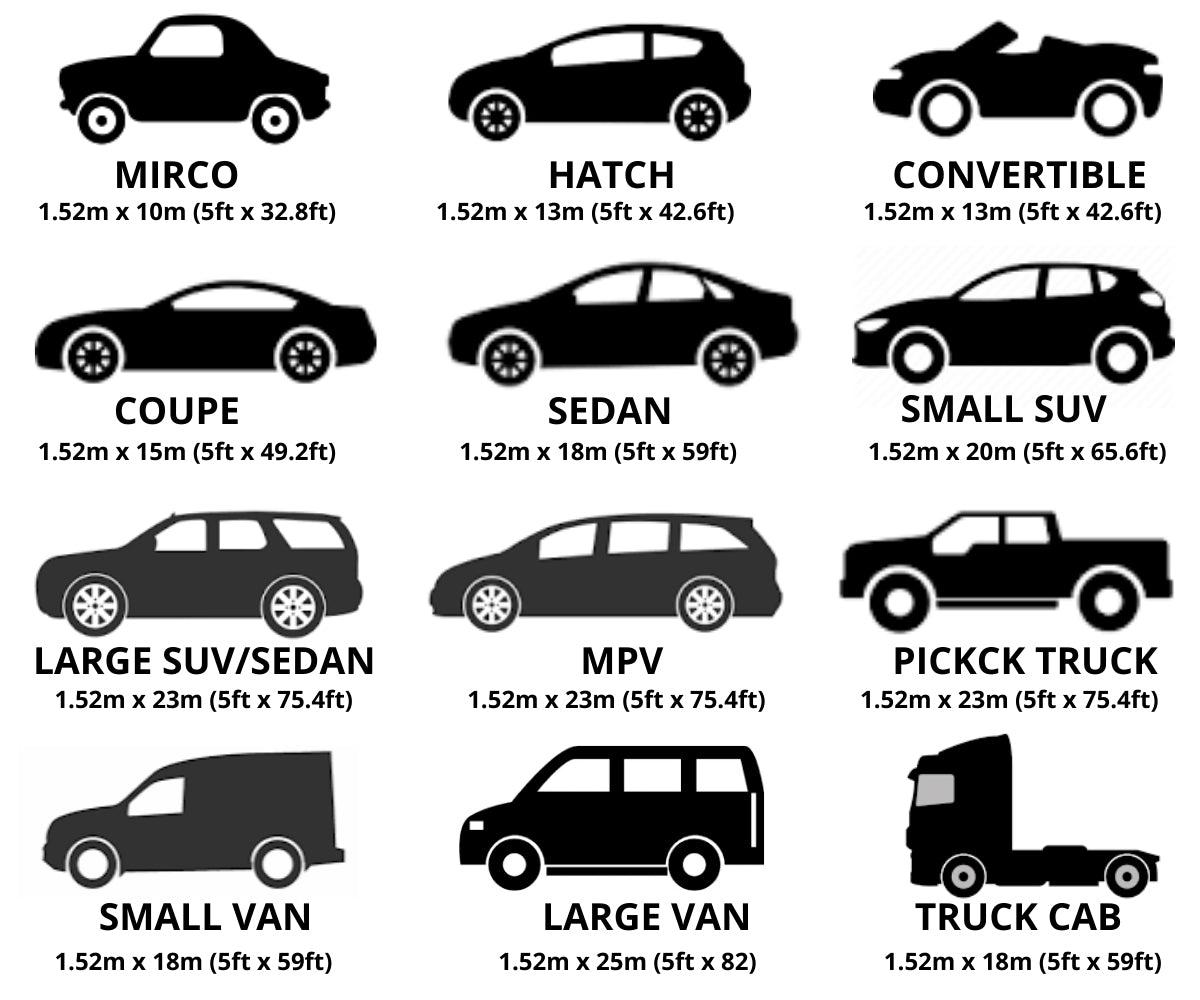
Credit: carlikewrap.com
Preparing Your Hood For Wrapping
Preparing your hood for wrapping is an essential step. It ensures the vinyl sticks well and lasts long. Proper preparation prevents bubbles and wrinkles. Taking time here saves effort later.
Focus on a clean, smooth surface. Remove anything that blocks the wrap. Control your workspace conditions. These actions help achieve a perfect finish.
Cleaning And Surface Prep
Start by washing the hood with soap and water. Remove dirt, grease, and dust completely. Use a clean microfiber cloth to dry it. Next, apply isopropyl alcohol to wipe the surface. This removes any leftover oils. Avoid touching the hood after cleaning.
Removing Obstructions
Take off parts like windshield wipers or emblems if possible. They make wrapping easier and cleaner. Use the right tools to avoid damage. Cover areas that cannot be removed with tape. This keeps the vinyl from sticking where it should not.
Temperature And Environment Considerations
Choose a room with stable temperature, ideally between 60-80°F (15-27°C). Avoid direct sunlight or windy areas. Humidity should be low to prevent moisture under the vinyl. Work in a dust-free space to reduce dirt sticking on the hood. A calm, clean environment improves the wrapping result.
Step-by-step Wrapping Process
Wrapping your car hood with vinyl is a careful process. Each step matters to get a smooth, clean finish. Follow the steps below to wrap your hood properly. This guide helps you understand how much vinyl you need and how to apply it well.
Cutting The Vinyl
Start by measuring your hood’s length and width. Add a few extra inches to each side. This extra vinyl helps cover curves and edges. Use a sharp blade or scissors to cut the vinyl. Cut slowly and carefully for straight lines. Avoid cutting too close to your measurements.
Applying The Vinyl
Clean the hood thoroughly before applying vinyl. Dirt or dust can cause bubbles. Peel the backing from the vinyl slowly. Place the vinyl on the hood starting at one edge. Press it down gently as you go. Use a squeegee to remove air pockets. Work from the center outward to push bubbles out.
Smoothing And Stretching Techniques
Heat the vinyl slightly with a heat gun or hairdryer. This makes it more flexible for curves. Stretch the vinyl carefully over edges and corners. Smooth it out with a squeegee or your hand. Avoid pulling too hard to prevent tears. Trim the extra vinyl neatly after wrapping. Press edges firmly to secure the wrap.

Credit: www.carlawrap.com
Common Mistakes To Avoid
Wrapping your hood with vinyl can change your car’s look. Many people make mistakes that cause problems. Avoiding these common errors saves time and money. The right steps help you get a smooth, long-lasting wrap.
Insufficient Vinyl Material
Buying too little vinyl is a big mistake. You need extra material for errors and curves. Measure your hood carefully before buying. Always add a few inches to your total length. Running out of vinyl stops your work and wastes time.
Poor Surface Preparation
Skipping cleaning or not removing dirt causes bubbles and peeling. The hood must be clean and dry. Use soap and water, then dry well. Any grease or dust will ruin the wrap. Smooth surface helps vinyl stick better and last longer.
Incorrect Application Methods
Applying vinyl too fast or without care leads to wrinkles and air pockets. Use a squeegee to press vinyl firmly. Heat the vinyl gently to make it flexible. Work slowly from the center outwards. Rushing causes damage and poor results.
Maintaining Your Vinyl Wrap
Maintaining your vinyl wrap is key to keeping it looking fresh and new. Proper care helps protect the wrap from damage and extends its life. Simple habits can make a big difference in preserving the color and finish of your hood wrap.
Cleaning Tips
Clean your vinyl wrap regularly to avoid dirt buildup. Use a soft cloth or sponge with mild soap and water. Avoid harsh chemicals or abrasive cleaners, as they can damage the vinyl. Rinse thoroughly with water and dry with a microfiber towel to prevent streaks. Wash your car in the shade to protect the wrap from heat damage.
Repairing Minor Damages
Small scratches or tears can be fixed at home. Use vinyl repair kits designed for car wraps. Gently clean the area before applying the repair product. Press the patch firmly and smooth out any air bubbles. For larger damage, seek professional help to avoid worsening the issue. Quick repairs keep the wrap looking smooth and uniform.
Longevity Expectations
Vinyl wraps usually last 5 to 7 years with proper care. Exposure to sunlight and weather can reduce lifespan. Regular cleaning and prompt repairs help maintain the wrap’s durability. Avoid parking under direct sun for long hours. Cover your car during harsh weather to protect the vinyl. Taking these steps ensures your wrap stays vibrant for years.
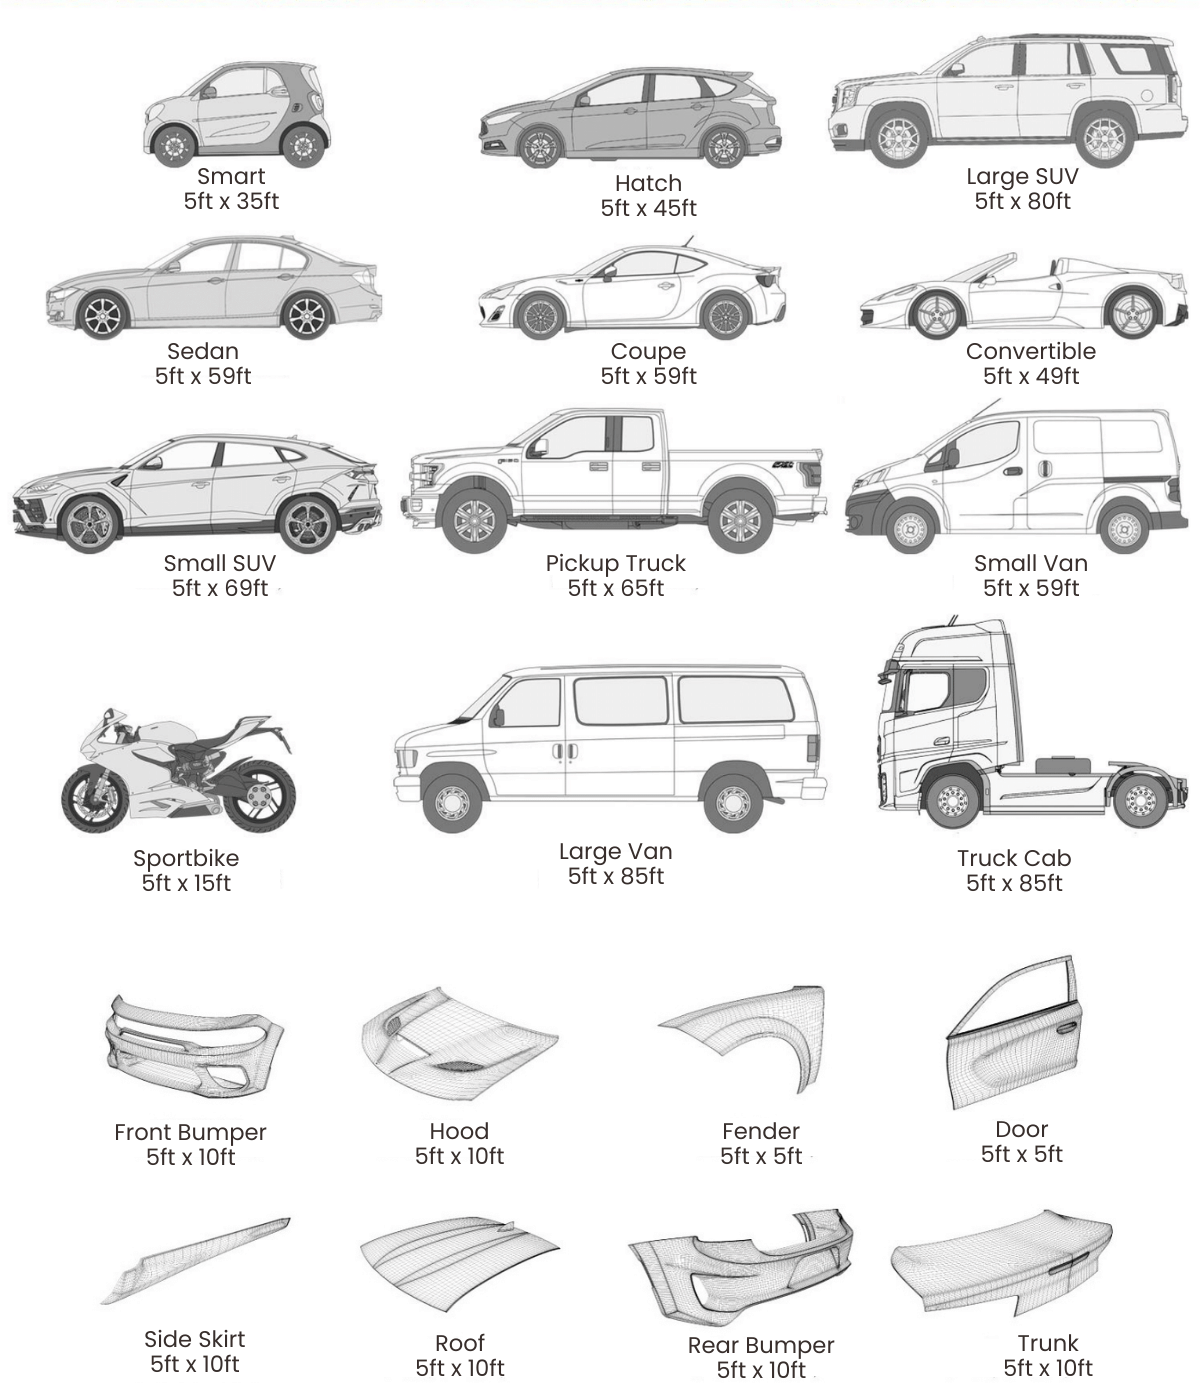
Credit: yeswrap.com
Frequently Asked Questions
How Do I Measure My Hood For Vinyl Wrap?
Measure the hood’s length and width in inches. Multiply these to get the surface area. Add 10-15% extra for errors and overlap.
How Much Vinyl Is Needed For A Car Hood?
Typically, 2 to 3 feet of vinyl wrap is enough for most hoods. This includes extra material for edges and curves.
Can I Use One Roll Of Vinyl For The Entire Hood?
Yes, one roll of 50-inch wide vinyl, about 3 feet long, usually covers a car hood fully.
What Factors Affect The Amount Of Vinyl For Wrapping?
Hood size, curves, and wrap technique impact vinyl needed. Complex shapes require more vinyl to cover properly.
Conclusion
Wrapping your hood with vinyl needs careful planning. Measure your hood’s length and width first. Add extra vinyl for edges and mistakes. Usually, 2 to 3 feet wide vinyl works well. Always buy a little more than you think. This way, you avoid running short mid-project.
Taking time to measure saves money and stress. Now, you can start your vinyl wrap with confidence. Enjoy the new look and protect your hood.


