
Want to give your car a fresh, stylish look without spending a fortune? Applying vinyl wrap to your car trim is a smart way to do just that.
It’s easier than you think, and with the right steps, you can achieve a professional finish all by yourself. In this guide, you’ll learn exactly how to apply vinyl wrap to your car trim, avoid common mistakes, and make your ride stand out on the road.
Ready to transform your car and turn heads wherever you go? Let’s dive in!
Choosing The Right Vinyl Wrap
Choosing the right vinyl wrap is the first step to a smooth and lasting finish on car trim. The wrap you select affects the look, durability, and ease of application. Different types suit different needs and surfaces. Knowing the basics helps you pick the best option for your project.
Types Of Vinyl Wraps
Vinyl wraps come in cast and calendared forms. Cast vinyl is thin, flexible, and lasts longer. It fits curves and complex shapes well. Calendared vinyl is thicker and less flexible. It suits flat or simple surfaces. Cast vinyl is ideal for car trim because of its flexibility and durability.
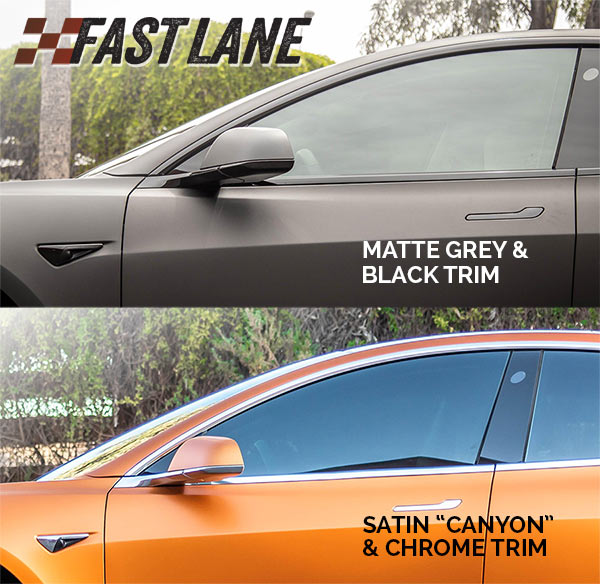
Color And Finish Options
Vinyl wraps offer many colors and finishes. Glossy wraps give a shiny, polished look. Matte finishes provide a smooth, non-reflective surface. Satin wraps fall between gloss and matte. Textured wraps mimic materials like carbon fiber or brushed metal. Choose a finish that matches your car style and personal taste.
Tools And Materials Needed
Good tools make applying vinyl easier and neater. You will need a squeegee to smooth out air bubbles. A heat gun helps stretch and shape the vinyl. Use a sharp utility knife to trim excess material. Cleaning supplies remove dirt before wrapping. Proper tools prevent mistakes and improve the final look.
Preparing Car Trim For Wrapping
Preparing car trim for wrapping is a key step in the vinyl wrap process. It ensures the wrap sticks well and lasts long. Proper preparation stops bubbles, peeling, and uneven surfaces. Follow these simple steps for a smooth finish.
Cleaning And Degreasing
Start by cleaning the trim with soap and water. Remove all dirt, dust, and grime. Use a degreaser to clear oil and grease. A clean surface helps the vinyl stick better. Wipe with a lint-free cloth to avoid fibers.
Removing Old Trim Or Accessories
Take off any old trim or accessories on the area. This includes clips, badges, or moldings. Removing them prevents bumps under the wrap. It also allows you to wrap edges neatly. Use tools carefully to avoid damage.
Sanding And Smoothing Surface
Lightly sand the trim with fine-grit sandpaper. This step removes rough spots and old paint flakes. Sanding creates a smooth and even surface. Clean off dust after sanding with a soft cloth. A smooth surface helps the vinyl lay flat.
Measuring And Cutting Vinyl
Measuring and cutting vinyl is a key step in applying a vinyl wrap to car trim. Accurate measurements ensure the vinyl fits perfectly. Poor measurements can cause waste and poor results. Cutting the vinyl properly helps avoid wrinkles or bubbles. This section explains how to measure and cut vinyl precisely for a smooth finish.
Taking Accurate Measurements
Use a flexible tape measure to get exact trim dimensions. Measure the length and width of the trim carefully. Write down each measurement clearly. Measure twice to avoid mistakes. Add a small extra margin to the measurements. This margin helps cover edges and allows for adjustments. Avoid guessing sizes to save time and material.
Marking And Cutting Techniques
Place the vinyl on a clean, flat surface before cutting. Use a ruler or straight edge to guide your cuts. Mark the cutting lines lightly with a pencil or washable marker. Cut slowly and steadily with a sharp utility knife or scissors. Avoid jagged or uneven edges. Smooth cuts help the vinyl wrap look neat and last longer. Keep your fingers safe and use a cutting mat underneath.
Credit: fastlanetints.com
Applying The Vinyl Wrap
Applying vinyl wrap to car trim requires care and patience. Proper application ensures a smooth, long-lasting finish. Follow clear steps to avoid mistakes and get the best look.
Positioning The Vinyl
Start by placing the vinyl over the trim. Align it carefully to cover all areas. Leave some extra material on edges for adjustments. Check the fit before peeling off the backing. Adjust the vinyl to prevent wrinkles and folds.
Using Heat For Flexibility
Use a heat gun or hair dryer to warm the vinyl. Heat makes the vinyl soft and flexible. Gently stretch the material to fit curves and corners. Avoid overheating to prevent damage. Heat helps the vinyl stick better to the trim.
Smoothing Out Bubbles And Wrinkles
Use a squeegee or soft cloth to press the vinyl. Start from the center and push toward the edges. Remove air bubbles and wrinkles as you go. Work slowly to avoid tearing the wrap. Small bubbles can be popped with a pin and smoothed out.
Trimming And Finishing Edges
Trimming and finishing edges is a key step in applying vinyl wrap to car trim. It gives a clean, sharp look. Proper trimming avoids peeling and bubbles.
Take your time to cut close to the edge. It helps the vinyl fit well and last longer. Finishing edges neatly also improves the wrap’s overall appearance.
Using A Precision Knife
Use a sharp precision knife for clean cuts. A dull blade can tear the vinyl or leave rough edges. Cut slowly and carefully along the trim lines.
Hold the knife at a slight angle. This helps avoid cutting into the trim itself. Replace the blade often for the best results. Always cut on a flat surface to keep control.
Sealing Edges For Durability
Seal the edges to protect the vinyl wrap. Edges are the most vulnerable to lifting or damage from weather. Use edge sealant or heat to secure the vinyl firmly.
Apply gentle heat with a heat gun to soften the vinyl. Press edges down tightly with a squeegee or cloth. This seals the vinyl to the trim, preventing moisture and dirt from entering.

Credit: episas.at
Post-application Tips
Applying vinyl wrap to car trim is just the first step. Proper care after application keeps your wrap looking fresh and lasting longer. Follow these tips to protect your work and avoid common problems.
Curing Time And Care
Allow the vinyl wrap to cure for at least 24 hours before touching. This time helps the adhesive bond firmly to the trim surface. Avoid washing your car or exposing it to rain during this period. Keep the car in a shaded, dry area to prevent dust and dirt from sticking.
Cleaning And Maintenance
Clean the wrapped trim gently using mild soap and water. Use a soft cloth or sponge to avoid scratching the vinyl. Avoid harsh chemicals, abrasive cleaners, or strong solvents. Regular cleaning prevents dirt build-up and keeps the vinyl shiny and smooth.
Troubleshooting Common Issues
Small bubbles may appear under the vinyl. Use a pin to carefully release trapped air and smooth the area. Edges may peel over time; press them down firmly or use a heat gun on low heat to reactivate the adhesive. If dirt or dust is trapped, clean the area and reapply pressure.

Credit: www.youtube.com
Frequently Asked Questions
What Tools Do I Need To Apply Vinyl Wrap To Car Trim?
You need a heat gun, squeegee, utility knife, cleaning solution, microfiber cloth, and vinyl wrap film. These tools help ensure smooth application and proper adhesion on car trim surfaces.
How Do I Prepare Car Trim Before Applying Vinyl Wrap?
Clean the trim thoroughly with a degreaser to remove dirt and oils. Dry it completely and smooth any rough areas for better vinyl adhesion.
Can Vinyl Wrap Be Applied On Curved Car Trim Surfaces?
Yes, vinyl wrap is flexible and can conform to curves. Use a heat gun to soften the vinyl and carefully stretch it over curved trim.
How Long Does Vinyl Wrap Last On Car Trim?
Vinyl wrap typically lasts 5 to 7 years with proper care. Avoid harsh chemicals and extreme weather to maintain its appearance longer.
Conclusion
Applying vinyl wrap to car trim takes patience and care. Clean the surface well before starting. Use a heat gun gently to avoid bubbles. Stretch the vinyl just enough to fit snugly. Take your time and work slowly. Small mistakes can be fixed with practice.
Vinyl wrap can give your car a fresh look. It’s a cost-effective way to customize your ride. Enjoy the process and the final result. You’ll feel proud driving a car with new trim.


