

If you’ve just installed new brake pads and rotors, you might think you’re done. But there’s one crucial step many people overlook: bedding them in properly.
How you break in your brakes can make all the difference in their performance and lifespan. Get it right, and your brakes will stop smoothly and safely every time. Get it wrong, and you could face noise, reduced stopping power, or even costly repairs.
In this guide, you’ll learn exactly how to bed your new brake pads and rotors the right way—quickly and easily. Keep reading to make sure your brakes work perfectly from the very first stop.
Credit: www.brakes-shop.com
Preparing Your Vehicle
Preparing your vehicle is the first step before bedding new brake pads and rotors. Taking time to get everything ready helps ensure the process goes smoothly. It also makes sure your brakes work well and last longer. Proper preparation avoids problems and safety risks on the road.
Gathering Necessary Tools
Collect all tools needed for the brake job. Common tools include a jack, jack stands, a lug wrench, and a C-clamp. You will also need brake cleaner, a wire brush, and a torque wrench. Having all tools ready saves time and avoids interruptions.
Ensuring A Safe Workspace
Find a flat and stable place to work on your vehicle. Use wheel chocks to prevent the car from moving. Set up good lighting so you see clearly. Wear gloves and safety glasses to protect yourself. Safety is key to avoid accidents.
Inspecting Brake Components
Check the condition of your brake system before installing new parts. Look for cracks, rust, or damage on rotors and pads. Inspect brake lines for leaks or wear. Clean the brake caliper and hardware. Fix any issues to ensure proper brake function.
Installing New Pads And Rotors
Installing new brake pads and rotors is a key step in maintaining your vehicle’s safety. Proper installation ensures smooth braking and longer part life. This process requires careful attention to detail and the right tools. Follow these steps to install new brake parts correctly and keep your brakes working well.
Removing Old Brake Parts
Start by lifting the car and removing the wheel. Use a wrench to take off the caliper bolts. Carefully slide the caliper off the rotor and support it with a hanger. Remove the old brake pads from the caliper bracket. Next, take off the caliper bracket itself to access the rotor. Finally, remove the old rotor from the wheel hub. Check for rust or damage that may make removal hard.
Cleaning The Brake Assembly
Clean the brake assembly area before installing new parts. Use a wire brush to remove rust and debris from the hub. Spray brake cleaner to remove grease and dirt. Wipe the area with a clean cloth until it looks clean. A clean surface helps new rotors fit well and prevents noise. Avoid getting grease on the braking surface.
Fitting New Rotors
Place the new rotor onto the wheel hub. Align it with the bolt holes for a perfect fit. Secure it temporarily with a lug nut to keep it in place. Check that the rotor sits flat against the hub surface. Tighten the caliper bracket bolts to hold the rotor firmly. This step ensures the rotor spins evenly with the wheel.
Installing New Brake Pads
Insert the new brake pads into the caliper bracket. Make sure the friction surface faces the rotor. Compress the caliper piston using a brake tool or C-clamp. Slide the caliper back over the pads and rotor. Tighten the caliper bolts securely. Check that the pads move smoothly but stay in place. Proper pad installation prevents brake noise and uneven wear.
Bedding Process Essentials
Bedding new brake pads and rotors is a key step for safe and smooth braking. This process helps parts work better together. It also makes brakes last longer. Proper bedding sets up the right friction between pads and rotors. This improves stopping power and reduces noise or vibration.
Follow the bedding steps carefully to get the best results. Each phase has a role in preparing your brakes for everyday use. Understanding these essentials will help you complete the bedding process correctly.
Why Bedding Matters
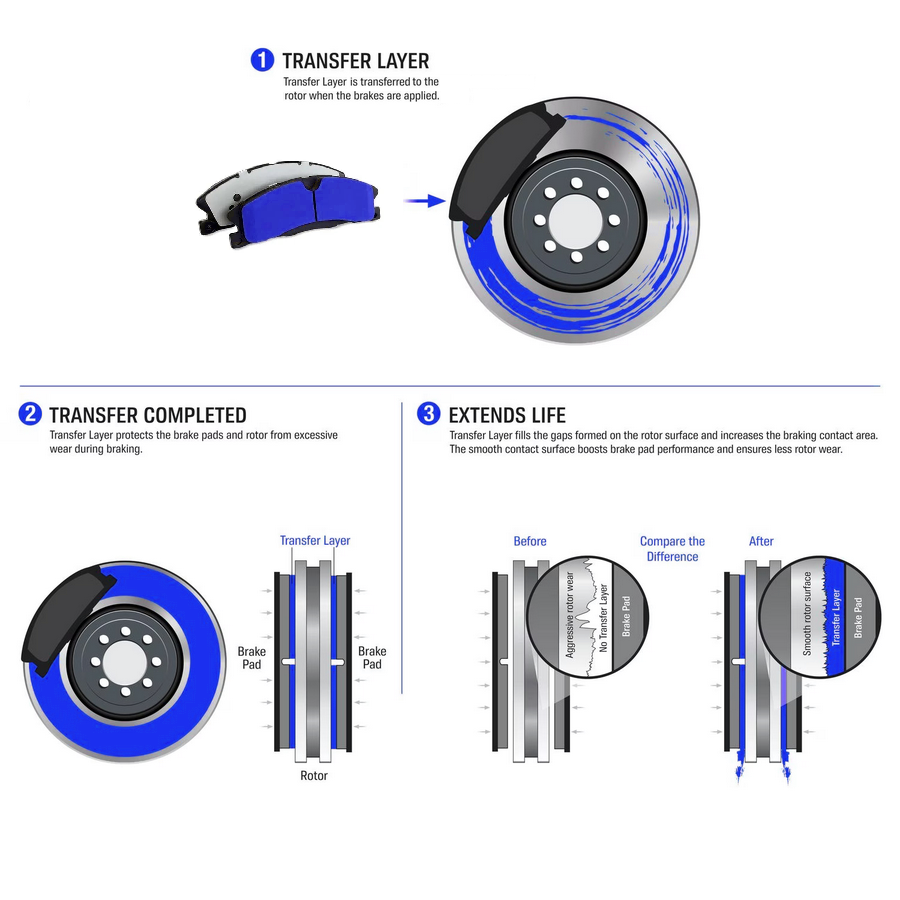
New pads and rotors have rough surfaces and oils from manufacturing. Bedding removes these oils and smooths the contact area. This creates a strong bond between pads and rotors. Good bedding reduces brake fade and improves response. It also prevents uneven wear and damage to parts.
Initial Brake Application Steps
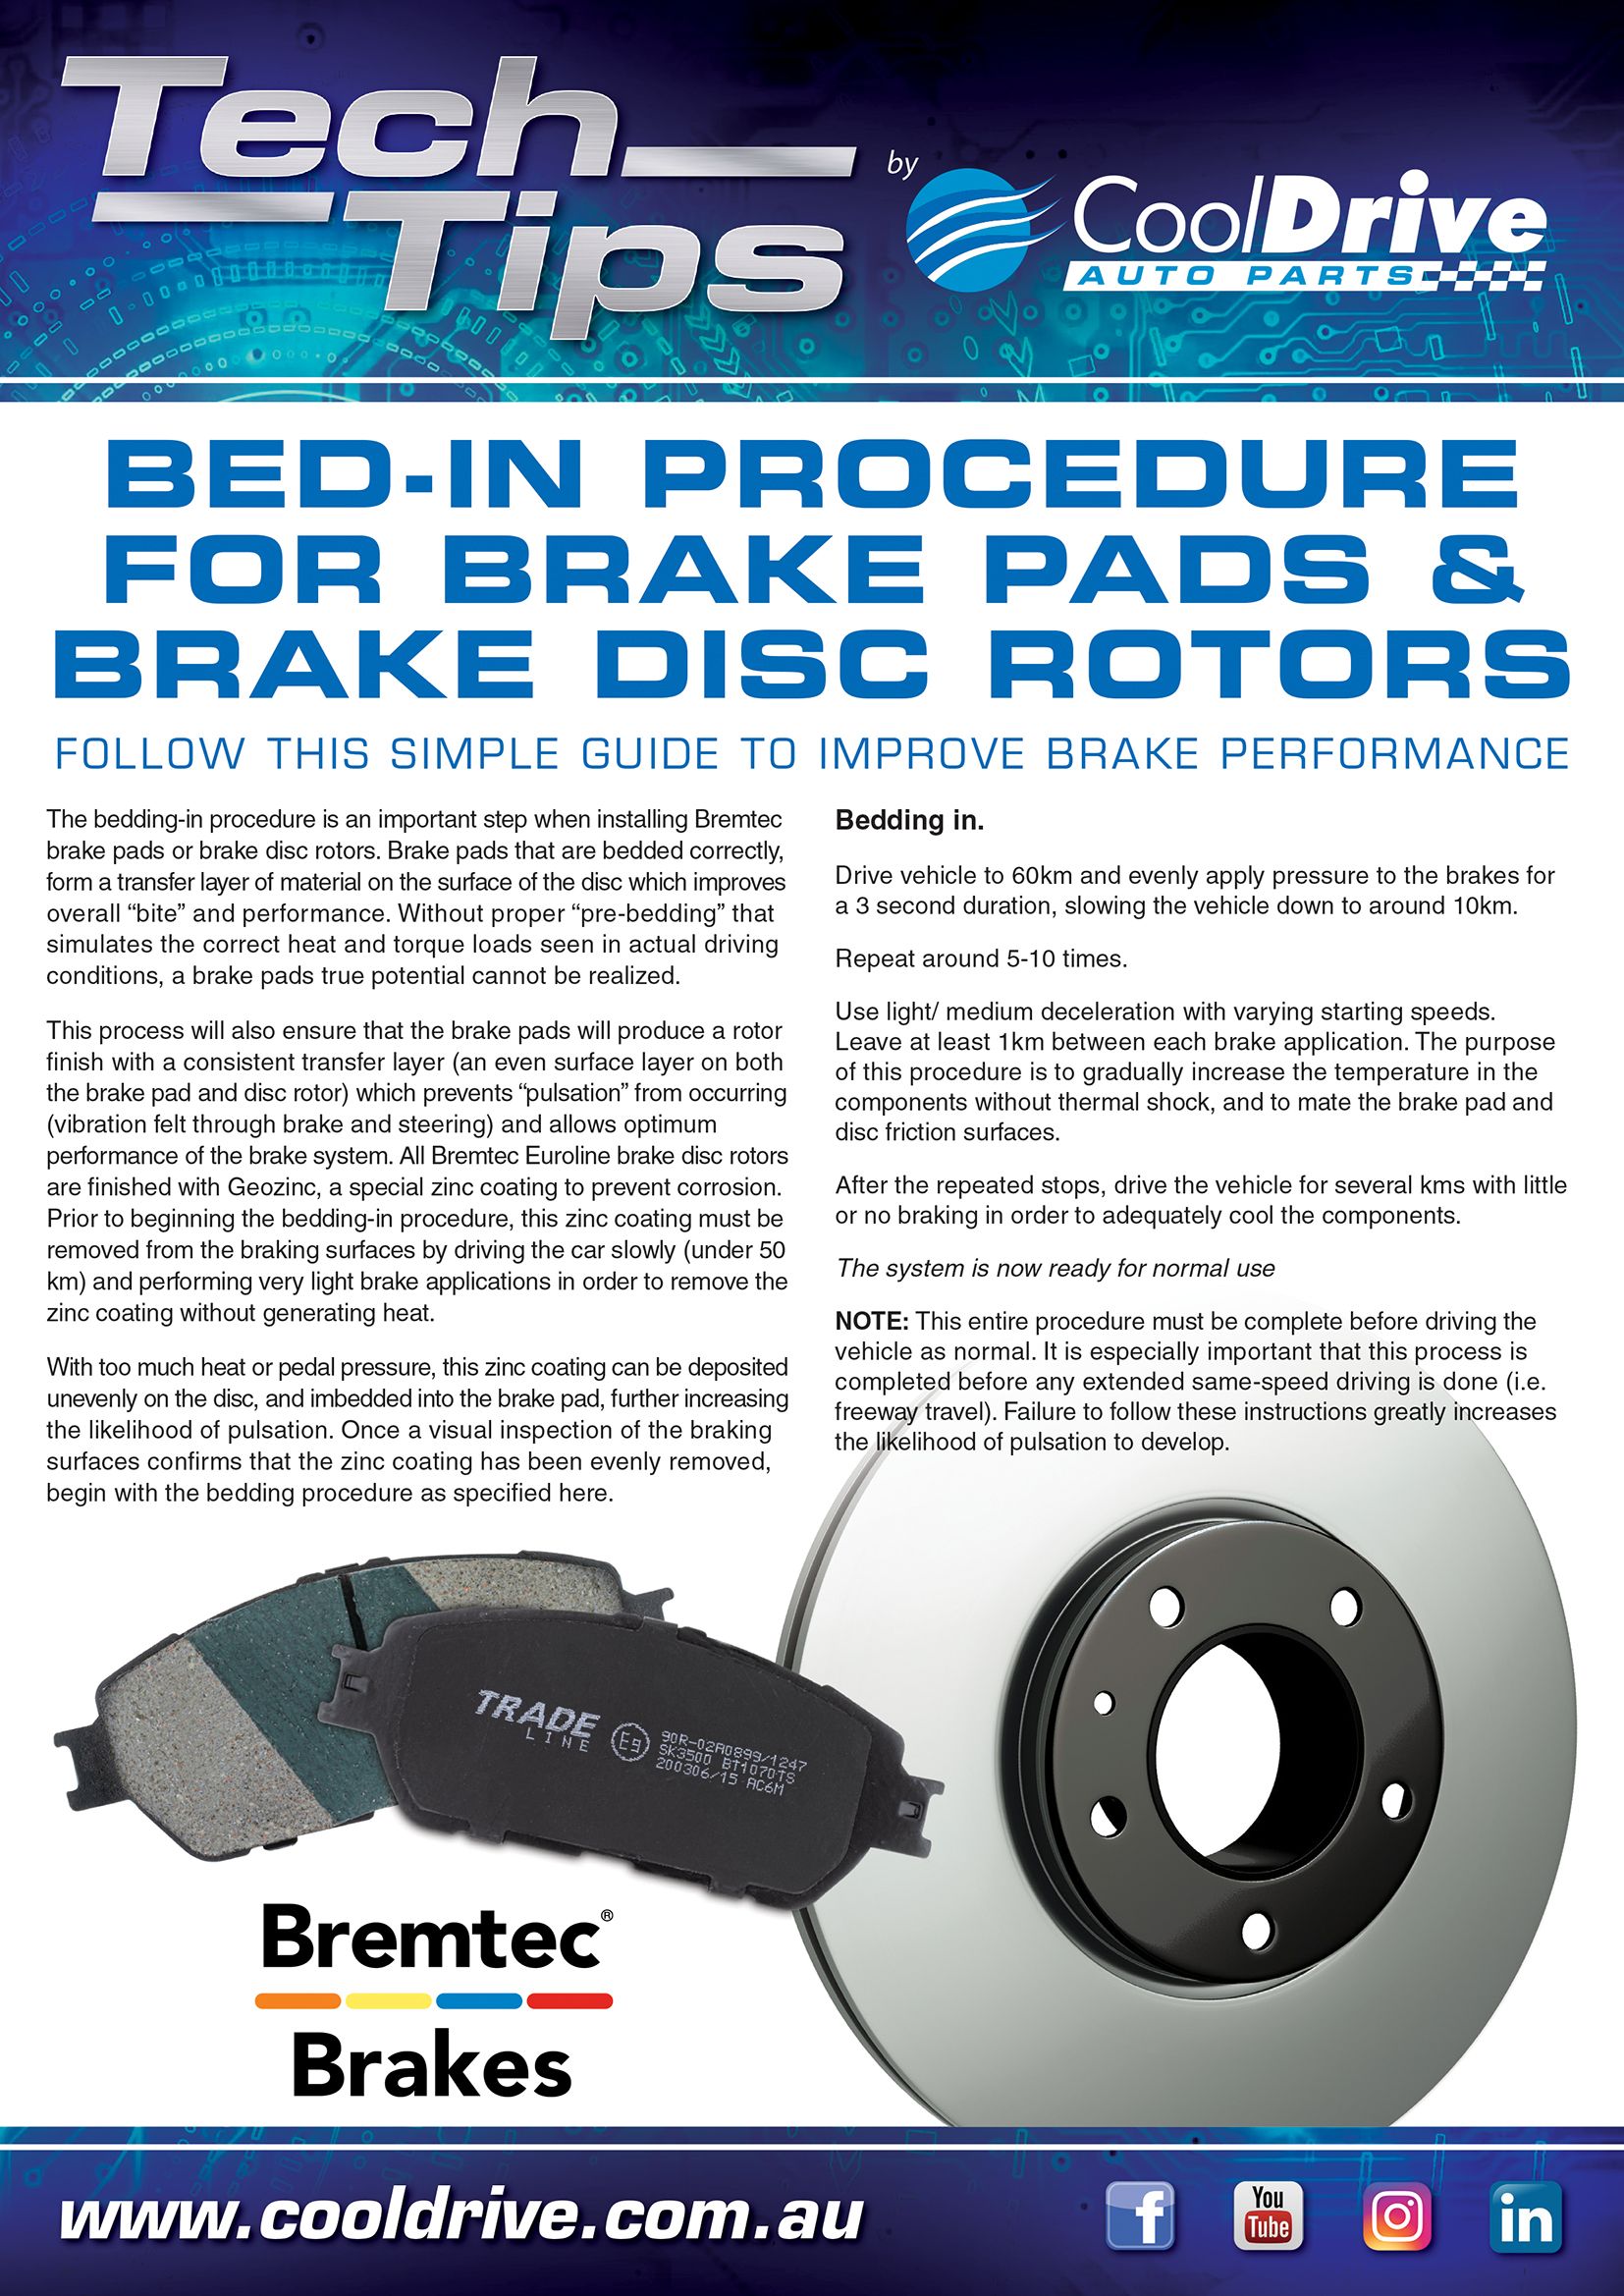
Start by driving slowly and pressing the brakes gently. Apply light pressure to heat the pads and rotors evenly. Do this several times without stopping. Avoid sudden or hard stops at this stage. This helps transfer a thin layer of pad material onto the rotor surface. This layer is important for consistent braking.
Gradual Speed And Pressure Increase
Increase your speed slowly over a few stops. Use moderate pressure on the brakes during each stop. Avoid locking the wheels or sudden braking. This builds up heat and strengthens the pad-rotor contact. Repeat this process several times until the brakes feel firm and smooth. Let the brakes cool down after bedding to avoid damage.
Credit: ishop.cooldrive.com.au
Safety Tips During Bedding
Bedding new brake pads and rotors is important for safety and performance. During this process, follow key safety tips. These tips help avoid damage and ensure smooth braking. Pay close attention to your driving and the condition of your brakes. Safe habits protect you and your vehicle.
Avoiding Overheating
Keep brake use gentle to prevent overheating. Avoid sudden, hard stops during the first few miles. Heat can damage new pads and rotors. Overheating reduces brake life and causes noise. Drive with smooth, steady pressure on the brake pedal.
Recognizing Unusual Noises
Listen carefully for strange sounds like squealing or grinding. These noises may signal a problem with bedding. Stop and check brakes if unusual sounds happen. Early detection helps avoid bigger damage or accidents. Noise should lessen as pads and rotors bed properly.
Maintaining Proper Distance
Keep extra space between your car and the vehicle ahead. This gives you time to brake smoothly. Following too close can cause hard stops and overheating. Safe distance also reduces stress on new brake parts. Always stay alert and keep a safe gap.
Post-bedding Checks
After bedding new brake pads and rotors, it is important to perform post-bedding checks. These checks ensure the brakes work safely and correctly. Skipping this step can cause poor brake performance or damage. Take time to carefully inspect and adjust the brakes for the best results.
Inspecting Brake Performance
Test the brakes by driving at a slow speed. Press the brake pedal firmly and feel the response. The brakes should stop the vehicle smoothly and quickly. Listen for any strange noises like squeaks or grinding. These signs may mean the pads or rotors are not bedded properly.
Checking For Vibrations Or Pulsations
Pay attention to the brake pedal and steering wheel. Vibrations or pulsations during braking can indicate uneven rotor surfaces. This problem may cause unsafe driving. If you feel any shaking, inspect the rotors for warping or uneven wear. Address these issues before driving longer distances.
Adjusting Brake Components If Needed
Check the brake calipers, pads, and hardware for proper fit. Loose parts can reduce braking efficiency. Tighten any loose bolts and make sure the pads sit correctly on the rotors. Adjust components to eliminate noise and improve brake feel. Proper adjustments extend the life of your brakes.

Credit: goodcar.com
Common Mistakes To Avoid
Bedding new brake pads and rotors helps them work better and last longer. Many people make mistakes that cause poor brake performance. Avoid these common errors to keep your brakes safe and efficient. Follow these tips for a smooth bedding process.
Skipping The Bedding Process
Do not skip bedding new pads and rotors. It helps create a smooth surface for better contact. Skipping this step can cause uneven wear and noise. Brakes might feel weak or grab suddenly. Take time to bed the brakes properly for safety.
Using Incorrect Bedding Techniques
Using the wrong bedding method can hurt your brakes. Avoid hard stops or sudden heavy braking. Instead, use gentle stops and build up pressure slowly. Follow a gradual process to transfer pad material evenly. This helps pads and rotors wear evenly and quietly.
Ignoring Manufacturer Guidelines
Each brake pad and rotor set has specific bedding instructions. Ignoring these can cause damage or poor performance. Always read and follow the manufacturer’s steps carefully. This ensures the best fit and longest life for your brakes. Don’t guess—trust the experts’ advice.
Frequently Asked Questions
What Is The Purpose Of Bedding New Brake Pads And Rotors?
Bedding ensures proper contact between pads and rotors. It improves braking performance and extends the lifespan of both parts. Proper bedding helps avoid vibrations and noise during braking.
How Do You Bed New Brake Pads And Rotors?
Drive at moderate speeds and apply brakes gently. Repeat this process multiple times to gradually heat and cool the brakes. Avoid sudden stops during bedding to prevent uneven wear.
How Long Does It Take To Bed Brake Pads And Rotors?
Bedding usually takes 20 to 30 minutes of driving. This includes several cycles of accelerating and braking. Proper bedding is essential before heavy or high-speed braking.
Can I Skip Bedding New Brake Pads And Rotors?
Skipping bedding can reduce braking efficiency and cause noise. It may also lead to uneven pad wear and rotor damage. Always bed new brakes for optimal safety and performance.
Conclusion
Properly bedding new brake pads and rotors ensures better brake performance. It helps prevent noise, vibration, and uneven wear. Follow the bedding steps carefully and drive safely during the process. Take your time and avoid hard braking at first. This simple routine extends brake life and keeps your vehicle stopping smoothly.
Remember, good brakes mean safer driving every day.

