If you own a Yamaha Rhino, you know how important it is to keep it running smoothly. One simple but crucial task that can save you from costly repairs is changing the fuel filter.
You might think it’s complicated or time-consuming, but it’s easier than you expect—and doing it yourself puts you in control of your Rhino’s performance. In this guide, you’ll learn step-by-step how to change your fuel filter quickly and safely, so your Rhino stays powerful and reliable every time you hit the trail.
Keep reading to discover the easy way to protect your engine and boost your ride’s efficiency!
Tools And Materials Needed
Changing the fuel filter on a Yamaha Rhino requires a few basic tools and materials. Having everything ready makes the process faster and easier. This section lists all the essential items you need before starting.
Basic Tools
You will need a socket wrench set to remove bolts securely. A flathead screwdriver helps pry off clamps and covers. Needle-nose pliers are useful for handling small clips and hoses.
Replacement Parts
Always use a new fuel filter designed for the Yamaha Rhino model. Using the correct filter ensures proper fuel flow and engine protection. Avoid cheap or generic filters that may cause problems later.
Safety Materials
Wear gloves to protect your hands from fuel and dirt. Safety glasses prevent debris or fuel from getting into your eyes. Keep a fire extinguisher nearby for extra safety during fuel work.
Additional Supplies
Have a clean rag or towel to wipe spills and clean parts. A small container catches any fuel that leaks during the change. Use a funnel to pour fuel back without spilling.
Locate The Fuel Filter
Before changing the fuel filter on your Yamaha Rhino, you must find it first. Locating the fuel filter helps you work faster and avoid mistakes. The fuel filter cleans the fuel before it reaches the engine. A clean filter keeps your Rhino running smoothly.
The fuel filter is usually small and cylindrical. It sits along the fuel line, between the fuel tank and the engine. Knowing its exact location saves time and effort during replacement.
Check Near The Fuel Tank
Start by looking close to the fuel tank. The fuel filter is often near the tank outlet. It connects the fuel hose from the tank to the engine line. You might see it under the Rhino’s seat or near the rear frame.
Follow The Fuel Line
Trace the fuel line from the tank toward the engine. The filter sits along this line. Look for a small, clear, or metal canister. It usually has clamps or fittings on both ends to hold the fuel hose.
Consult The Owner’s Manual
Your Yamaha Rhino’s manual shows the exact fuel filter location. The diagrams make it easy to find. Use the manual to spot the filter without confusion. It also gives safety tips before you start working.
Prepare The Yamaha Rhino
Preparing the Yamaha Rhino properly makes the fuel filter change easier and safer. Take time to get the vehicle ready before starting any work. This step helps avoid mistakes and keeps you safe during the process.
Follow these simple steps to prepare your Rhino correctly. They ensure a smooth and efficient fuel filter replacement.
Turn Off The Engine
First, turn off the Yamaha Rhino’s engine. Do not try to change the fuel filter with the engine running. This avoids fuel spills and reduces fire risk. Wait a few minutes after turning off the engine to let it cool down. Cooling prevents burns and other injuries.
Ensure Safety Precautions
Wear protective gloves and safety glasses before starting work. Fuel can irritate the skin and eyes. Work in a well-ventilated area to avoid inhaling fumes. Keep a fire extinguisher nearby in case of emergencies. Make sure the Rhino is on a flat surface and the parking brake is set. These steps keep you safe during the fuel filter change.
Credit: www.rhinoforums.net
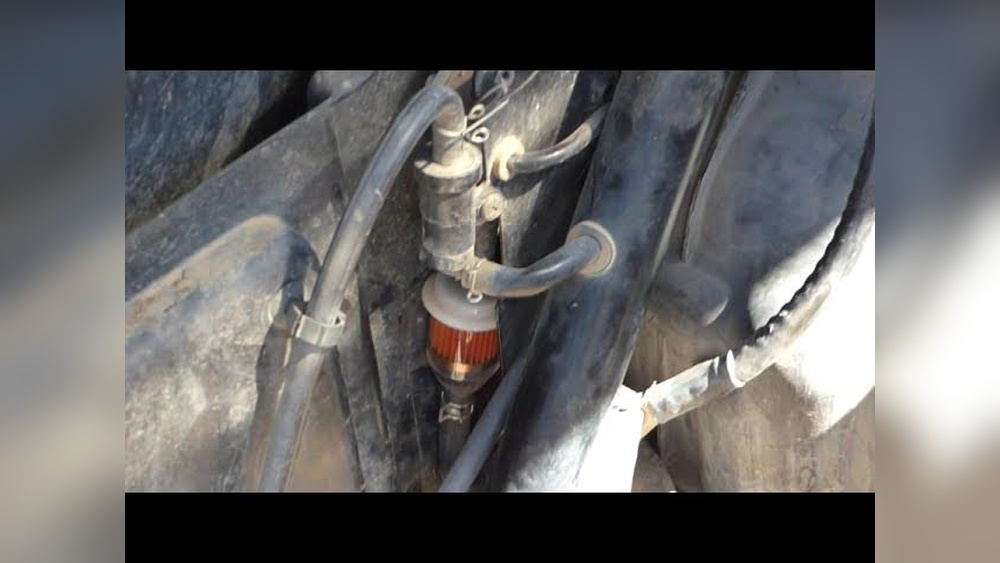
Remove The Old Fuel Filter
Removing the old fuel filter from your Yamaha Rhino is a key step in keeping the engine clean. This process helps avoid dirt and debris from reaching the engine. You need to work carefully to prevent fuel spills and damage to fuel lines.
Disconnect Fuel Lines
First, locate the fuel lines connected to the filter. Use pliers to gently squeeze the clamps holding the lines. Pull the fuel lines off the filter carefully. Keep a rag nearby to catch any fuel drips. Avoid twisting the lines too hard to prevent breaks.
Take Out The Filter
Check how the filter is secured in place. Some filters have clips or screws; others just fit tightly. Release any clips or unscrew the fasteners with the right tool. Pull the old filter straight out. Dispose of the filter properly to avoid fuel leaks.
Install The New Fuel Filter
Installing the new fuel filter on your Yamaha Rhino is a key step to keep the engine running smoothly. This process ensures clean fuel flows to the engine, preventing clogs and damage. Follow these steps carefully to position and connect the new filter correctly.
Position The New Filter
Take the new fuel filter out of its packaging. Notice the direction of the fuel flow arrow on the filter body. Align this arrow with the fuel flow path on your Rhino. Place the filter in the same spot as the old one. Make sure it fits snugly without forcing it. A proper position helps the filter work efficiently.
Reconnect Fuel Lines
Attach the fuel lines to each end of the new filter. Push the hoses firmly onto the filter’s connectors. Check for any loose connections. Secure them with clamps or clips if needed. This prevents leaks and keeps fuel flowing properly. Double-check that each line is tight before moving on.

Credit: www.youtube.com
Check For Leaks
Checking for leaks is a key step after changing the fuel filter on your Yamaha Rhino. It helps keep the engine safe and running well. Leaks can cause fuel loss and may create fire risks. Always take time to inspect the fuel lines and connections carefully.
Look closely at the fuel filter and the hoses attached to it. Make sure all clamps are tight and secure. Even a small drip can cause problems later. Keep a cloth nearby to catch any fuel that might spill during the check.
Visual Inspection Of Fuel Lines
Start by looking at the fuel lines connected to the filter. Check for cracks, holes, or loose fittings. Fuel lines should be firm and free from wear. Replace any part that looks damaged to avoid leaks.
Check The Filter Connections
Examine the points where the fuel filter meets the hoses. These connections must be tight. Use a wrench if needed to secure clamps. Loose connections often cause leaks after filter replacement.
Run The Engine And Observe
Turn on your Yamaha Rhino and let it run for a few minutes. Watch closely around the fuel filter area. Look for any signs of fuel dripping or wet spots. This test shows if your work was done correctly.
Use A Leak Detection Solution
Apply a leak detection fluid around the fuel filter and lines. This solution bubbles if there is a leak. It makes it easier to spot small leaks that are hard to see. Clean the area well before applying the solution.
Test The Engine
Testing the engine after changing the fuel filter on your Yamaha Rhino is crucial. It confirms the filter works well and the engine runs smoothly. This step helps spot any issues early. Ensuring your engine starts and runs properly keeps your Rhino safe and reliable.
Start The Engine Carefully
Turn the key to start the engine. Listen for any unusual sounds. The engine should start quickly. If it struggles, check the fuel connections and filter again. A smooth start means the filter is installed right.
Check For Fuel Leaks
Look around the fuel filter area while the engine runs. Fuel leaks can cause problems and danger. Tighten any loose clamps or connections you find. No leaks means the fuel system is sealed well.
Observe Engine Performance
Let the engine run for a few minutes. Watch for steady running without stalling or sputtering. Smooth performance shows clean fuel flow. If the engine hesitates, recheck the filter and fuel lines.

Credit: www.ebay.com
Maintenance Tips
Proper maintenance keeps your Yamaha Rhino running smoothly. Changing the fuel filter is a key part of this. It helps the engine get clean fuel. Clean fuel means better performance and fewer problems. Follow these simple tips to know when and why to replace the filter.
Regular checks can save you from costly repairs. Understanding signs of a clogged filter helps you act fast. Keep your Rhino ready for every ride.
When To Replace The Filter
Replace the fuel filter every 12 months or 12,000 miles. If you use your Rhino in dusty areas, check it more often. Always follow the Yamaha manual for specific advice. Regular replacement prevents dirt from reaching the engine. This keeps the engine parts safe and working well.
Signs Of A Clogged Filter
A clogged filter blocks fuel flow. Your Rhino may stall or lose power. The engine may hesitate when you press the gas. Hard starting or rough idling can also appear. Watch for unusual engine sounds. These signs mean the filter needs changing soon.
Frequently Asked Questions
How Often Should I Change The Fuel Filter On Yamaha Rhino?
You should change the fuel filter every 12 months or 1,000 miles. Regular replacement ensures optimal engine performance and prevents clogging issues.
What Tools Are Needed To Change Yamaha Rhino Fuel Filter?
Basic tools like screwdrivers, pliers, and a wrench are needed. Always have a container to catch fuel spills during the replacement process.
Can I Use Any Fuel Filter For Yamaha Rhino?
No, use only the OEM or compatible fuel filter designed for Yamaha Rhino. This guarantees proper fit and efficient fuel filtration.
How Do I Locate The Fuel Filter On Yamaha Rhino?
The fuel filter is located along the fuel line between the tank and engine. Consult your manual for exact placement and access instructions.
Conclusion
Changing the fuel filter on your Yamaha Rhino keeps the engine running smooth. Clean fuel helps avoid clogs and engine trouble. Regular filter changes save money on repairs later. Follow the steps carefully and take your time. Your Rhino will perform better and last longer.
Simple maintenance makes a big difference in the long run. Keep your vehicle ready for every ride. Easy to do, worth the effort.

