Your brakes are one of the most important parts of your car. If your brake pads or rotors are worn out, it can be dangerous for you and everyone on the road.
But how do you know when it’s time to check them? This guide will show you simple steps to inspect your brake pads and rotors yourself. By learning these easy tips, you can save money, avoid costly repairs, and keep your drives safe.
Keep reading to find out exactly what to look for and how to do it right.
Signs Of Worn Brake Pads
Worn brake pads affect car safety. Recognizing signs early helps avoid accidents. Brake pads wear down with use. Checking them often keeps your car safe.
Squeaking And Squealing Noises
High-pitched noises mean brake pads are thin. This sound comes from a small metal indicator. It alerts you to replace the pads soon. Ignoring these noises can damage rotors.
Reduced Braking Performance
Your car takes longer to stop. The brake pedal feels soft or spongy. You need to press harder to slow down. These signs show brake pads are worn out. This condition is dangerous on the road.
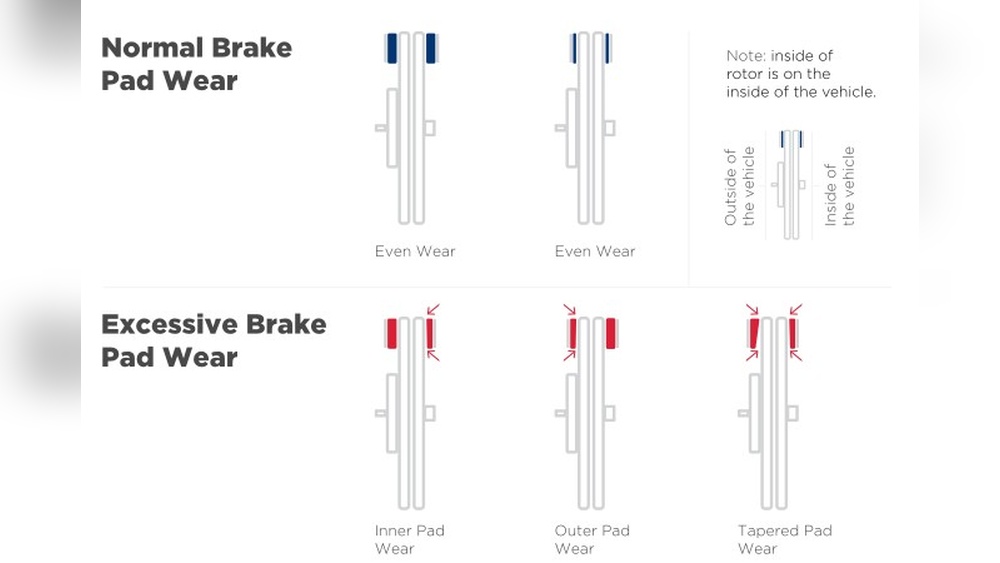
Vibration Or Pulsation In Pedal
Feel shaking or pulsing in the brake pedal. This happens when pads wear unevenly. It also indicates rotor problems. Vibrations mean braking is less smooth and less safe. Inspect pads and rotors if you notice this.
Credit: pca.org
Tools Needed For Inspection
Checking your brake pads and rotors needs the right tools. These tools help you see if parts are worn out or damaged. Using the correct tools also keeps you safe and makes the job easier. Here is a list of tools for a proper brake inspection.
Basic Hand Tools
Start with simple hand tools. A lug wrench helps remove the wheel bolts. A jack and jack stands lift and hold your car safely. A flashlight lets you see inside the wheel well. A flathead screwdriver can help pry off dust covers. These tools are essential for most brake checks.
Safety Equipment
Safety is important. Wear gloves to protect your hands from dirt and sharp edges. Use safety glasses to keep dust and debris out of your eyes. A dust mask helps avoid breathing in brake dust, which can be harmful. Always follow safety steps to prevent injury.
Optional Diagnostic Tools
You can use extra tools for a detailed check. A micrometer measures brake pad thickness accurately. A dial indicator checks rotor run-out or wobble. A brake fluid tester checks the fluid condition. These tools give more precise results but are not always needed.
Preparing Your Vehicle
Start by removing the wheel to see the brake pads and rotors clearly. Check for thin pads or deep grooves on rotors. Listen for squeaking sounds, which may mean it’s time to replace parts.
Park On A Level Surface
Start by parking your vehicle on a flat, level surface. This helps keep the car stable during inspection. Avoid slopes or uneven ground that can cause the car to roll. A level area makes it easier and safer to check brake pads and rotors.
Engage Parking Brake
Apply the parking brake firmly to stop the car from moving. This adds an extra layer of safety. The parking brake holds the wheels in place. It prevents the vehicle from rolling while you work under or around it.
Lift The Vehicle Safely
Use a reliable jack to lift the car. Place the jack under the manufacturer’s recommended lift points. These points are usually marked in the owner’s manual. Raise the car just enough to remove the wheel safely. Always use jack stands to support the vehicle after lifting. Never rely on the jack alone to hold the car up.
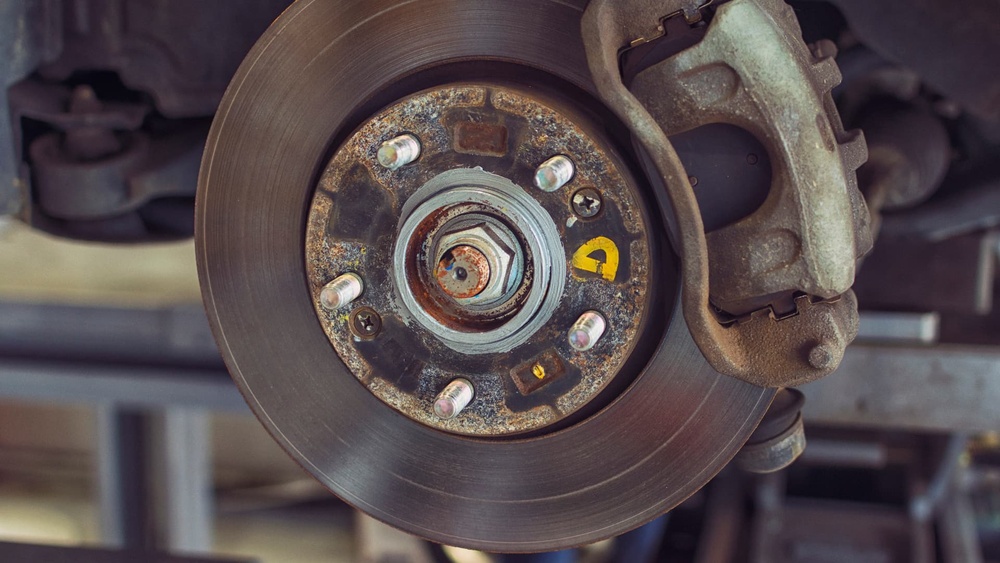
Checking Brake Pads
Checking your brake pads is a key step in car safety. Worn pads reduce braking power and increase stopping distance. Regular checks help avoid costly repairs and keep driving safe.
Remove The Wheel
Start by loosening the lug nuts on the wheel. Use a jack to lift the car safely. Remove the wheel to access the brake parts easily. This step gives a clear view of the brake pads.
Inspect Pad Thickness
Look at the brake pads through the caliper. New pads are about 8-12 mm thick. If pads are thinner than 3 mm, they need replacement soon. Thin pads mean less material to stop the car effectively.
Look For Uneven Wear
Check both sides of each pad carefully. Uneven wear can cause vibrations or noise during braking. It may signal a stuck caliper or other brake issues. Uneven pads should be checked by a mechanic.
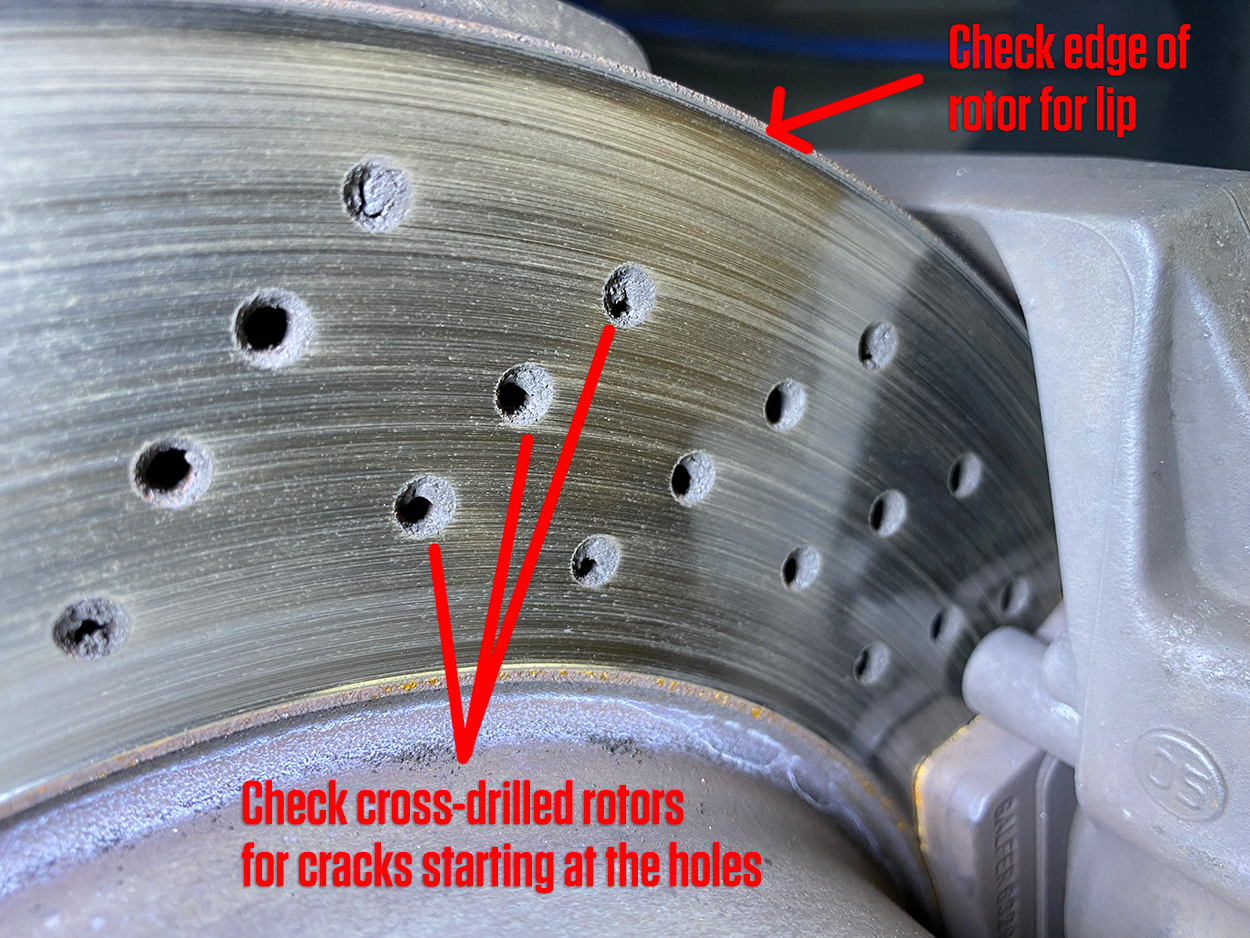
Inspecting Brake Rotors
Inspecting brake rotors is a key step in keeping your vehicle safe. Rotors work with brake pads to stop your car smoothly. Worn or damaged rotors can cause noise, vibrations, or poor braking. Regular checks help catch issues early. This section guides you through simple ways to inspect your brake rotors.
Visual Signs Of Damage
Start by looking closely at the rotors. Check for cracks or deep grooves on the surface. Rust spots may appear, especially on the edges. Uneven wear or discoloration shows heat damage. Any visible damage means the rotor may need repair or replacement.
Measuring Rotor Thickness
Rotors have a minimum thickness limit set by the manufacturer. Use a micrometer or caliper to measure thickness. Compare your reading to the limit found in your car manual. Thin rotors can overheat and warp easily. Replace rotors that are below the minimum thickness.
Checking For Warping
Warped rotors cause shaking or pulsing in the brake pedal. Use a dial indicator tool to check rotor runout. Place the tool on the rotor surface and spin the wheel slowly. If the needle moves beyond the allowed limit, the rotor is warped. Warped rotors should be resurfaced or replaced for safe braking.

Credit: www.youtube.com
When To Replace Brake Components
Knowing when to replace brake pads and rotors is key to safe driving. Worn brake parts reduce stopping power and increase accident risk. Regular checks help catch issues early and save money on repairs.
Minimum Pad Thickness Guidelines
Brake pads wear down with use. Most new pads start about 10 to 12 millimeters thick. Replace pads when thickness reaches 3 millimeters or less. Thin pads cause poor braking and damage rotors. Use a ruler or caliper to measure pad thickness.
Rotor Surface Condition
Rotors should have a smooth, even surface. Deep grooves, cracks, or warping mean the rotor needs replacement. Run your hand carefully over the rotor to feel bumps. Vibrations while braking also signal rotor problems. Damaged rotors can cause brake noise and reduce safety.
Manufacturer Recommendations
Car makers give specific guidance on brake part replacement. Check your vehicle’s manual for intervals and signs to watch. Follow these rules for best performance and warranty protection. Different cars and brakes need different care. Using the right advice keeps your brakes reliable.
Tips For Maintaining Brakes
Keeping your brakes in good shape is key for safe driving. Simple care can help your brake pads and rotors last longer. This section shares easy tips to maintain your brakes. Follow these steps to avoid costly repairs and stay safe on the road.
Regular Inspections
Check your brake pads and rotors often. Look for thin pads or deep grooves on rotors. Listen for squeaking or grinding sounds when braking. These signs mean it is time to inspect. Regular checks catch problems early. You can do this yourself or ask a friend with experience.
Driving Habits That Extend Brake Life
Drive smoothly to protect your brakes. Avoid sudden stops and hard braking. Use engine braking when going downhill. This reduces pressure on brake pads. Keep a safe distance from other cars. It helps you brake gently. Small changes in driving save your brake parts.
Scheduling Professional Checks
Have a mechanic check your brakes at least once a year. Professionals find hidden issues quickly. They measure pad thickness and rotor condition. Mechanics also check brake fluid and system parts. Regular professional checks keep your brakes reliable. Book an appointment before long trips or harsh seasons.

Credit: www.youtube.com
Frequently Asked Questions
How Do I Know If Brake Pads Need Replacing?
Brake pads need replacing if you hear squealing or grinding noises. Also, check for reduced braking power or vibration. Inspect the pad thickness; less than 3mm means replacement is necessary. Regular checks prevent damage to rotors and ensure safe driving.
What Are The Signs Of Worn Brake Rotors?
Worn rotors often cause pulsing or vibration when braking. You may also notice deep grooves or cracks on the rotor surface. Excessive rotor wear reduces braking efficiency and safety. Regular inspection helps detect rotor issues early and avoid costly repairs.
Can I Check Brake Pads And Rotors Myself?
Yes, you can check brake pads and rotors yourself. Remove the wheel and visually inspect pad thickness and rotor surface. Look for uneven wear, cracks, or scoring. Always use proper tools and follow safety precautions when inspecting brakes at home.
How Often Should Brake Pads And Rotors Be Inspected?
Brake pads and rotors should be inspected every 10,000 to 15,000 miles or at least twice a year. Frequent inspections help catch wear early and prevent brake failure. Follow your vehicle’s maintenance schedule for best results.
Conclusion
Checking your brake pads and rotors keeps you safe on the road. Worn parts can cause noise, vibration, or poor braking. Regular checks help spot problems early and save money. Use simple tools and follow clear steps to inspect them.
Pay attention to thickness, cracks, and wear marks. Don’t wait for warning signs to act. A little care now prevents big repairs later. Stay alert and maintain your brakes for smooth driving every time. Safety is always worth the extra effort.