

If you own a Tesla, you know how important every detail is to keep your car looking sharp and running smoothly. Removing your Tesla wheel covers might seem tricky at first, but it’s easier than you think.
Whether you want to clean underneath, replace damaged covers, or upgrade your wheels, this guide will walk you through each simple step. By the end, you’ll feel confident handling your wheel covers like a pro—and save time and money along the way.
Ready to get started? Let’s dive in!
Tools Needed
Removing Tesla wheel covers requires a few simple tools. Having the right equipment makes the job easier and safer. Prepare all tools before starting to avoid interruptions. This section lists what you need to remove the wheel covers effectively.
Essential Tools
- Plastic pry tool – prevents scratches on wheels
- Flathead screwdriver – helps to loosen clips gently
- Socket wrench set – removes lug nuts if needed
- Clean cloth – wipes away dirt before removal
- Bucket of water or mild soap – cleans wheel covers if necessary
Safety Gear
- Gloves – protect your hands from sharp edges
- Safety glasses – shield your eyes from debris
- Closed-toe shoes – guard feet during work
- Wheel chocks – keep the car steady and prevent rolling
Preparing Your Tesla
Start by cleaning the wheel covers to remove dirt and debris. Gently pry the covers off using a plastic tool to avoid damage. Take care not to apply too much force during removal.
Parking And Securing
Start by parking your Tesla on a flat, stable surface. This prevents the car from moving while you work. Engage the parking brake to keep it secure. Turn off the vehicle and remove the key or fob. This ensures no accidental starts during the process. Check that the wheels are cool to the touch. Cold wheels are safer to handle and avoid damage.
Cleaning The Wheel Covers
Before removing, clean the wheel covers gently. Use a soft cloth and mild soap with water. Remove dirt and grime that may cause slipping. Cleaning helps you see the clips or screws clearly. Avoid harsh chemicals that can damage the covers. Dry the covers with a clean towel afterward. This step makes removal easier and safer.
Step-by-step Removal
Removing Tesla wheel covers is easier than it looks. Follow clear steps to avoid damage. This guide shows simple ways to take off wheel covers safely. No special skills required. Just a little care and the right tools.
Locating The Clips
First, find the clips holding the wheel cover. They are small and placed around the edge. Look carefully along the rim of the wheel cover. The clips keep the cover attached to the wheel. Knowing their position helps remove the cover smoothly.
Applying Gentle Pressure
Press gently near the clips to loosen the cover. Use your fingers to push and pull with care. Avoid using too much force to prevent breaking the clips. Work slowly around the wheel cover. This helps the cover start to come off little by little.
Using Pry Tools Safely
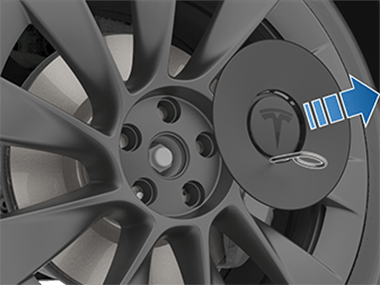
Use a plastic pry tool for extra help. Metal tools can scratch or damage the wheel. Insert the pry tool carefully under the cover edge. Lift gently to release the clips. Move the tool around the wheel cover to free all clips evenly. Take time to avoid bending or cracking the cover.

Credit: www.youtube.com
Dealing With Stubborn Covers
Removing Tesla wheel covers can be tricky, especially if they stick tightly. Stubborn covers need patience and the right approach. Pulling hard might damage the clips or the cover itself.
Use gentle tools and careful moves to avoid harm. The next tips help handle tough clips and keep your wheel covers safe.
Tips For Tough Clips
Start by cleaning around the edges. Dirt can hold the clips tight. Use a plastic pry tool to lift the cover slightly. Work your way around the wheel slowly. Avoid metal tools that can scratch the cover.
If clips feel stuck, spray a little WD-40 or lubricant. Let it sit for a few minutes. Then try prying again with gentle pressure. Use a flathead screwdriver wrapped in tape as a last option. This prevents scratches.
Avoiding Damage
Do not pull the cover straight out forcefully. It can break clips or bend the cover. Pull at an angle and use slow, steady force. Check for hidden clips or locks before removing.
Keep your hands clear of sharp edges. Protect the wheel rim by placing a cloth between the tool and the rim. Always handle wheel covers carefully. This keeps them reusable and looking good.
Post-removal Care
After removing Tesla wheel covers, taking care of them is very important. Proper care keeps the covers and wheels in good shape. It also helps you avoid damage and extra costs. Follow simple steps to keep everything clean and safe.
Inspecting Wheel And Covers
Check the wheel covers for cracks or scratches. Look closely for any missing clips or broken parts. Examine the wheels for dirt, rust, or damage. Early detection can stop problems from getting worse. Fix or replace damaged parts before putting covers back.
Cleaning And Storage
Use mild soap and water to clean the covers. Avoid harsh chemicals that can harm the finish. Dry the covers completely to stop rust or mold. Store them in a cool, dry place away from sunlight. Keep covers in a soft cloth or bag to avoid scratches.
Credit: service.tesla.com
When To Seek Professional Help
Removing Tesla wheel covers can be simple for many car owners. But some situations need expert help. Knowing when to call a professional saves time and avoids damage.
Professionals have the right tools and skills. They handle tough cases safely. Avoiding mistakes protects your wheels and car value.
Signs Of Damaged Or Stuck Wheel Covers
If the wheel cover does not budge after gentle effort, it may be stuck. Forced removal risks breaking the cover or wheel. Visible cracks or bends also need expert attention.
Missing Or Broken Removal Tools
Without the correct tools, removing covers is tricky. Professionals have specialized equipment to remove wheel covers carefully. Using wrong tools can cause scratches or dents.
Worries About Wheel Or Tire Damage
Experienced technicians know how to protect your wheels and tires. If you fear damage during removal, let a professional handle it. They minimize risks and ensure safe removal.
Limited Experience With Tesla Wheel Covers
Tesla wheel covers may differ from other cars. Lack of experience can lead to errors. Professionals understand Tesla designs and removal methods well.

Credit: www.reddit.com
Frequently Asked Questions
How Do I Safely Remove Tesla Wheel Covers?
To safely remove Tesla wheel covers, use a plastic pry tool. Gently insert it between the cover and the rim. Carefully pry the cover off without using excessive force to avoid damage to the cover or wheel.
Can I Remove Tesla Wheel Covers Without Tools?
Removing Tesla wheel covers without tools is difficult. Using a plastic pry tool is recommended for safety. Trying to remove covers by hand may cause scratches or damage to the covers or wheels.
How Often Should Tesla Wheel Covers Be Removed?
Remove Tesla wheel covers when cleaning or inspecting wheels. Also remove them to replace or repair tires. Regular checks ensure covers and wheels stay in good condition.
Are Tesla Wheel Covers Easy To Reinstall?
Yes, Tesla wheel covers are easy to reinstall. Align the cover with the wheel and press firmly until it snaps into place. Ensure all clips are securely attached for a proper fit.
Conclusion
Removing Tesla wheel covers is simple with the right steps. Use gentle tools to avoid damage. Clean the area before and after removal. Take your time and stay patient. This keeps your wheels looking great and safe. Now you can change or clean your covers easily.
Enjoy the fresh look and smooth ride. Keep these tips for future use. Your Tesla deserves proper care every time.


